Copyright © 1999, 2000, 2001, 2002 Federico Lupi
Copyright © 2003, 2004, 2005, 2006, 2007, 2008, 2009, 2010, 2011, 2012, 2013, 2014, 2015, 2016, 2017, 2018, 2019, 2020, 2021, 2022, 2023, 2024 The NetBSD Foundation
Published: 2024/01/01 06:49:50
$NetBSD: netbsd.html,v 1.333 2024/05/03 09:49:54 wiz Exp $
Table of Contents
- Purpose of this guide
- I. About NetBSD
- II. System installation and related issues
- 2. Installing NetBSD: Preliminary considerations and preparations
- 3. Example installation
- 3.1. Introduction
- 3.2. The installation process
- 3.3. Keyboard layout
- 3.4. Starting the installation
- 3.5. MBR partitions
- 3.6. Disklabel partitions
- 3.7. Setting the disk name
- 3.8. Last chance!
- 3.9. The disk preparation process
- 3.10. Installation type
- 3.11. Choosing the installation medium
- 3.12. Extracting sets
- 3.13. System configuration
- 3.14. Finishing the installation
- 4. Upgrading NetBSD
- III. System configuration, administration and tuning
- 5. The first steps on NetBSD
- 5.1. Troubleshooting
- 5.2. The man command
- 5.3. Editing configuration files
- 5.4. Login
- 5.5. Changing the
rootpassword - 5.6. Adding users
- 5.7. Shadow passwords
- 5.8. Changing the keyboard layout
- 5.9. System time
- 5.10. Secure Shell (ssh(1))
- 5.11. Basic configuration in
/etc/rc.conf - 5.12. Basic network settings
- 5.13. Mounting a CD-ROM
- 5.14. Mounting a floppy
- 5.15. Installing additional software
- 5.16. Security alerts
- 5.17. Stopping and rebooting the system
- 6. Editing
- 7. The rc.d System
- 8. Console drivers
- 9. The X Window System
- 10. Audio
- 11. Power management
- 12. Printing
- 13. Using removable media
- 13.1. Initializing and using USB flash drives
- 13.2. Initializing and using floppy disks
- 13.3. How to use a ZIP disk
- 13.4. Reading data CDs with NetBSD
- 13.5. Reading multi-session CDs with NetBSD
- 13.6. Allowing normal users to access CDs
- 13.7. Mounting an ISO image
- 13.8. Using video CDs with NetBSD
- 13.9. Using audio CDs with NetBSD
- 13.10. Creating an MP3 (MPEG layer 3) file from an audio CD
- 13.11. Using a CD-R writer with data CDs
- 13.12. Using a CD-R writer to create audio CDs
- 13.13. Creating an audio CD from MP3s
- 13.14. Copying an audio CD
- 13.15. Copying a data CD with two drives
- 13.16. Using CD-RW rewritables
- 13.17. DVD support
- 13.18. Creating ISO images from a CD
- 13.19. Getting volume information from CDs and ISO images
- 14. The cryptographic device driver (CGD)
- 15. Concatenated Disk Device (CCD) configuration
- 16. NetBSD RAIDframe
- 16.1. RAIDframe Introduction
- 16.2. Setup RAIDframe Support
- 16.3. Example: RAID-1 Root Disk
- 16.3.1. Pseudo-Process Outline
- 16.3.2. Hardware Review
- 16.3.3. Initial Install on Disk0/wd0
- 16.3.4. Preparing Disk1/wd1
- 16.3.5. Initializing the RAID Device
- 16.3.6. Setting up Filesystems
- 16.3.7. Migrating System to RAID
- 16.3.8. The first boot with RAID
- 16.3.9. Adding Disk0/wd0 to RAID
- 16.3.10. Testing Boot Blocks
- 17. NetBSD Logical Volume Manager (LVM) configuration
- 17.1. Anatomy of NetBSD Logical Volume Manager
- 17.2. Install physical media
- 17.3. Configure Kernel Support
- 17.4. Disklabel each physical volume member of the LVM
- 17.5. Create Physical Volumes
- 17.6. Create Volume Group
- 17.7. Create Logical Volume
- 17.8. Example: LVM with Volume groups located on raid1
- 18. Pluggable Authentication Modules (PAM)
- 18.1. About
- 18.2. Introduction
- 18.3. Terms and conventions
- 18.4. PAM Essentials
- 18.5. PAM Configuration
- 18.6. PAM modules
- 18.7. PAM Application Programming
- 18.8. PAM Module Programming
- 18.9. Sample PAM Application
- 18.10. Sample PAM Module
- 18.11. Sample PAM Conversation Function
- 18.12. Further Reading
- 19. Tuning NetBSD
- 20. NetBSD Veriexec subsystem
- 21. Bluetooth on NetBSD
- 22. Miscellaneous operations
- IV. Networking and related issues
- 23. Introduction to TCP/IP Networking
- 24. Setting up TCP/IP on NetBSD in practice
- 24.1. Overview of the network configuration files
- 24.2. Connecting to common LAN setups
- 24.3. Manually creating a small LAN
- 24.4. Connecting to a home/office ISP with PPPoE
- 24.5. Setting up an Internet gateway with NPF
- 24.6. Setting up a network bridge device
- 24.7. Ensuring interfaces are initialized in the correct order
- 24.8. Some useful commands
- 25. The Internet Super Server inetd
- 25.1. Overview
- 25.2. What is inetd?
- 25.3. Configuring inetd -
/etc/inetd.conf - 25.4. Services -
/etc/services - 25.5. Protocols -
/etc/protocols - 25.6. Remote Procedure Calls (RPC) -
/etc/rpc - 25.7. Allowing and denying hosts
-
/etc/hosts.{allow,deny} - 25.8. Adding a Service
- 25.9. When to use or not to use inetd
- 25.10. Other Resources
- 26. The Domain Name System
- 27. Mail and news
- 28. Introduction to the Common Address Redundancy Protocol (CARP)
- 29. Network services
- V. Virtualization and emulation
- VI. Building the system
- 32. Obtaining the sources
- 33. Crosscompiling NetBSD with
build.sh - 34. Compiling the kernel
- 35. Updating an existing system from sources
- 36. Building NetBSD installation media
- A. Information
- B. Contributing to the NetBSD guide
- C. Getting started with XML/DocBook
- D. Acknowledgements
- E. Bibliography
List of Figures
- 2.1. Partitions
- 3.1. Selecting the language
- 3.2. Selecting a keyboard type
- 3.3. The sysinst main menu
- 3.4. Confirming to install NetBSD
- 3.5. Choosing a hard disk
- 3.6. Disk geometry
- 3.7. Choosing the partitioning scheme
- 3.8. fdisk
- 3.9. Partition options
- 3.10. Installing the boot selector
- 3.11. Edit partitions?
- 3.12. Setting partition sizes
- 3.13. The disklabel editor
- 3.14. Disklabel partition editing
- 3.15. Naming the NetBSD disk
- 3.16. Last chance to abort
- 3.17. Selecting bootblocks
- 3.18. Full or custom installation
- 3.19. Selecting distribution sets
- 3.20. Installation media
- 3.21. Mounting a file system
- 3.22. Mounting a partition
- 3.23. Accessing a MSDOS file system
- 3.24. Defining the FTP settings
- 3.25. Which network interface to configure
- 3.26. Using autoconfiguration
- 3.27. Confirm autoconfiguration
- 3.28. NFS install screen
- 3.29. NFS example
- 3.30. Extraction of sets completed
- 3.31. Configuration menu
- 3.32. Selecting the system's time zone
- 3.33. Choosing a shell
- 3.34. Set a root password?
- 3.35. Setting root password
- 3.36. Enabling installation of binary packages
- 3.37. Additional packages
- 3.38. Fetch and unpack pkgsrc
- 3.39. Installation completed
- 3.40. Reboot to finish installation
- 4.1. Starting the upgrade
- 4.2. Continuing the upgrade
- 4.3. Choosing the hard drive
- 4.4. File system check
- 4.5. Choosing bootblocks
- 4.6. Choosing the distribution filesets
- 4.7. Install medium
- 4.8. Upgrade complete
- 16.1. RAID-1 Disk Logical Layout
- 16.2. Perform generic install onto Disk0/wd0
- 16.3. Setup RAID Set
- 16.4. Reboot using Disk1/wd1 of RAID
- 16.5. Mirror Disk1/wd1 back to Disk0/wd0
- 16.6. Award BIOS i386 Boot Disk1/wd1
- 16.7. Award BIOS i386 Boot Disk0/wd0
- 17.1. Anatomy of Logical Volume Management
- 17.2. Example raid 1 configuration
- 23.1. IPv4-addresses are divided into more significant network- and less significant hostbits
- 23.2. Our demo-network
- 23.3. Attaching one subnet to another one
- 23.4. IPv6-addresses are divided into more significant network- and less significant hostbits, too
- 23.5. IPv6-addresses have a similar structure to class B addresses
- 23.6. Several interfaces attached to a link result in only one scope ID for the link
- 27.1. Structure of the mail system
List of Tables
List of Examples
- 11.1.
/etc/powerd/scripts/lid_switch - 11.2.
/etc/powerd/scripts/acadapter - 12.1.
/etc/printcap - 12.2.
/usr/local/libexec/lpfilter - 12.3.
/etc/printcap - 12.4.
/usr/local/libexec/lpfilter-ps - 24.1.
/etc/wpa_supplicant.conf - 24.2.
/etc/hosts - 24.3.
/etc/ifconfig.pppoe0 - 24.4.
/etc/ppp/ip-up - 24.5.
/etc/ppp/ip-down - 24.6.
/etc/ifconfig.vlan0 - 24.7.
/etc/dhcpcd.conf - 24.8.
/etc/npf.conf - 24.9.
/etc/dhcpd.conf - 24.10.
/etc/ifconfig.tap0 - 26.1. strider's
/etc/hostsfile - 26.2.
localhost - 32.1.
.cvsrc
This guide describes the installation and the configuration of the NetBSD operating system as well as the setup and administration of some of its subsystems. It primarily addresses people coming from other Unix-like operating systems, and aims to be a useful guide in the face of the many small problems one encounters when using a new tool.
This guide is not a Unix tutorial: basic knowledge of some concepts and tools is assumed. You should know, for example, what a file and a directory are, and how to use an editor. There are plenty of books explaining basic Unix and operating system concepts, and you should consult one if you need more background information. It is better to choose a general book and avoid titles like “Learning Unix-XYZ, version 1.2.3.4 in 10 days”, but this is a matter of personal taste.
Much work is still required to finish this introduction to NetBSD: some chapters are not finished (some are not even started) and some subjects need more testing. Corrections and additions are most certainly welcome.
This guide is currently maintained by the NetBSD www team
(<www@NetBSD.org>). Corrections and suggestions
should be sent to that address. See also Appendix B, Contributing to the NetBSD guide.
Table of Contents
Table of Contents
NetBSD is a free, fast, secure, and highly portable Unix-like Open Source operating system. It is available for many platforms, from 64-bit x86 servers and PC desktop systems to embedded ARM- and MIPS- based devices. Its clean design and advanced features make it excellent in both production and research environments, and it is user-supported with complete source. Many applications are easily available through pkgsrc, the NetBSD Packages Collection.
The first version of NetBSD (0.8) dates back to 1993 and springs from the 4.3BSD Lite operating system, a version of Unix developed at the University of California, Berkeley (BSD = Berkeley Software Distribution), and from the 386BSD system, the first BSD port to the Intel 386 CPU. In the following years, modifications from the 4.4BSD Lite release (the last release from the Berkeley group) were integrated into the system. The BSD branch of Unix has had a great importance and influence on the history of Unix-like operating systems, to which it has contributed many tools, ideas and improvements which are now standard: the vi editor, the C shell, job control, the Berkeley Fast File System, reliable signals, support for virtual memory and TCP/IP, just to name a few. This tradition of research and development survives today in the BSD systems and, in particular, in NetBSD.
NetBSD operates on a vast range of hardware platforms and is very portable. The full source to the NetBSD kernel and userland is available for all the supported platforms; please see the details on the official site of the NetBSD Project.
The basic features of NetBSD are:
Code quality and correctness
Portability to a wide range of hardware
Secure defaults
Adherence to industry standards
Research and innovation
These characteristics also bring indirect advantages. For example, if you work on just one platform you could think that you're not interested in portability. But portability is tied to code quality; without a well-written and well-organized code base it would be impossible to support a large number of platforms. And code quality is the base of any good and solid software system, though surprisingly few people seem to understand it.
One of the key characteristics of NetBSD is that its developers are not satisfied with partial implementations. Some systems seem to have the philosophy of “If it works, it's right”. In that light, NetBSD's philosophy could be described as “It doesn't work unless it's right”. Think about how many overgrown programs are collapsing under their own weight and “features” and you'll understand why NetBSD tries to avoid this situation at all costs.
NetBSD supports many platforms, including the popular i386 and amd64, ARM, SPARC, Alpha, Amiga, Atari, and m68k- and PowerPC-based Apple Macintosh machines. Technical details for all of them can be found on the NetBSD site.
The NetBSD site states that: “The NetBSD Project provides a freely available and redistributable system that professionals, hobbyists, and researchers can use in whatever manner they wish”. It is also an ideal system if you want to learn Unix, mainly because of its adherence to standards (one of the project goals) and because it works equally well on the latest PC hardware as well as on hardware which is considered obsolete by many other operating systems. To learn and use Unix you don't need to buy expensive hardware; you can use that old PC or Mac in your attic. It is important to note that although NetBSD runs on old hardware, modern hardware is well supported and care has been taken to ensure that supporting old machines does not inhibit performance on modern hardware. In addition, if you need a Unix system which runs consistently on a variety of platforms, NetBSD is probably your best choice.
Aside from the standard Unix productivity tools, editors, formatters, C/C++ compilers and debuggers, and so on, that are included with the base system, there is a huge collection of packages (currently over 20,000) that can be installed as binary packages or built from pkgsrc, including popular cross-platform software such as Firefox, PostgreSQL, Python, and Xfce.
NetBSD is an Open Source operating system, and as such it is freely available for download from cdn.NetBSD.org and other mirrors.
Table of Contents
- 2. Installing NetBSD: Preliminary considerations and preparations
- 3. Example installation
- 3.1. Introduction
- 3.2. The installation process
- 3.3. Keyboard layout
- 3.4. Starting the installation
- 3.5. MBR partitions
- 3.6. Disklabel partitions
- 3.7. Setting the disk name
- 3.8. Last chance!
- 3.9. The disk preparation process
- 3.10. Installation type
- 3.11. Choosing the installation medium
- 3.12. Extracting sets
- 3.13. System configuration
- 3.14. Finishing the installation
- 4. Upgrading NetBSD
Table of Contents
It is possible to install NetBSD together with other operating systems on one hard disk.
If there is already an operating system on the hard disk, think about how you can free some space for NetBSD; if NetBSD will share the disk with other operating systems you will probably need to create a new partition (which you will do with sysinst). Oftentimes this will not be possible unless you resize an existing partition.
Unfortunately, it is not possible to resize an existing partition with sysinst, but there are some commercial products (like Partition Magic) and some free tools (GNU Parted, FIPS, pfdisk) available for this.
You can also install NetBSD on a separate hard disk.
Advice
Unless you are comfortable with setting up a partitioning scheme for two or more operating systems, and unless you understand the risk of data loss if you should make a mistake, it is recommended that you give NetBSD its own hard disk. This removes the risk of damage to the existing operating system.
It is possible to install and run NetBSD on top of other operating systems without having to worry about partitioning. Emulators or virtualization environments provide a quick and secure way to try out NetBSD. The host operating system remains unchanged, and the risk of damaging important data is minimized.
Information about NetBSD as a Xen host and guest system is available on the NetBSD/xen web page.
The NetBSD on emulated hardware web page provides detailed information about various emulators and the supported NetBSD platforms. It should also be noted that NetBSD runs as a VMware guest.
The first thing to do before installing NetBSD is to read the
release information and installation notes in one of the
INSTALL files: this is the official
description of the installation procedure, with platform-specific
information and important details. It is available in HTML, PostScript,
plain text, and an enhanced text format to be used with
more. These
files can be found in the root
directory of the NetBSD release (on the install CD or on the FTP
server). For example, the amd64 install instructions are available at
ftp.NetBSD.org/pub/NetBSD/NetBSD-10.0/amd64/INSTALL.html
The terminology used by NetBSD for partitioning is different from the typical DOS/Windows terminology; in fact, there are two partitioning schemes involved when running NetBSD on a typical PC. NetBSD installs in one of the four primary BIOS partitions (the partitions defined in the hard disk partition table).
Within a BIOS partition (also called slice) NetBSD defines its BSD partitions using a disklabel. These partitions can be seen only by NetBSD and are identified by lowercase letters (starting with “a”). For example, wd0a refers to the “a” partition of the first IDE disk (wd0) and sd0a refers to the “a” partition of the first SCSI disk. In Figure 2.1, “Partitions” there are two primary BIOS partitions, one used by DOS and the other by NetBSD. NetBSD describes the disk layout through the disklabel.
Note
The meaning of partitions “c” and “d” is typical of the amd64 port. On most other ports, “c” represents the whole disk.
Note
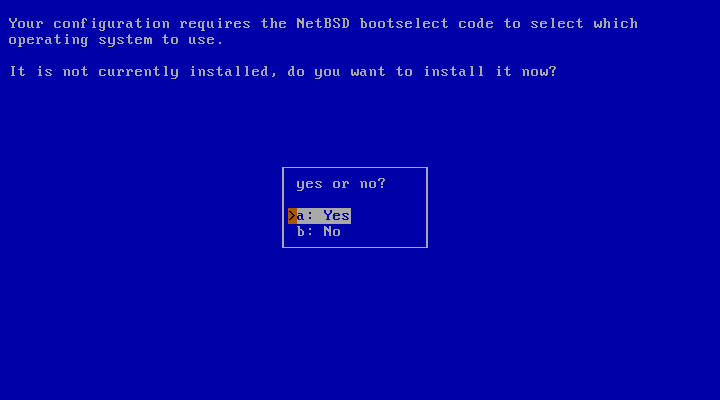
If NetBSD shares the hard disk with another operating system (like in the previous example) you will want to install a boot manager, i.e., a program which lets you choose which OS to start at boot time. sysinst can do this for you and will ask if you want to install one. Unless you have specific reasons not to, you should let sysinst perform this step.
The exact amount of space required for a given NetBSD installation varies depending on the platform being used and which distribution sets are selected. Generally speaking, if you have a few GB of free space on your hard drive, you will have enough space for a full installation of the base system.
If you plan to fetch distribution sets over the network (not necessary if you downloaded a full-size install ISO) and do not use DHCP, write down your basic network settings. You will need:
Your IP address (example: 192.168.1.7)
the netmask (example: 255.255.255.0)
the IP address of your default gateway (example: 192.168.1.1)
the IP address of the DNS server you use (example: 145.253.2.75)
Before you begin the installation, make sure that you have a reliable backup of any operating systems and data on the used hard disk. Mistakes in partitioning your hard disk can lead to data loss. Existing operating systems may become unbootable. "Reliable backup" means that the backup and restore procedure is tested and works flawlessly!
The NetBSD installation system consists of two parts. The first part is the installation kernel. This kernel contains the NetBSD install program sysinst and it is booted from the install media (e.g, CD/DVD, USB drive, memory card, etc.). The sysinst program will prepare the disk: it separates the disk space into partitions, makes the disk bootable and creates the necessary file systems.
The second part of the install system is made up of the binary distribution sets: the files of the NetBSD operating system. The installer needs to have access to the distribution sets. sysinst will usually fetch these files from the install media you booted from, but it can also fetch them via FTP, NFS, or a local filesystem.
The NetBSD Project provides
complete install media for every supported hardware architecture.
This is usually in the form of bootable CD images (.iso
files).
To use a bootable USB install image (on amd64, i386),
download the img.gz file for your hardware
architecture, decompress and copy the image to a USB. For example
on a Unix-like system you may use:
#gunzip NetBSD-10.0-amd64-install.img.gz#dd if=NetBSD-10.0-amd64-install.img of=/dev/your-usbbs=2m
Examples of your-usb are
/dev/rsd0d (NetBSD),
/dev/sda (Linux).
Caution
Selecting the wrong device in dd may destroy your current system. Double-check it isn't mounted and is your USB stick. It should appear at the bottom of dmesg on connect, for example, if you see:
sd0 at scsibus0 target 0 lun 0: [...], disk removable
on NetBSD, you will want to select
/dev/rsd0d.
To use a bootable NetBSD install CD,
download the iso file for your hardware
architecture and burn it to a CD or DVD. You will need to handle
this step alone, as burning programs vary widely. Ensure that
your computer is set up to boot from CD-ROM before hard drives,
insert the disc, and reboot the computer.
This is the checklist about the things that should be clear and on-hand now:
Available disk space
Bootable medium with the install system
CD/DVD or server with the distribution sets
Your network information (only if you will be fetching distribution sets via the network and do not use DHCP)
A working backup
A copy of the INSTALL document
Table of Contents
- 3.1. Introduction
- 3.2. The installation process
- 3.3. Keyboard layout
- 3.4. Starting the installation
- 3.5. MBR partitions
- 3.6. Disklabel partitions
- 3.7. Setting the disk name
- 3.8. Last chance!
- 3.9. The disk preparation process
- 3.10. Installation type
- 3.11. Choosing the installation medium
- 3.12. Extracting sets
- 3.13. System configuration
- 3.14. Finishing the installation
This chapter will guide you through the installation process. The concepts presented here apply to all installation methods. The only difference is in the way the distribution sets are fetched by the installer. Some details of the installation differ depending on the NetBSD release. The examples from this chapter were created with NetBSD 8.0.
Note
The following install screens are just examples. Do not simply copy them, as your hardware and configuration details may be different!
The installation process is divided logically into two parts. In the first part, you create a partition for NetBSD and write the disklabel for that partition. In the second part, you decide which distribution sets (subsets of the operating system) you want to install and then extract the files into the newly created partition(s).
The NetBSD install program sysinst allows you to change the keyboard layout during the installation. If for some reason this does not work for you, you can use the map in the following table.
| US | IT | DE | FR |
|---|---|---|---|
| - | ' | ß | ) |
| / | - | - | ! |
| = | ì | ' | - |
| : | ç | Ö | M |
| ; | ò | ö | m |
| # | £ | § | 3 |
| " | ° | Ä | % |
| * | ( | ( | 8 |
| ( | ) | ) | 9 |
| ) | = | = | 0 |
| ' | à | ä | ù |
| ` | \ | ^ | @ |
| \ | ù | # | ` |
To start the installation of NetBSD, insert your chosen boot medium (CD/DVD, USB drive, floppy, etc.) and reboot the computer. The kernel on the installation medium will be booted and it will start displaying a lot of messages on the screen about hardware being detected.
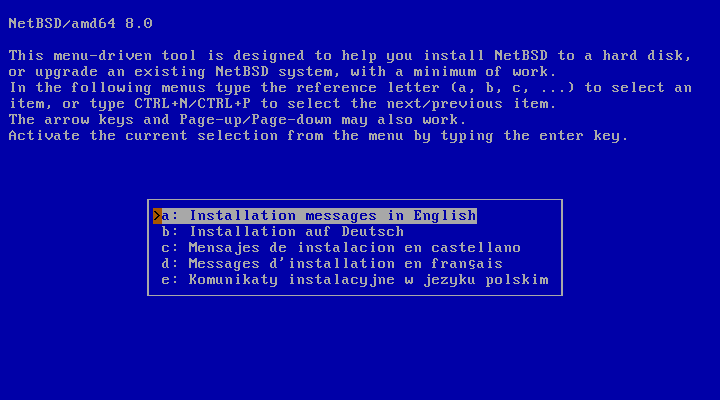
When the kernel has booted, you will find yourself in the NetBSD
installation program, sysinst, shown in
Figure 3.1, “Selecting the language”. From here on, you should
follow the instructions displayed on the screen, using the
INSTALL document as a companion reference. You
will find the INSTALL document in various formats in the root
directory of the NetBSD release. The
sysinst screens all have more or less the
same layout: the upper part of the screen shows a short description of
the current operation or a short help message, and the rest of the
screen is made up of interactive menus and prompts. To make a choice,
use the cursor keys, the “Ctrl+N” (next) and
“Ctrl+P” (previous) keys, or press one of the letters
displayed left of each choice. Confirm your choice by pressing the
Return (also known as “Enter”) key.
Start by selecting the language you prefer to use for the installation process.
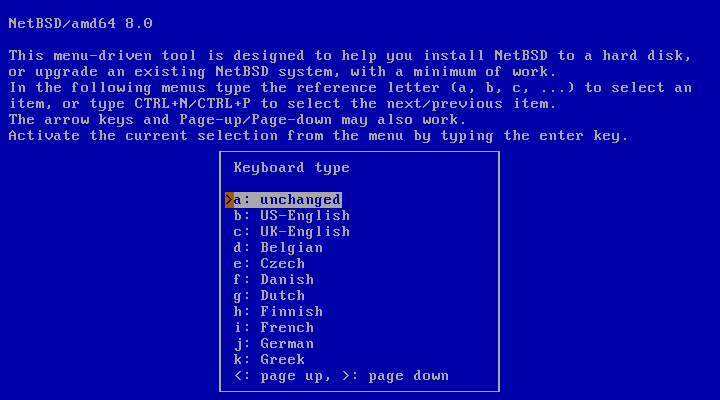
The next screen Figure 3.2, “Selecting a keyboard type” will allow you to select a suitable keyboard type.
This will bring you to the main menu of the installation program (Figure 3.3, “The sysinst main menu”).
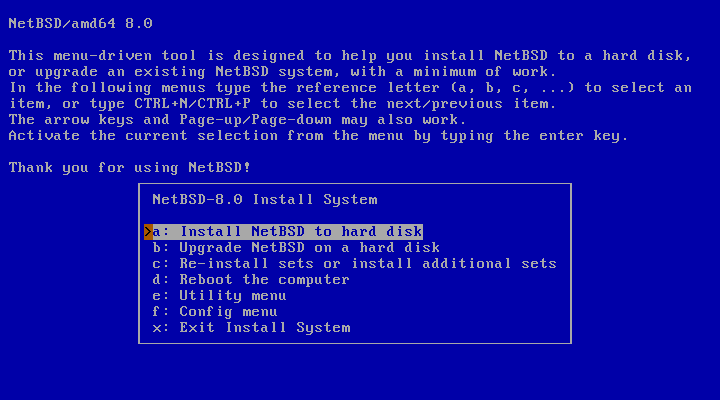
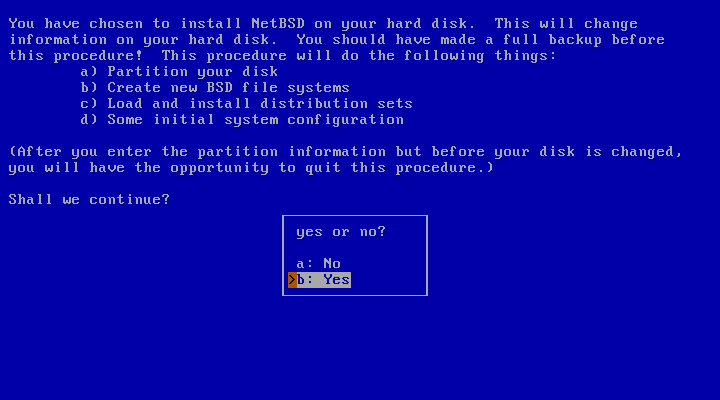
Choosing the “Install NetBSD to hard disk” option brings you to the next screen (Figure 3.4, “Confirming to install NetBSD”), where you need to confirm that you want to continue the installation.
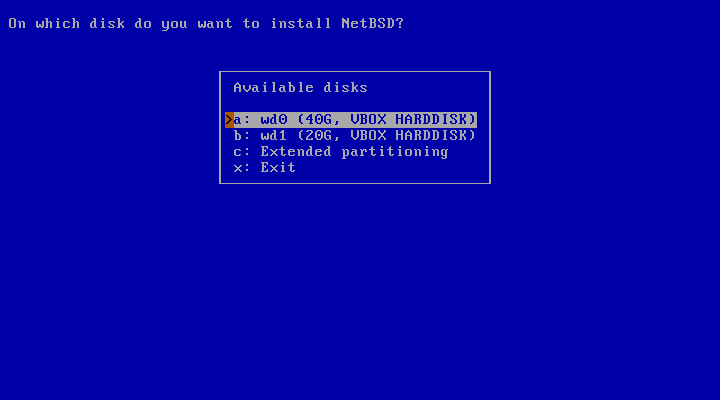
After choosing “Yes” to continue, sysinst displays a list of one or more disks and asks which one you want to install NetBSD on. In the example of Figure 3.5, “Choosing a hard disk”, two disks are listed, and NetBSD will be installed on “wd0”, the first SATA or IDE disk found. If you use SCSI or external USB disks, the first one will be named “sd0”, the second one “sd1” and so on.
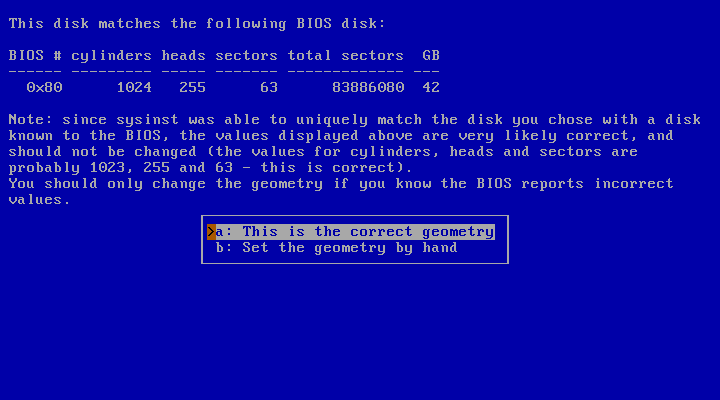
Then the installer will ask you to confirm the detected disk geometry from the information provided by the BIOS, as shown in Figure 3.6, “Disk geometry”. It almost always gives the right values. Choose “This is the correct geometry”, unless you know that the information provided by your BIOS is reportedly incorrect.
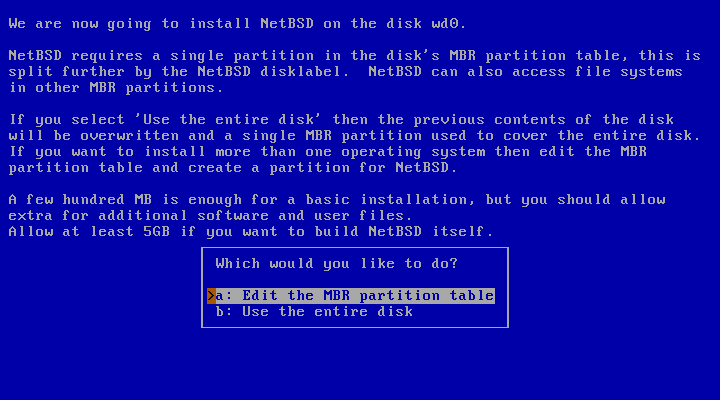
The first important step of the installation has come: the partitioning of the hard disk. First, you need to specify whether NetBSD will use a partition (suggested choice) or the whole disk. In the former case it is still possible to create a partition that uses the whole hard disk (Figure 3.7, “Choosing the partitioning scheme”), so we recommend that you select this option as it keeps the BIOS partition table in a format which is compatible with other operating systems.
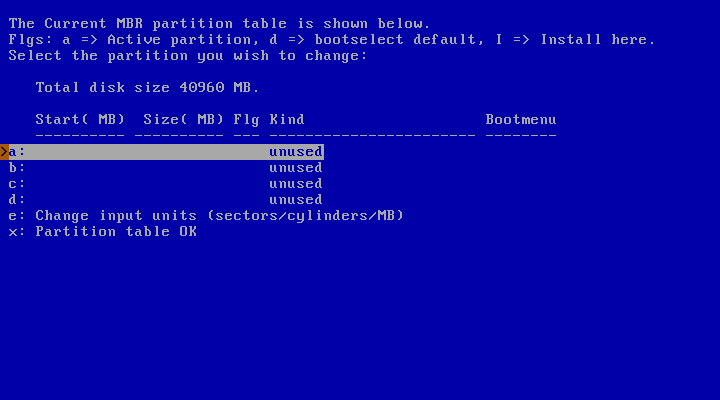
The next screen shows the current state of the MBR partition table on the hard disk before the installation of NetBSD. There are four primary partitions, and as you can see, this example disk is currently empty. If you do have other partitions you can leave them around and install NetBSD on a partition that is currently unused, or you can overwrite a partition to use it for NetBSD.
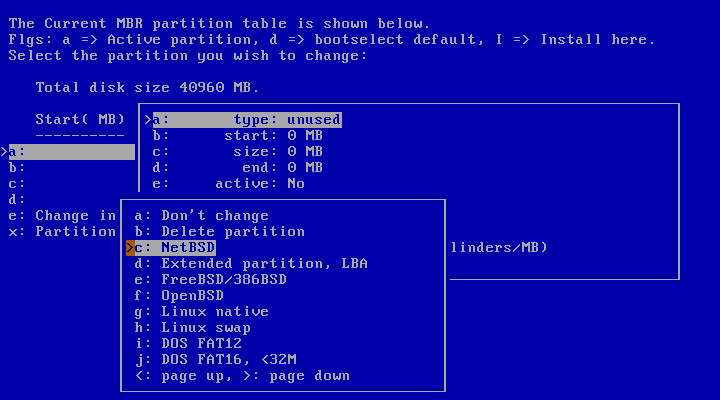
Deleting a partition is simple: after selecting the partition, a menu with options for that partition will appear (Figure 3.9, “Partition options”). Change the partition kind to “Delete partition” to remove the partition. Of course, if you want to use the partition for NetBSD you can set the partition kind to “NetBSD”.
You can create a partition for NetBSD by selecting the partition you want to install NetBSD to. The partition names “a” to “d” correspond to the four primary partitions on other operating systems. After selecting a partition, a menu with options for that partition will appear, as shown in Figure 3.9, “Partition options”.
To create a new partition, the following information must be supplied:
the type (kind) of the new partition
the first (start) sector of the new partition
the size of the new partition
Choose the partition type “NetBSD” for the new partition (using the “type” option). The installation program will try to guess the “start” position based on the end of the preceding partition. Change this value if necessary. The same thing applies to the “size” option; the installation program will try to fill in the space that is available until the next partition or the end of the disk (depending on which comes first). You can change this value if it is incorrect, or if you do not want NetBSD to use all the suggested amount of space.
After you have chosen the partition type, start position, and size, it is a good idea to set the name that should be used in the boot menu. You can do this by selecting the “bootmenu” option and providing a label, e.g., “NetBSD”. Repeat this step for other bootable partitions, so you can boot both NetBSD and a Windows system (or other operating systems) using the NetBSD bootselector. You can also choose one of the labelled partitions as default for the boot menu. If you are satisfied with the partition options, confirm your choice by selecting “Partition OK”. Choose “Partition table OK” to leave the MBR partition table editor.
If you have made an error in partitioning (for example you have created overlapping partitions) sysinst will display a message and suggest to go back to the MBR partition editor (but you are also allowed to continue). If the data is correct but the NetBSD partition lies outside the range of sectors which is bootable by the BIOS, sysinst will warn you and ask if you want to proceed anyway. Doing so may lead to problems on older PCs.
Note
This is not a limitation of NetBSD. Some old BIOSes cannot boot a partition which lies outside the first 1024 cylinders. To fully understand the problem, you should study the different types of BIOSes and the many addressing schemes that they use (physical CHS, logical CHS, LBA, ...). These topics are not described in this guide.
On modern computers (those with support for int13 extensions), it is possible to install NetBSD in partitions that live outside the first 8 GB of the hard disk, provided that the NetBSD boot selector is installed.
Next, sysinst will offer to install a boot selector on the hard disk. This screen is shown in Figure 3.10, “Installing the boot selector”.
At this point, the BIOS partitions (called slices on BSD systems) have been created. They are also called PC BIOS partitions, MBR partitions or fdisk partitions.
Note
Do not confuse the slices or BIOS partitions with the BSD partitions, which are different things.
Some platforms, like PC systems (amd64 and i386), use DOS-style MBR partitions to separate file systems. The MBR partition you created earlier in the installation process is necessary to make sure that other operating systems do not overwrite the diskspace that you allocated to NetBSD.
NetBSD uses its own partition scheme, called a disklabel, which is stored at the start of the MBR partition: for more information, refer to Section 2.2.2, “Partitions”. In the next few steps you will create a disklabel(5) and set the sizes of the NetBSD partitions, or use existing partition sizes, as shown in Figure 3.11, “Edit partitions?”.
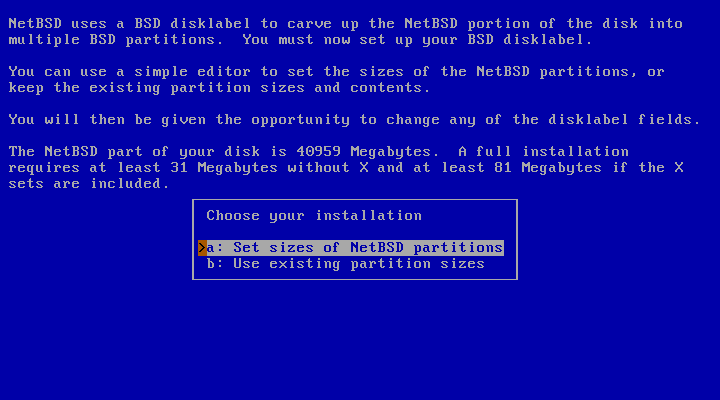
When you choose to set the sizes of the NetBSD partitions you can define the partitions you would like to create. The installation program will generate a disklabel based on these settings. This installation screen is shown in Figure 3.12, “Setting partition sizes”.
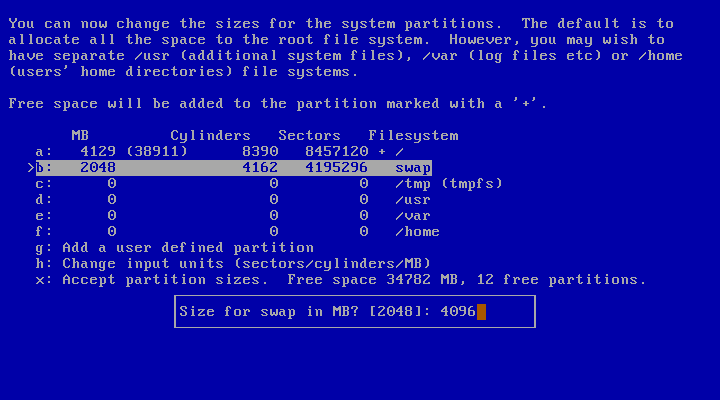
As specified in Figure 3.3, “The sysinst main menu”, the items of the installation menus can be selected pressing the letter displayed left of them. Be careful that, in these menus, they do not always correspond to the BSD disklabel partition letters. For example, third line (letter “c”) of Figure 3.12, “Setting partition sizes” does not refer to the whole NetBSD partition, as well as the fourth line (letter “d”) does not correspond to BSD disklabel partition “d”.
The default partition scheme of just using a big
/ (root) file system (plus swap) works fine with
NetBSD, and there is little need to change this. Figure 3.12, “Setting partition sizes” shows how to change the size of the
swap partition to 4096 MB. Note also that partition
/ is marked with a “+”, so it will
occupy all the remaining free space (not located for any other
partition). Changing /tmp to reside on a
RAM disk (mount_tmpfs(8) or mfs(8)) for
extra speed may be a good idea. Other partition schemes may use
separate partitions for /var,
/usr and/or /home, but you
should use your own experience to decide if you need this. When you
completed the definition of all the desired partitions, choose
“Accept partition sizes”.
The next step is to create the disklabel and edit its partitions, if necessary, using the disklabel editor (Figure 3.13, “The disklabel editor”). If you predefined the partition sizes in the previous step, the resulting disklabel will probably fit your wishes. In that case you can complete the process immediately by selecting “Partition sizes ok”.

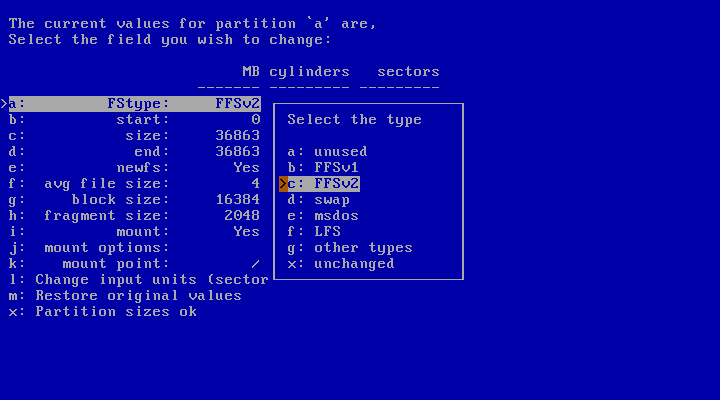
Letters in Figure 3.13, “The disklabel editor” are used for line selection and to represent the corresponding BSD disklabel partitions, with the meaning specified in Section 2.2.2, “Partitions”. In the amd64 port, there are two reserved partitions: “c”, representing the NetBSD partition, and “d”, representing the whole disk. You can edit all the other partitions by using the cursor keys and pressing the Return key, or using their corresponding letters. You can add a partition by selecting an unused slot and setting parameters for that partition. The partition editing screen is shown in Figure 3.14, “Disklabel partition editing”. When you are satisfied with all the values, choose “Partition sizes ok”.
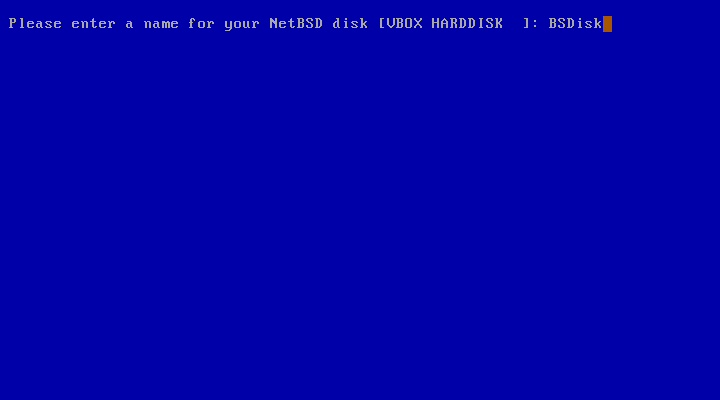
After defining the partitions in the new disklabel, the last item is to enter a name for the NetBSD disk as shown in Figure 3.15, “Naming the NetBSD disk”. This can be used later to distinguish between disklabels of otherwise identical disks.
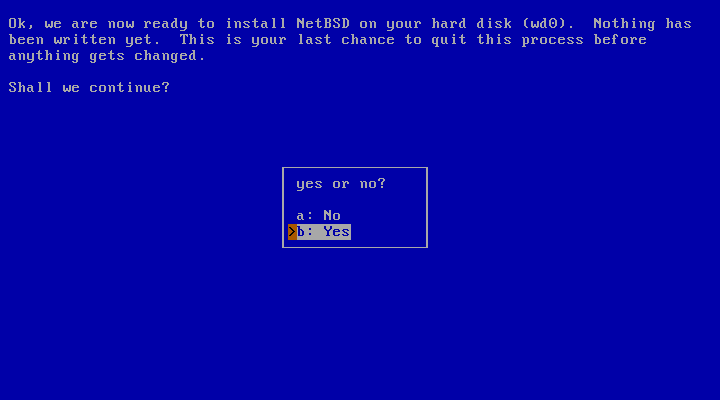
The installer now has all the data it needs to prepare the disk. Nothing has been written to the disk at this point but, and now is your last chance to abort the installation process before actually writing data to the disk. Choose “no” to abort the installation process and return to the main menu, or continue by selecting “yes”.
After confirming that sysinst should prepare the disk, it will run disklabel(8) to create the NetBSD partition layout and newfs(8) to create the file systems on the disk.
After preparing the NetBSD partitions and their filesystems, the next question (shown in Figure 3.17, “Selecting bootblocks”) is which bootblocks to install. Usually you will choose the default of BIOS console, i.e., show boot messages on your computer's display.
If you run a farm of machines without monitor, it may be more convenient to use a serial console running on one of the serial ports. The menu also allows changing the serial port's baud rate from the default of 9600 baud, 8 data bits, no parity and one stopbit.

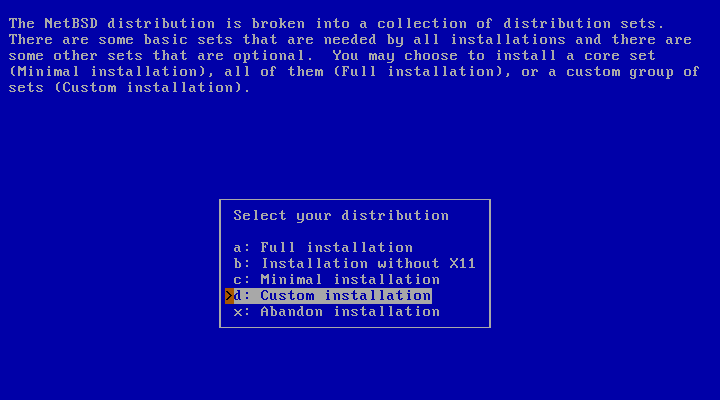
The installer will then ask whether you want to do a full, minimal or custom installation. NetBSD is broken into a collection of distributions sets. “Full installation” is the default and will install all sets; “Minimal installation” will only install a small core set, the minimum of what is needed for a working system. If you select “Custom installation” you can select which sets you would like to have installed. This step is shown in Figure 3.18, “Full or custom installation”.
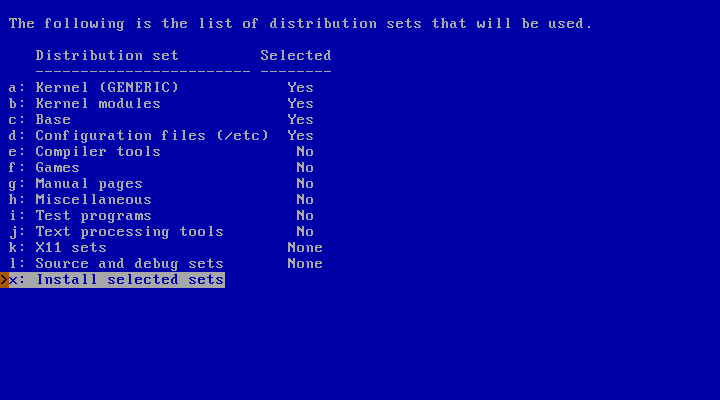
If you choose to do a custom installation, sysinst will allow you to choose which distribution sets to install, as shown in Figure 3.19, “Selecting distribution sets”. At a minimum, you must select a kernel and the “Base” and “Configuration files (/etc)” sets.
At this point, you have finished the first and most difficult part of the installation!
The second half of the installation process consists in populating
the file systems by extracting the distribution sets that you selected
earlier (“Base”, “Compiler tools”,
“Games”, etc.). Now sysinst
needs to find the NetBSD sets and you must tell it where to find them:
it can be the same medium where sysinst
resides, or a different one, according to your preferences. The menu
offers several choices, as shown in Figure 3.20, “Installation media”.
The options are explained in detail in the
INSTALL documents.
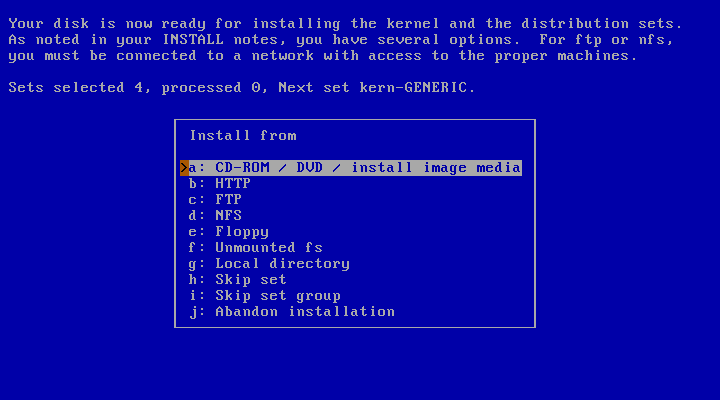
Choose this option if you want to install NetBSD from either an optic medium (“CD-ROM / DVD”) or another medium, such as an USB drive. If the running sysinst itself has been loaded from there, the corresponding device will be automatically selected and the extraction of the distribution sets will begin.
The CD-ROM/DVD or other device name
If sysinst is not able to detect the CD-ROM/DVD or the USB flash device, you can gather more information about the hardware configuration as follows:
Press “Ctrl+Z” to pause sysinst and go to the shell prompt.
-
Type the command:
#dmesgThis will show the kernel startup messages, including information about not detected or not configured devices. When the first CD-ROM or DVD drive in the system is properly working, it is usually named cd0, regardless of whether it is IDE or SCSI (or even USB or FireWire). The first USB flash drive is named sd0 when it is correctly configured.
-
If the display scrolls too quickly, you can also use more:
#dmesg | more As instructed, you can return to the NetBSD installation by typing either “exit” or “^D” (“Ctrl+D”).
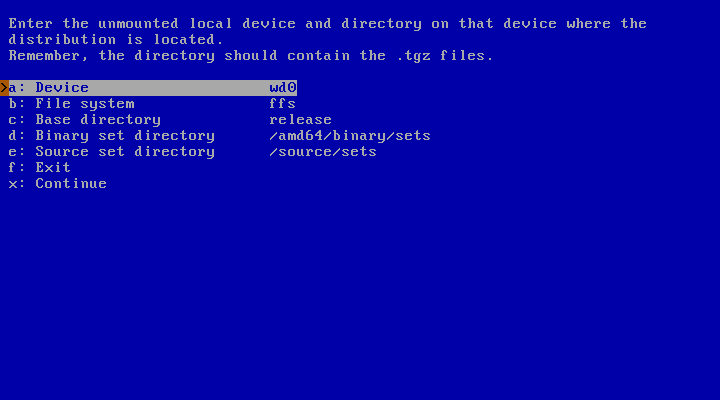
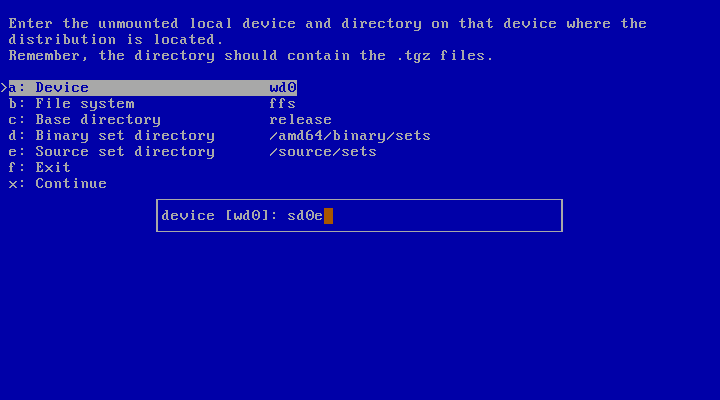
Figure 3.21, “Mounting a file system” shows the menu to install NetBSD
from an unmounted file system. It is necessary to specify the
device (“Device”), its file system type (“File
system”) and a root directory inside it (“Base
directory”). The binary installation sets and the source
sets are .tgz files. The default mountpoint is
“mnt” in amd64. The path is formed as follows:
/<default mountpoint>/<Base directory>/<Binary set directory> or <Source set directory>/set.tgz
Choose a combination of “Base directory” and
“Binary set directory” (or “Source set
directory”) that generates a valid path in your unmounted
filesystem. If more than one consecutive /
appear, only the first / will actually be
considered. You need to specify a “Source set
directory” only if you previously chose to install some
sources. Source sets are usually not included in the installation
images.
In the following example the install sets are stored on a MSDOS file system, on partition “e” on the device “sd0”.
Specify the device name and the partition. Figure 3.22, “Mounting a partition ” shows how to specify device "sd0" with partition "e".
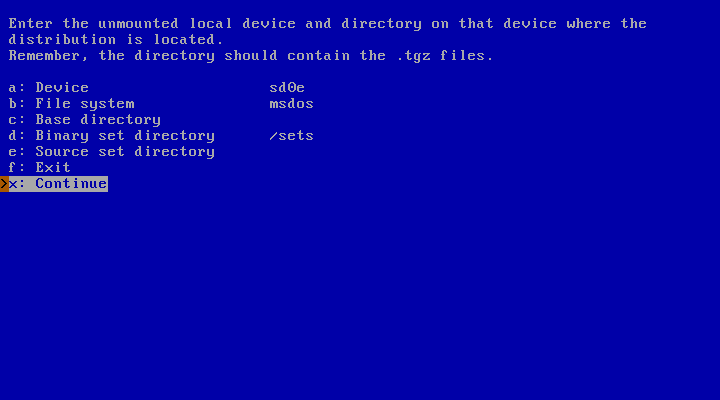
In Figure 3.23, “Accessing a MSDOS file system” the file system type
specified is “msdos”. This value is used to form the
command mount_<File system> to mount the
volume. Any string (representing a “File system” type)
which forms a valid command is accepted: for example, the NetBSD
file system “ffs” or “ext2fs”, a Linux
file system. In this example, the “Base directory”
item is left blank and the binary sets are stored under
/sets, so that the path becomes:
/mnt///sets
Ignoring the multiple /, this is
equivalent to /mnt/sets and it is a valid one.
Choosing “Continue” will start the extraction of the
sets.
If you choose to install from a local network or the Internet via FTP, sysinst must be instructed to properly get the distribution sets, as shown in Figure 3.24, “Defining the FTP settings”.
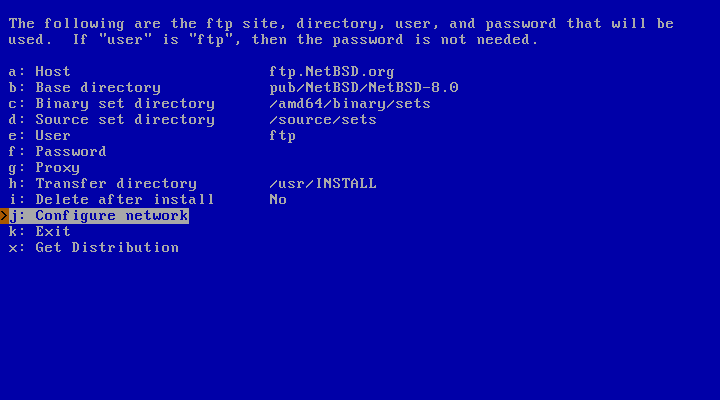
The defaults work most of the time. You also need to configure your network connection, before proceeding: go to the corresponding menu item, pressing letter “j”.
NetBSD currently supports installation via ethernet, USB ethernet or wireless, and wireless LAN. Installation via DSL (PPP over Ethernet) is not supported during installation.
In the first step, shown in Figure 3.25, “Which network interface to configure”, the network card to be configured must be selected. sysinst will determine a list of available network interfaces, present them and ask which one to use.
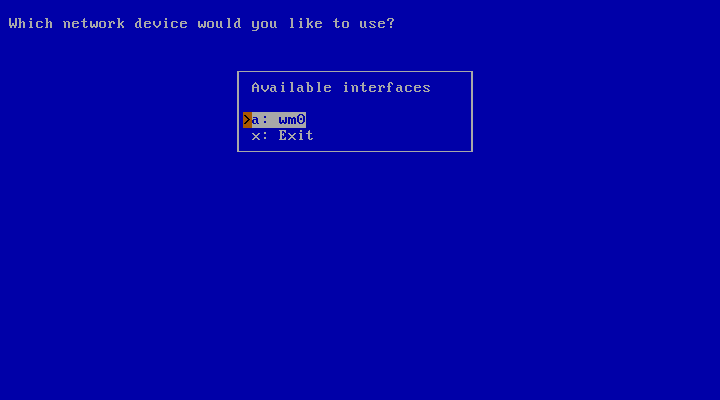
Note
The exact names of your network interfaces depend on the hardware you use. Example interfaces are “wm” for Intel Gigabit interfaces, “ne” for NE2000 and compatible ethernet cards, and “ath” for Atheros based wireless cards. This list is by no means complete, and NetBSD supports many more network devices.
If your network device is not listed in Figure 3.25, “Which network interface to configure”, maybe it has not been properly detected. To get a list of network interfaces available on your system, interrupt the installation process by pressing “Ctrl+Z”, then enter
#ifconfig -awm0: flags=0x8802<BROADCAST,SIMPLEX,MULTICAST> mtu 1500 capabilities=2bf80<TSO4,IP4CSUM_Rx,IP4CSUM_Tx,TCP4CSUM_Rx> capabilities=2bf80<TCP4CSUM_Tx,UDP4CSUM_Rx,UDP4CSUM_Tx,TCP6CSUM_Tx> capabilities=2bf80<UDP6CSUM_Tx> enabled=0 ec_capabilities=7<VLAN_MTU,VLAN_HWTAGGING,JUMBO_MTU> ec_enabled=0 address: 08:00:27:7e:85:d7 media: Ethernet autoselect (1000baseT full-duplex) status: active lo0: flags=0x8048<LOOPBACK,RUNNING,MULTICAST> mtu 33624
If the desired interface has not been shown, get more information about all the devices found during system boot. Type:
#dmesg | more
As instructed, you can return to the NetBSD installation by typing either “exit” or “^D” (“Ctrl+D”).
Next, you have a chance to set your network medium. Press “Enter” to choose the default.
Note
It is unlikely that you will need anything other than the default here. If you experience problems like very slow transfers or timeouts, you may, for example, force different duplex settings for ethernet cards. To get a list of supported media and media options for a given network device (“wm0”, for example), escape from sysinst by pressing “Ctrl+Z”, then enter:
#ifconfig -m wm0wm0: flags=0x8802<BROADCAST,SIMPLEX,MULTICAST> mtu 1500 capabilities=2bf80<TSO4,IP4CSUM_Rx,IP4CSUM_Tx,TCP4CSUM_Rx> capabilities=2bf80<TCP4CSUM_Tx,UDP4CSUM_Rx,UDP4CSUM_Tx,TCP6CSUM_Tx> capabilities=2bf80<UDP6CSUM_Tx> enabled=0 ec_capabilities=7<VLAN_MTU,VLAN_HWTAGGING,JUMBO_MTU> ec_enabled=0 address: 08:00:27:7e:85:d7 media: Ethernet autoselect (1000baseT full-duplex) status: active supported Ethernet media: media none media 10baseT media 10baseT mediaopt full-duplex media 100baseTX media 100baseTX mediaopt full-duplex media autoselect
The several values printed after “media” may be of interest here, including keywords like “autoselect” but also including any “mediaopt” settings.
Return to the installation by typing “exit” or “^D” (“Ctrl+D”).
The next question, shown in Figure 3.26, “Using autoconfiguration”, is whether you want to perform autoconfiguration. This procedure uses DHCP (Dynamic Host Configuration Protocol). sysinst will fetch a number of defaults from it, giving most likely the correct settings. This procedure is recommended, unless you want to set a static IP address, and/or specify some custom parameters.
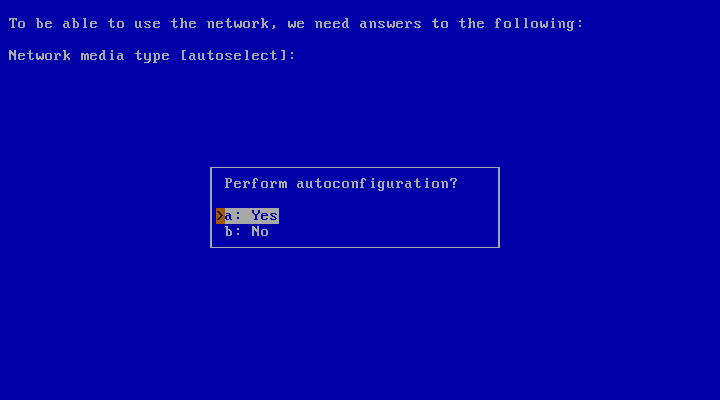
You will then be asked for your “DNS domain”; if the machine is not in a registered public domain, it can be left blank.
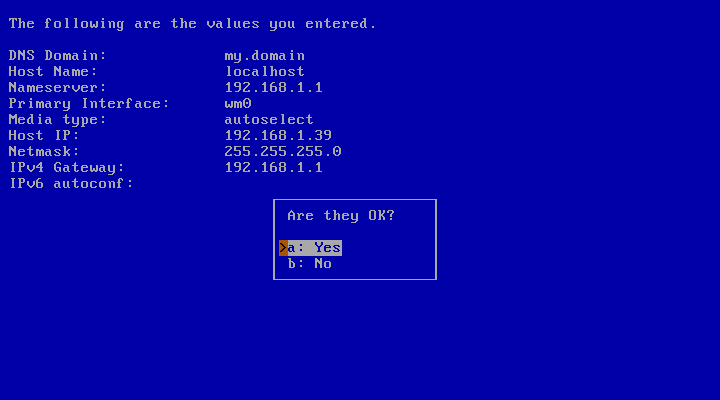
At the end of this procedure, a list of all the settings is shown, as in Figure 3.27, “Confirm autoconfiguration”. If they are correct, choose “Yes”. Otherwise, choosing “No”, the network configuration will restart from the beginning, giving the opportunity to perform again all the steps (and also to perform a manual configuration).
If you chose “No” in Figure 3.26, “Using autoconfiguration”, you will be asked several questions to manually configure the network. All the parameters are presented in the form “Parameter_name [default_value]:”. Press “Enter” to use the default value. If no default value is provided, the parameter will be left blank.
- Your host name:
The name by which other machines can usually address your computer. Not used during installation.
- Your DNS Domain:
This is the name of the domain you are in. You may leave it blank if you are not in a public domain.
- Your IPv4 address:
Enter your numerical Internet Protocol address in “dotted quad” notation here, for example, 192.168.1.3. It will be used as a static IP for your network card.
- IPv4 Netmask:
The netmask for your network, either given as a hex value (“0xffffff00”) or in dotted-quad notation (“255.255.255.0”).
- IPv4 gateway:
Your router's (or default gateway's) IP address. Do not use a hostname here!
- Your name server:
Your (first) DNS server's IP address. Again, don't use a hostname.
After answering all of your network configuration info, their list is shown as in Figure 3.27, “Confirm autoconfiguration”. You will have a chance to go back and make changes. If you are satisfied with your settings, choose “Yes”.
sysinst will now run a few commands (not displayed in detail here) to configure the network: flushing the routing table, setting the default route, and testing if the network connection is operational.
Now that you have a functional network connection, the menu in Figure 3.24, “Defining the FTP settings” will be shown again. Choose “Get Distribution” to continue: sysinst will download the selected set files to a temporary directory, and then extract them.
If you want to install NetBSD from a server in your local network, NFS is an alternative to FTP.
Note
Using this installation method requires the ability to set up an NFS server, a topic which is not discussed here.
As shown in Figure 3.28, “NFS install screen”, you must specify: the IP address of the NFS server as “Host”; the directory exported by the NFS server as “Base directory”; the directory containing the install sets as “Set directory”.
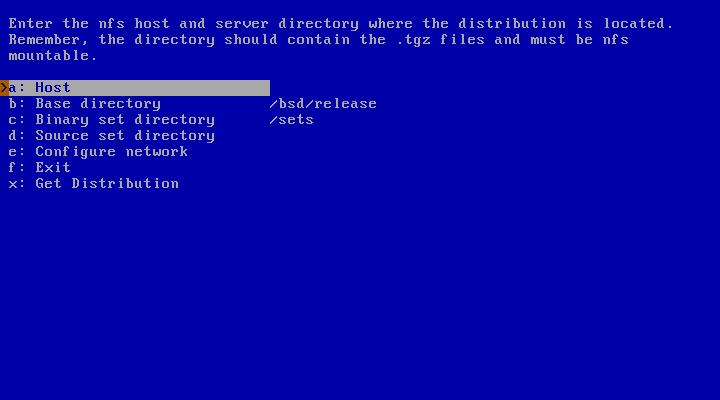
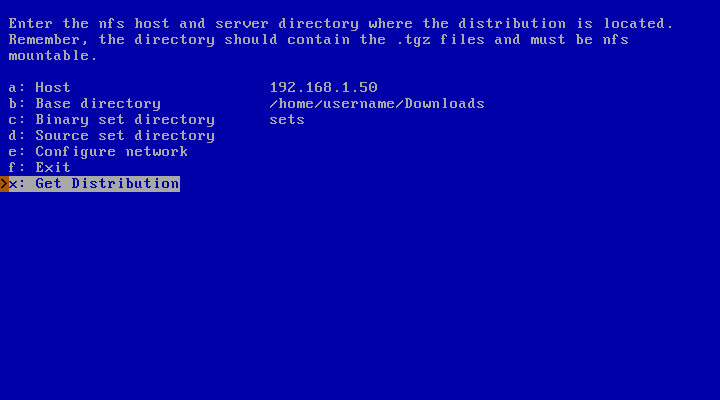
Figure 3.29, “NFS example” shows an example: Host
“192.168.1.50” is the NFS server which exports the
directory /home/username/Downloads. The NetBSD
install sets are stored in
/home/username/Downloads/sets on the NFS
server. Choose “Continue” to start the installation of
the distribution sets.
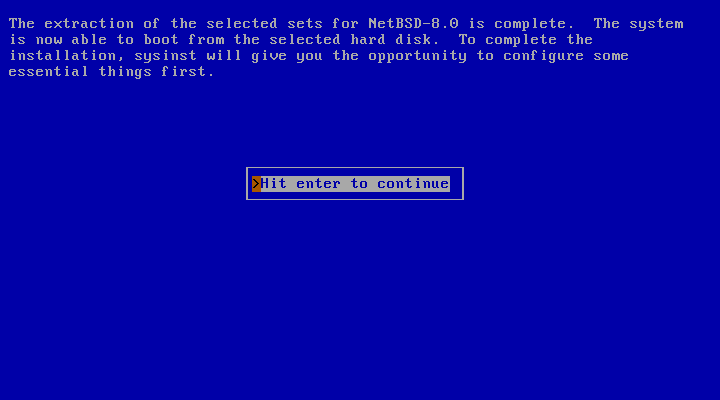
After the method to obtain the distribution sets has been chosen, and (if applicable) after those sets have been transferred, they will be extracted into the new NetBSD file system.
A message (see Figure 3.30, “Extraction of sets completed”) will let you know that the set extraction is now completed and that you have the opportunity to perform some essential configuration before finishing the NetBSD installation.
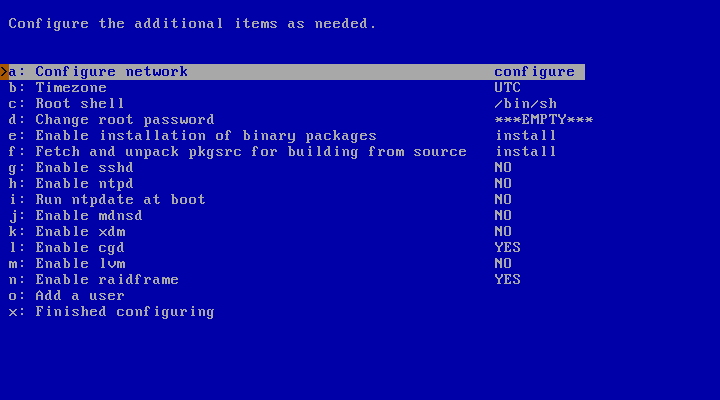
A menu with all the available configuration options is shown like in Figure 3.31, “Configuration menu”. After the configuration of each item, you will get back to this menu, having the chance to select another one.
If you have not yet configured Network, you can do it now, following the same procedure already presented in Section 3.11.3, “Installing via FTP and Network configuration”.
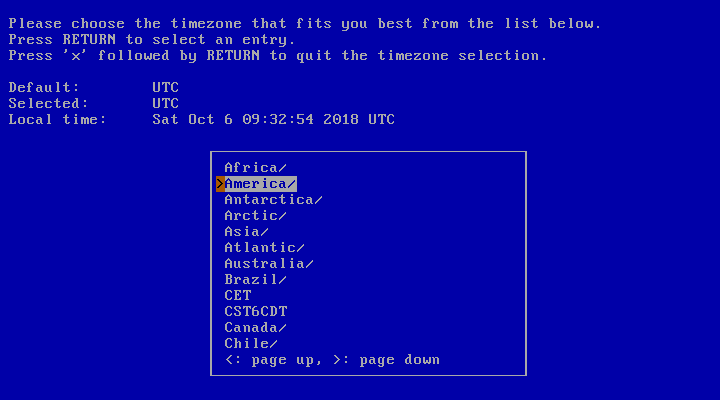
The timezone can also be configured. It is Universal Time Coordinated (UTC) by default. Use the two-level menu of Continents/Countries and cities shown in Figure 3.32, “Selecting the system's time zone” to select your local timezone with the Return key. After a valid selection, the cursor will automatically be moved to an “Exit” item. Then, simply press Return to exit the timezone selection.
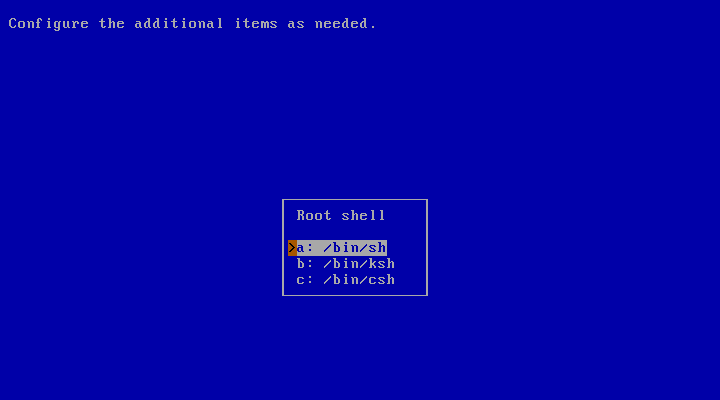
The next item in Figure 3.31, “Configuration menu” allows you to choose which command-line interpreter - also known as “shell” - will be used for the root account. The default is the Bourne-compatible Almquist shell, sh(1). Other choices are the Korn shell (ksh(1)) and the C shell (csh(1)). If, upon reading this, you don't have some idea on which shell you prefer, simply use the default, as this is a highly subjective decision. Should you later change your mind, root's shell can always be changed.
The root account still does not have a password. It is recommended to set it at this point for security reasons, choosing the related item in Figure 3.31, “Configuration menu”.
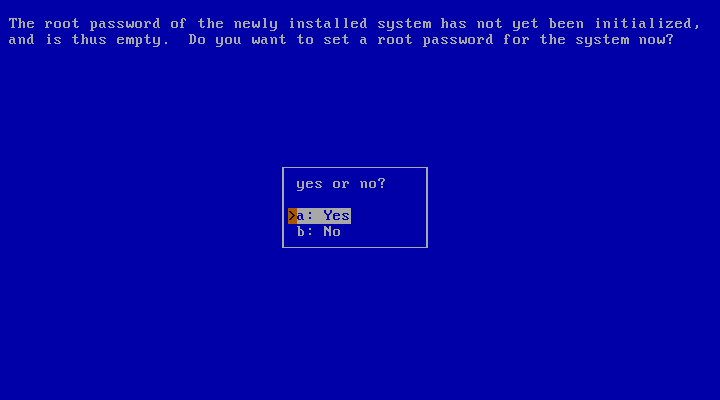
When you agree to set a root password, sysinst will run the passwd(1) utility for you. Please note that the password is not echoed.

To ease the future installation of binary packages, it is possible to make a preliminary configuration of pkgin: choose “Enable installation of binary packages” in Figure 3.31, “Configuration menu”. pkgin will be fetched and installed from an FTP server, so be sure that the network configuration has already been done. Specify the “Host” name, its “Base directory” (where the packages for all the NetBSD ports are stored), and the “Package directory”, related to your port and your NetBSD version. Usually, the defaults are correct.
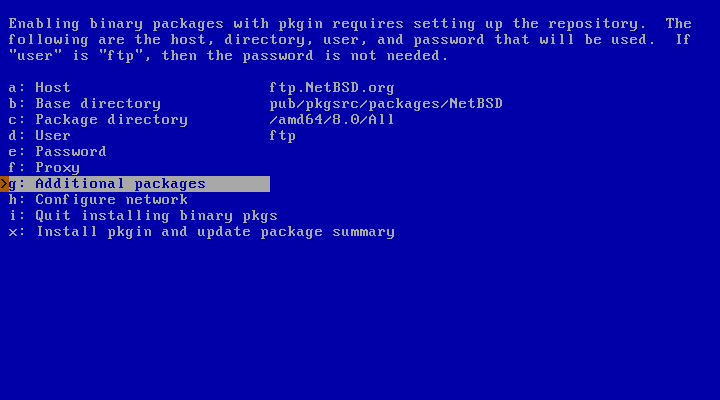
Choosing “ftp” as “User”, no password will be required. As shown in Figure 3.36, “Enabling installation of binary packages”, you can also choose to install one or more additional packages, typing their names using a space as separator, pressing “Enter” at the end. To proceed to the installation, type “x” and press “Enter”. A “pkgin update” will be run after the installation of pkgin, to let the repository be immediately up to date.

After the procedure is completed, sysinst will show the command to install further packages. Hit “Enter” to go back to the configuration menu.
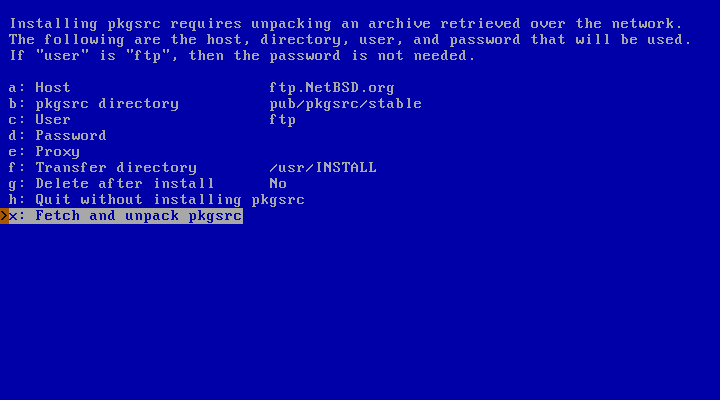
If you need or want to build packages from their source code via
pkgsrc, choose “Fetch and unpack pkgsrc for building from
source” in Figure 3.31, “Configuration menu”. As before,
specify the “Host” name; “pkgsrc directory”
is the sources base directory. Defaults are usually the best values.
A single archive file will be downloaded, for example
pkgsrc.tgz: if you want to automatically remove
it after the pkgsrc installation, move the cursor on “Delete
after install” and press “Enter”. To proceed
with the download, type “x” and then press
“Enter”.
In the initial configuration menu (Figure 3.31, “Configuration menu”), it is also possible to enable some useful services such as the daemon listening for ssh. For information about ntpd and ntpdate, refer to Section 29.2, “The Network Time Protocol (NTP)”. xdm handles the authentication and the session of users through an X display. Usage of the Cryptographic Device Driver (cgd) is shown in Chapter 14, The cryptographic device driver (CGD). Logical Volume Manager (lvm) is documented in Chapter 17, NetBSD Logical Volume Manager (LVM) configuration, raidframe in Chapter 16, NetBSD RAIDframe. mdnsd provides a Multicast DNS service, and also DNS Service Discovery on NetBSD: check mdnsd(8) for more details.
Finally, the menu in Figure 3.31, “Configuration menu” lets you add a regular user to the system. For all the base information about users and root accounts, as well as the wheel group, refer to Section 5.6, “Adding users”.
When you completed the configuration of all the desired items, choose “Finished configuring” in Figure 3.31, “Configuration menu”.
At this point the installation is finished.
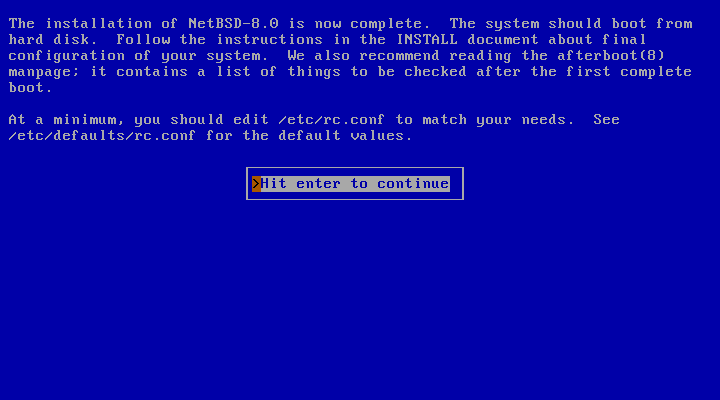
After passing the dialog that confirms the installation, sysinst will return to the main menu. Remove any installation media (CD, floppy, etc.) and choose “Reboot the computer” to boot your new NetBSD installation.
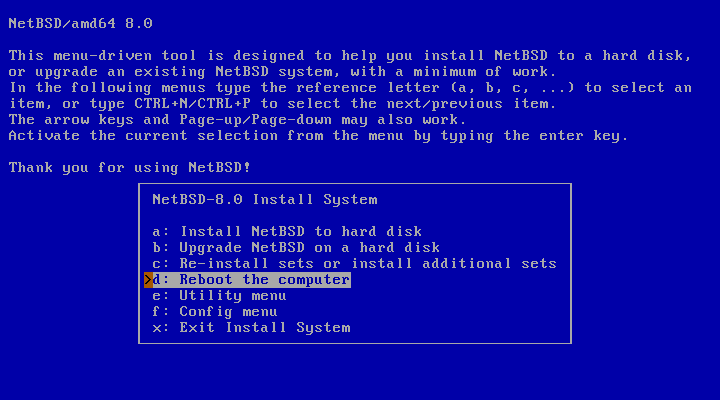
Table of Contents
This chapter describes the binary upgrade of a NetBSD system. There are a variety of alternatives to perform this procedure, and the following sections will guide you through them:
To do the upgrade, you must have some form of bootable media (CD-ROM, USB drive, floppy, etc.) available and at least the base and kern distribution sets. Since files already installed on the system are overwritten in place, you only need additional free space for files which weren't previously installed or to account for growth of the sets between releases. Usually this is not more than a few megabytes.
Note
Since upgrading involves replacing the kernel, boot blocks, and most of the system binaries, it has the potential to cause data loss. Before beginning, you are strongly advised to back up any important data on the NetBSD partition or on any other partitions on your disk.
The upgrade procedure is similar to an installation, but without
the hard disk partitioning. sysinst will
attempt to merge the settings stored in your /etc
directory with the new version of NetBSD. Also, file systems are checked
before unpacking the sets. Fetching the binary sets is done in the same
manner as in the installation procedure.
Before doing an upgrade it is essential to read the
release information and upgrading notes in one of the
INSTALL files: this is the official
description of the upgrade procedure, with platform specific
information and important details. It can be found in the root
directory of the NetBSD release (on the install CD or on the FTP
server).
It is advisable to print the INSTALL document out. It is available in four formats: .txt, .ps, .more, and .html.
The following section provides an overview of the binary upgrade process. Most of the following sysinst dialogs are similar to those of the installation process. More verbose descriptions and explanations of the dialogs are available in Chapter 3, Example installation.
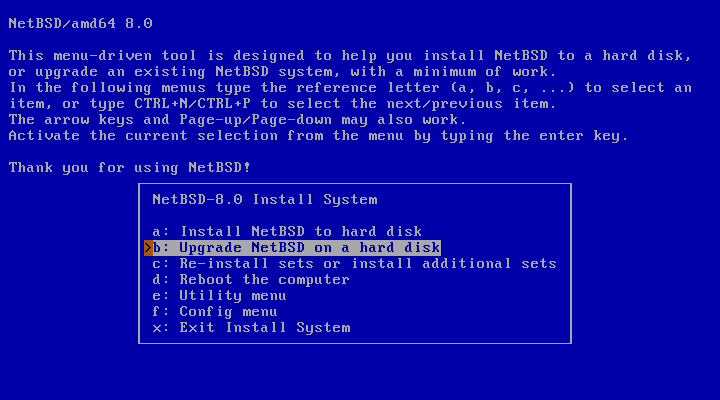
After selecting the installation language and the keyboard type, the main menu appears. Choosing option “b: Upgrade NetBSD on a hard disk” will start the the upgrade process.
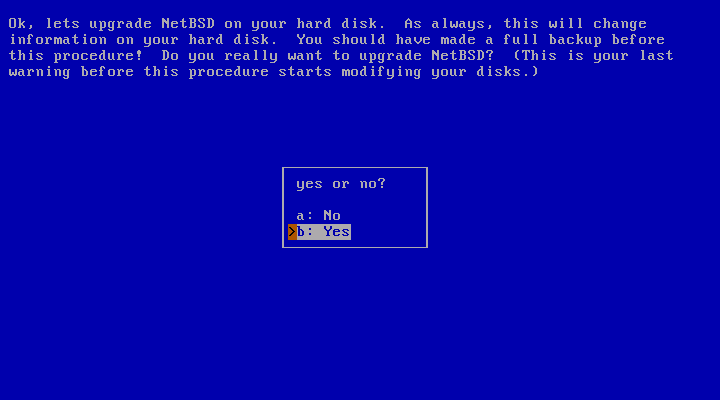
The dialog in Figure 4.2, “Continuing the upgrade” will request permission to continue with the upgrade. At this point nothing has been changed yet and the upgrade can still be cancelled. This is a good time to ask yourself whether you have made a backup, and if you know for certain that you will be able to restore from it.
After choosing to continue with “Yes”, the next dialog will ask you to specify the hard disk with the NetBSD system that shall be upgraded.
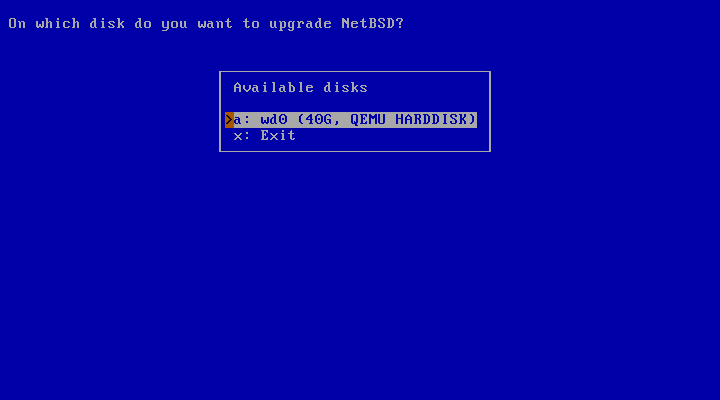
The system used for the example has only one hard disk available: “wd0”.
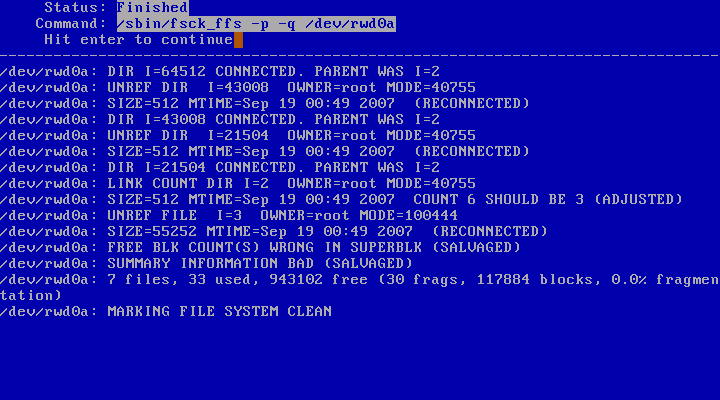
At this point, sysinst will perform a check of the file system to ensure its integrity.
The next step is to choose which type of bootblocks to install.
The following dialog provides a menu to choose the installation type. The choices are “Full installation”, “Installation without X11”, “Minimal installation”, or “Custom installation”.
The following dialog asks for the install method of choice and provides a list of possible options. The install medium contains the new NetBSD distribution sets. You will be prompted for different information depending on which option you choose. For example, a CD-ROM or DVD install requires you to specify which device to use and which directory the sets are in, while an FTP install requires you to configure your network and specify the hostname of an FTP server. More details can be found in Section 3.11, “Choosing the installation medium”.
sysinst will now unpack the distribution
sets, replacing your old binaries. After unpacking these sets, it
runs the postinstall(8) script to perform various system cleanup
and configuration update tasks. If
postinstall produces errors, you will have
to manually resolve the issues it brings up. See postinstall's man
page for more information. Even after a successful
postinstall run, it is advisable to use
etcupdate(8) to aid in merging any other configuration changes.
You should also read the remarks in INSTALL about
upgrading, as specific compatibility issues are documented there.
When you are back at the main menu, remove the boot medium (if applicable) and reboot. Have fun with your new version of NetBSD!
The sysupgrade utility (currently
found in pkgsrc/sysutils/sysupgrade) allows you
to upgrade a running system to a newer binary release.
Note
Take care when upgrading across major releases - ensure your running kernel is never newer than the userspace.
One of the benefits of sysupgrade is that it is an integrated and almost-unattended solution: the tool fetches the new kernel and distribution sets from remote sites if you desire and performs the upgrade without user intervention until new changes to the configuration files need to be merged.
Let's assume you are running NetBSD/amd64 9.1 and you wish to upgrade to NetBSD 9.2. The procedure to do so would be to run the following command:
#sysupgrade auto https://cdn.NetBSD.org/pub/NetBSD/NetBSD-9.2/amd64
And that's all that it takes. This will proceed to download the kernel and sets appropriate for your machine, unpack them and assist you in merging new configuration changes. Do not forget to reboot afterwards.
When upgrading between major releases (e.g. between NetBSD 8.2 and 9.2), take care to first upgrade the kernel and modules:
#sysupgrade fetch https://cdn.NetBSD.org/pub/NetBSD/NetBSD-9.2/amd64#sysupgrade kernel#sysupgrade modules#reboot#sysupgrade sets#sysupgrade etcupdate#sysupgrade postinstall#sysupgrade clean#reboot
For more details, please see the included sysupgrade(8) manual
page and the /usr/pkg/etc/sysupgrade.conf
configuration file.
Table of Contents
- 5. The first steps on NetBSD
- 5.1. Troubleshooting
- 5.2. The man command
- 5.3. Editing configuration files
- 5.4. Login
- 5.5. Changing the
rootpassword - 5.6. Adding users
- 5.7. Shadow passwords
- 5.8. Changing the keyboard layout
- 5.9. System time
- 5.10. Secure Shell (ssh(1))
- 5.11. Basic configuration in
/etc/rc.conf - 5.12. Basic network settings
- 5.13. Mounting a CD-ROM
- 5.14. Mounting a floppy
- 5.15. Installing additional software
- 5.16. Security alerts
- 5.17. Stopping and rebooting the system
- 6. Editing
- 7. The rc.d System
- 8. Console drivers
- 9. The X Window System
- 10. Audio
- 11. Power management
- 12. Printing
- 13. Using removable media
- 13.1. Initializing and using USB flash drives
- 13.2. Initializing and using floppy disks
- 13.3. How to use a ZIP disk
- 13.4. Reading data CDs with NetBSD
- 13.5. Reading multi-session CDs with NetBSD
- 13.6. Allowing normal users to access CDs
- 13.7. Mounting an ISO image
- 13.8. Using video CDs with NetBSD
- 13.9. Using audio CDs with NetBSD
- 13.10. Creating an MP3 (MPEG layer 3) file from an audio CD
- 13.11. Using a CD-R writer with data CDs
- 13.12. Using a CD-R writer to create audio CDs
- 13.13. Creating an audio CD from MP3s
- 13.14. Copying an audio CD
- 13.15. Copying a data CD with two drives
- 13.16. Using CD-RW rewritables
- 13.17. DVD support
- 13.18. Creating ISO images from a CD
- 13.19. Getting volume information from CDs and ISO images
- 14. The cryptographic device driver (CGD)
- 15. Concatenated Disk Device (CCD) configuration
- 16. NetBSD RAIDframe
- 16.1. RAIDframe Introduction
- 16.2. Setup RAIDframe Support
- 16.3. Example: RAID-1 Root Disk
- 16.3.1. Pseudo-Process Outline
- 16.3.2. Hardware Review
- 16.3.3. Initial Install on Disk0/wd0
- 16.3.4. Preparing Disk1/wd1
- 16.3.5. Initializing the RAID Device
- 16.3.6. Setting up Filesystems
- 16.3.7. Migrating System to RAID
- 16.3.8. The first boot with RAID
- 16.3.9. Adding Disk0/wd0 to RAID
- 16.3.10. Testing Boot Blocks
- 17. NetBSD Logical Volume Manager (LVM) configuration
- 17.1. Anatomy of NetBSD Logical Volume Manager
- 17.2. Install physical media
- 17.3. Configure Kernel Support
- 17.4. Disklabel each physical volume member of the LVM
- 17.5. Create Physical Volumes
- 17.6. Create Volume Group
- 17.7. Create Logical Volume
- 17.8. Example: LVM with Volume groups located on raid1
- 18. Pluggable Authentication Modules (PAM)
- 18.1. About
- 18.2. Introduction
- 18.3. Terms and conventions
- 18.4. PAM Essentials
- 18.5. PAM Configuration
- 18.6. PAM modules
- 18.7. PAM Application Programming
- 18.8. PAM Module Programming
- 18.9. Sample PAM Application
- 18.10. Sample PAM Module
- 18.11. Sample PAM Conversation Function
- 18.12. Further Reading
- 19. Tuning NetBSD
- 20. NetBSD Veriexec subsystem
- 21. Bluetooth on NetBSD
- 22. Miscellaneous operations
Table of Contents
- 5.1. Troubleshooting
- 5.2. The man command
- 5.3. Editing configuration files
- 5.4. Login
- 5.5. Changing the
rootpassword - 5.6. Adding users
- 5.7. Shadow passwords
- 5.8. Changing the keyboard layout
- 5.9. System time
- 5.10. Secure Shell (ssh(1))
- 5.11. Basic configuration in
/etc/rc.conf - 5.12. Basic network settings
- 5.13. Mounting a CD-ROM
- 5.14. Mounting a floppy
- 5.15. Installing additional software
- 5.16. Security alerts
- 5.17. Stopping and rebooting the system
After installing and rebooting, the computer will boot from the hard disk. If everything went well you'll be looking at the login prompt within a few seconds (or minutes, depending on your hardware). The system is not yet fully configured, but basic configuration is easy. You will see how to quickly configure some important things, and in doing so you will learn some basics about how the system works.
If the system does not boot it could be that the boot manager was not installed correctly or that there is a problem with the MBR (Master Boot Record). Boot the machine from your install medium (CD, DVD, floppy, etc.) and when you see the boot menu, select the option to drop to the boot prompt.
type "?" or "help" for help.>?commands are: boot [xdNx:][filename] [-12acdqsvxz] (ex. "hd0a:netbsd.old -s") ls [path] dev xd[N[x]]: consdev {pc|com[0123]|com[0123]kbd|auto} modules {enabled|disabled} load {path_to_module} multiboot [xdNx:][filename] [<args>] help|? quit>boot hd0a:netbsd
The system should now boot from the hard disk. If NetBSD boots correctly from the hard disk, there is probably a Master Boot Record problem. You can install the boot manager or modify its configuration with the fdisk -B command. See Section 22.1, “Installing the boot manager” for a detailed description.
If you or the installation software haven't done any configuration
of /etc/rc.conf
(sysinst normally will), the system will
drop you into single user mode and show the message
/etc/rc.conf is not configured. Multiuser boot aborted
When the system asks you to choose a shell, simply press
RETURN to get to a /bin/sh prompt. If you are
asked for a terminal type, respond with vt220
(or whatever is appropriate for your terminal type) and press RETURN.
You may need to type one of the following commands to get your delete
key to work properly, depending on your keyboard:
#stty erase '^h'#stty erase '^?'
At this point, you need to configure at least one file in the
/etc directory. However, the root file system
(/) is mounted read-only, so you will first need to
make it writable with:
#/sbin/mount -u -w /
Next, take a look at the /etc/rc.conf file.
Modify it to your tastes, making sure that you set
“rc_configured=YES ” so that you don't end
up in this position again. Default values for the various programs can be
found in /etc/defaults/rc.conf.
More complete documentation can be found in rc.conf(5).
When you have finished, type exit at the prompt to leave the single-user shell and continue with the multi-user boot.
If you have never used a Unix(-like) operating system before, your best friend is now the man command, which displays a manual page. The NetBSD manual pages are among the best and most detailed you can find, although they are very technical.
A good manual to read after booting a new NetBSD system is afterboot(8). It contains information about various necessary and useful configuration settings.
man name shows the man page of the
“name”
command and man -k name shows a list of man pages
dealing with “name” (you can also use the
apropos command).
To learn the basics of the man command, type:
#man man
Manual pages contain not only information about commands but also descriptions of some NetBSD features and structures. For example, take a look at the hier(7) man page, which describes in detail the layout of the filesystem used by NetBSD.
#man hier
Other similar pages are release(7) and pkgsrc(7).
#man 8 intro
Manual pages are divided in several sections, depending on what they document:
general commands (tools and utilities), see intro(1)
system calls and error numbers, see intro(2)
C libraries, see intro(3)
special files and hardware support, see intro(4)
file formats, see intro(5)
games, see intro(6)
miscellaneous information pages, see intro(7)
system maintenance and operation commands, see intro(8)
kernel internals, see intro(9)
A subject may appear in more than one section of the manual; to view a specific page, supply the section number as an argument to the man command. For example, time appears in section 1 (the time user command) and in section 3 (the time function of the C library). To see the man page for the time C function, write:
#man 3 time
To see all the available pages:
#man -w time#man -a time
Other than a shell, a text editor is the most essential tool for NetBSD system administration.
There are two provided in the base system
ed(1), a line orientated text editor. ed is a very simplistic text editor. It has a command mode (active when first started) and an input mode. Its primary advantage is that it will work even without a correct terminal type set. In an emergency, ed is worth knowing, but note that vi(1) is available in
/rescue, which brings us to...vi(1), a screen orientated text editor. vi is the only screen editor available in the base install, and requires a valid terminal type to run. Refer to Chapter 6, Editing to learn more about NetBSD's default editor.
Advice
Before you continue you should know or learn how to open, edit and save files within vi. Make sure to read Chapter 6, Editing.
For the first login you will use the root
user, which is the only user defined at the end of the
installation.
At the password prompt type the password for root that you
set during the installation.
If you didn't set a password, just press Enter.
NetBSD/i386 (Amnesiac) (ttyE0)login:rootpassword:We recommend creating a non-root account and using su(1) for root access.#
If you did not set a password for root
during the installation, you should use the
/usr/bin/passwd command to do so now.
#/usr/bin/passwdChanging local password for root. New password: Retype new password:
Passwords are not displayed on the screen while you type.
Choose a password that has numbers, digits, and special characters (not space) as well as from the upper and lower case alphabet. Do not choose any word in any language. It is common for an intruder to use dictionary attacks.
For security reasons, it is bad practice to login as root during
regular use and maintenance of the system. Instead, administrators are
encouraged to add a regular user, add the user to the
wheel group, then use the su(1) command when
root privileges are required. NetBSD offers the useradd(8) utility
to create user accounts. For example, to create a new user:
#useradd -m joe
The defaults for the useradd command can be changed; see the useradd(8) man page.
User accounts that can su to root are required to be in the "wheel" group. This can be done when the account is created by specifying a secondary group:
#useradd -m -G wheel joe
As an alternative, the usermod(8) command can be used to add a user to an existing group:
#usermod -G wheel joe
In case you just created a user but forgot to set a password, you can still do that later using the passwd(1) command.
#passwd joe
Note
You can edit /etc/group directly to add
users to groups, but do not edit
the /etc/passwd directly; use vipw(8).
Shadow passwords are enabled by default. What this means is that
all the passwords in /etc/passwd
are simply “*”; the encrypted passwords are stored in
a file that can only be read by root,
/etc/master.passwd.
When you start vipw(8) to edit the password file, the program
opens a copy of /etc/master.passwd; when you exit,
vipw checks the validity of the copy,
creates a new /etc/passwd and installs the
new /etc/master.passwd file.
Finally, vipw launches
pwd_mkdb(8), which creates the files
/etc/pwd.db and
/etc/spwd.db, two databases which are equivalent to
/etc/passwd and
/etc/master.passwd but faster to process.
It is very important to always use
vipw and the other tools for account
administration (chfn(1), chsh(1),
chpass(1), passwd(1)) and to
never directly modify
/etc/master.passwd or
/etc/passwd.
If you do not have a US layout keyboard, you will probably want to change keymaps. For example, to use an italian keyboard, enter the following command:
#wsconsctl -k -w encoding=itencoding -> it
To save the keyboard layout permanently, add the following line to the
/etc/wscons.conf file:
encoding itSee Section 8.1.2.1, “Keyboard mappings” for a list of available keymaps.
NetBSD, like all Unix systems, uses a system clock based on
UTC (Coordinated Universal Time) and this is what you should set your
system clock to.
If you want to keep the system clock set to the local time
(because, for example, you have a dual boot system with Windows
installed), you must notify NetBSD, adding
rtclocaltime=YES
to /etc/rc.conf:
#echo rtclocaltime=YES >> /etc/rc.conf#service rtclocaltime restart
Note
Alternatively, it is possible to configure Windows 7 and beyond to cope with the RTC being UTC. As alluded to in this Microsoft Knowledge Base article, the way to do this is to add a DWORD registry key named RealTimeIsUniversal, with a value of 1, to HKEY_LOCAL_MACHINE\System\CurrentControlSet\Control\TimeZoneInformation.
The number of minutes west of GMT is calculated
automatically and is set in the kern.rtc_offset
sysctl variable.
To display the current setting of the
kern.rtc_offset variable:
#sysctl kern.rtc_offsetkern.rtc_offset = -60
This automatic configuration only works if you have set the proper
time zone with a symbolic link to /etc/localtime.
Normally this is done as part of the install procedure, but if for some
reason it wasn't, you can set it by creating a symbolic link from a
file in the /usr/share/zoneinfo directory to
/etc/localtime.
The following example sets the time zone to Eastern Europe Summer Time:
#ln -fs /usr/share/zoneinfo/Europe/Helsinki /etc/localtime
5.10. Secure Shell (ssh(1))
By default, all services are disabled in a fresh NetBSD
installation, and ssh(1) is no exception.
You may wish to enable it so you can log in to your system remotely.
Set sshd=YES in
/etc/rc.conf and then start the
server with the command
#service sshd start
The first time the server is started, it will generate a new
keypair, which will be stored inside the directory
/etc/ssh.
NetBSD uses /etc/rc.conf to determine what
will be executed when the system boots. Understanding this file is
important. The rc.conf(5) manual page contains a
detailed description of all available options.
The /etc/defaults/rc.conf file
contains the default values for most settings. To override a default
value, the new value must be put into /etc/rc.conf.
The definitions there override the ones in
/etc/defaults/rc.conf (which you should leave
unchanged).
#man rc.conf
The first modifications are:
Set “
rc_configured=YES” (this modification should already have been done by the installation software.)Set “
dhcpcd=YES” to configure your system's network using DHCP.Define a hostname for your machine (use a fully qualified hostname, i.e., one including domain). If you have a standalone machine you can use any name (for example,
vigor3.your.domain). If your machine is connected to a network, you should supply the correct name.If your machine is connected to a local network or the Internet through a router, set the defaultroute variable to the IP address of your router (sometimes called a default gateway). For example, “
defaultroute=192.168.1.1”.
To resolve the names and IP addresses of remote hosts, the system
needs access to a (remote or local) DNS nameserver.
Tell the system which nameserver(s) to use by adding the IP address of one
or more nameservers to the /etc/resolv.conf file,
using the following as an example:
nameserver 145.253.2.75
To set the names of local hosts that are not available through DNS,
edit the /etc/hosts file, which has the form:
IP-addresshostnamehost
For example:
192.168.1.3vigor3.your.domainvigor3
New users are often surprised by the fact that although the installation program recognized and mounted their CD-ROM perfectly, the installed system seems to have “forgotten” how to use the CD-ROM. There is no special magic for using a CD-ROM; you can mount it like any other file system. All you need to know is the device name and some options to the mount(8) command. You can find the device name with the aforementioned dmesg(8) command. For example, if dmesg displays:
#dmesg | grep ^cdcd0 at atapibus0 drive 1: <ASUS CD-S400/A, , V2.1H> type 5 cdrom removable
the device name is cd0, and you can mount the
CD-ROM with the following commands:
#mkdir /cdrom#mount -t cd9660 -o ro /dev/cd0a /cdrom
To make things easier, you can add a line to the
/etc/fstab file:
/dev/cd0a /cdrom cd9660 ro,noauto 0 0
Without the need to reboot, you can now mount the CD-ROM with:
#mount /cdrom
When the CD-ROM is mounted you can't eject it manually; you will have to unmount it before you can do that:
#umount /cdrom
There is also a software command which unmounts the CD-ROM and ejects it:
#eject /dev/cd0a
To mount a floppy you must know the name of the floppy device and the file system type of the floppy. Read the fdc(4) manpage for more information about device naming, as this will differ depending on the exact size and kind of your floppy disk. For example, to read and write a floppy in MS-DOS format you use the following command:
#mount -t msdos /dev/fd0a /mnt
Instead of /mnt, you can use another
directory of your choice; you could, for example, create a
/floppy directory like you did for the CD-ROM.
If you do a lot of work with MS-DOS floppies, you will want to
install the mtools package, which enables you to
access a MS-DOS floppy (or hard disk partition) without the need
to mount it. It is very handy for quickly copying a file to or from a
floppy:
#mcopy foo bar a:#mcopy a:baz.txt baz#mcopy a:\*.jpg .
If you wish to install any of the software freely available for UNIX-like systems you are strongly advised to first check the NetBSD package system, pkgsrc. pkgsrc automatically handles any changes necessary to make the software run on NetBSD. This includes the retrieval and installation of any other packages on which the software may depend.
See the list of available packages
-
Precompiled binaries are available on the NetBSD FTP server for most ports. To install them the
PKG_PATHvariable needs to be adjusted in the following way (under the sh(1) shell):#PKG_PATH="https://cdn.NetBSD.org/pub/pkgsrc/packages/NetBSD/$(uname -p)/$(uname -r | cut -d_ -f1)/All"#exportPKG_PATHApplications can now be installed by the superuser
rootwith the pkg_add command:#pkg_add -v perl#pkg_add -v apache#pkg_add -v firefoxThe above commands will install the Perl programming language, Apache web server, and the Firefox web browser as well as all the packages they depend on.
It is recommended you install and use pkgin for most non-trivial binary package management tasks, and managing upgrades. pkgin can be installed from the post-installation configuration menu in sysinst, or afterwards using pkg_add on a live system:
#pkg_add -v pkginIt maintains a local database of packages that are on the remote server, you can fetch the database with:
#pkgin updateIts usage is oriented on the package tools you have with other operating systems. To search the package database for a word `stat`, use
#pkgin search WORDTo install a package (in this case `fscd`), just type
#pkgin install fluxboxTo upgrade installed packages:
#pkgin upgradeYou should read the manpage to know about more actions you can do with pkgin.
All details about package management can be found in The pkgsrc guide
On many UNIX-like systems the directory structure under
/usr/local is reserved for applications and
files which are independent of the system's software management.
This convention is the reason why most software developers
expect their software to be installed under
/usr/local. NetBSD has no
/usr/local directory, but it can be
created manually if needed. NetBSD does not care about anything
installed under /usr/local, so this task is left to
you as the system administrator.
By the time that you have installed your system, it is quite likely that bugs in the release have been found. All significant and easily fixed problems will be reported at http://www.NetBSD.org/support/security/. It is recommended that you check this page regularly.
Use one of the following two shutdown commands to halt or reboot the system:
#shutdown -h now#shutdown -r now
Two other commands to perform the same tasks are:
#halt#reboot
halt, reboot and shutdown are not synonyms: the latter is more sophisticated. On a multiuser system you should really use shutdown, which allows you to schedule a shutdown time and notify users. It will also take care to stop processes properly. For more information, see the shutdown(8), halt(8) and reboot(8) manpages.
Table of Contents
It is not like the vi editor needs introducing to seasoned UNIX users. The vi editor, originally developed by Bill Joy of Sun Microsystems, is an endlessly extensible, easy to use light ASCII editor and the bane of the newbie existence. This section will introduce the vi editor to the newbie and perhaps toss in a few ideas for the seasoned user as well.
The first half of this section will overview editing, saving, yanking/putting and navigating a file within a vi session. The second half will be a step by step sample vi session to help get started.
This is intended as a primer for using the vi editor, it is not by any means a thorough guide. It is meant to get the first time user up and using vi with enough skills to make changes to and create files.
Using the vi editor really is not much different than any other terminal based software with one exception, it does not use a tab type (or curses if you will) style interface, although many versions of vi do use curses it does not give the same look and feel of the typical curses based interface. Instead it works in two modes, command and edit. While this may seem strange, it is not much different than windows based editing if you think about it. Take this as an example, if you are using say gedit and you take the mouse, highlight some text, select cut and then paste, the whole time you are using the mouse you are not editing (even though you can). In vi, the same action is done by simply deleting the whole line with dd in command mode, moving to the line you wish to place it below and hitting p in command mode. One could almost say the analogy is “mouse mode vs. command mode” (although they are not exactly identical, conceptually the idea is similar).
To start up a vi session, one simply begins the way they might with any terminal based software:
$vifilename
One important note to remember here is that when a file is edited, it is loaded into a memory buffer. The rest of the text will make reference to the buffer and file in their proper context. A file only changes when the user has committed changes with one of the write commands.
The vi editor sports a range of options one can provide at start up, for the time being we will just look at the default startup. When invoked as shown above, the editor's default startup mode is command mode, so in essence you cannot commence to typing into the buffer. Instead you must switch out out of command mode to enter text. The following text describes edit start modes:
a Append after cursor.
A Append to end of line.
C Change the rest of current line.
cw Change the current word.
i Insert before cursor.
I Insert before first non blank line.
o Open a line below for insert
O Open a line above for insert.
Of course knowing the edit commands does not do much good if you can't switch back to command mode and save a file, to switch back simply hit the ESC key. To enter certain commands, the colon must be used. Write commands are one such set of commands. To do this, simply enter :.
Hitting the colon then will put the user at the colon (or command if you will) prompt at the bottom left corner of the screen. Now let us look at the save commands:
:w Write the buffer to file.
:wq Write the buffer to file and quit.
What good is an editor if you cannot manipulate blocks of text? Of course vi supports this feature as well and as with most of the vi commands it somewhat intuitive. To yank a line but not delete it, simply enter yy or Y in command mode and the current line will be copied into a buffer. To put the line somewhere, navigate to the line above where the line is to be put and hit the p key for the “put” command. To move a line, simply delete the whole line with the dd command, navigate and put.
Most vi primers or tutorials start off with navigation, however, not unlike most editors in order to navigate a file there must be something to navigate to and from (hence why this column sort of went in reverse). Depending on your flavor of vi (or if it even is vi and not say elvis, nvi or vim) you can navigate in both edit and command mode.
For the beginner I feel that switching to command mode and then navigating is a bit safer until one has practiced for awhile. The navigation keys for terminals that are not recognized or do not support the use of arrow keys are the following:
k Moves the cursor up one line.
j Moves the cursor down one line.
l Moves the cursor right one character.
h Moves the cursor left one character.
If the terminal is recognized and supports them, the arrow keys can be used to navigate the buffer in command mode.
In addition to simple “one spot navigation” vi supports jumping to a line by simply typing in the line number at the colon prompt. For example, if you wanted to jump to line 223 the keystrokes from editor mode would look like so:
ESC
:223
The vi editor supports searching using regular expression syntax, however, it is slightly different to invoke from command mode. One simply hits the / key in command mode and enters what they are searching for, as an example let us say I am searching for the expression foo:
/foo
That is it, to illustrate a slightly different expression, let us say I am looking for foo bar:
/foo bar
Searching and scrolling are not the only ways to navigate a vi buffer. Following is a list of succinct navigation commands available for vi:
0 Move to beginning of line.
$ Move to end of line.
b Back up one word.
w Move forward one word.
G Move to the bottom of the buffer.
H Move to the top line on the screen.
L Move to the last line on the screen.
M Move the cursor to the middle of the screen.
N Scan for next search match but opposite direction.
n Scan for next search match in the same direction.
Now that we have covered the basics, let us run a sample session using a couple of the items discussed so far. First, we open an empty file into the buffer from the command line like so:
#vi foo.txt
Next we switch to edit mode and enter two lines separated by an empty line, remember our buffer is empty so we hit the i key to insert before cursor and enter some text:
This is some text

there we skipped a line
~
~
~
~
Now hit the ESC key to switch back into command mode.
Now that we are in command mode, let us save the file. First, hit the : key, the cursor should be sitting in the lower left corner right after a prompt. At the : prompt enter w and hit the ENTER or RETURN key. The file has just been saved. There should have been a message to that effect, some vi editors will also tell you the name, how many lines and the size of the file as well.
It is time to navigate, the cursor should be sitting wherever it was when the file was saved. Try using the arrow keys to move around a bit. If they do not work (or you are just plain curious) try out the hjkl keys to see how they work.
Finally, let us do two more things, first, navigate up to the first line and then to the first character. Try out some of the other command mode navigation keys on that line, hit the following keys a couple of times:
$
0
$
0
The cursor should hop to the end of line, back to the beginning and then to the end again.
Next, search for an expression by hitting the / key and an expression like so:
/we
The cursor should jump to the first occurrence of we.
Now save the file and exit using write and quit:
:wq
The standard editor supplied with NetBSD is, needless to say, vi, the most loved and hated editor in the world. If you don't use vi, skip this section, otherwise read it before installing other versions of vi. NetBSD's vi (nvi) was written by Keith Bostic of UCB to have a freely redistributable version of this editor and has many powerful extensions worth learning while being still very compatible with the original vi. Nvi has become the standard version of vi for BSD.
Amongst the most interesting extensions are:
Extended regular expressions (egrep style), enabled with option
extended.Tag stacks.
Infinite undo (to undo, press u; to continue undoing, press .).
Incremental search, enabled with the option
searchincr.Left-right scrolling of lines, enabled with the option
leftright; the number of columns to scroll is defined by thesidescrolloption.Command line history editing, enabled with the option
cedit.Filename completion, enabled by the
filecoption.Backgrounded screens and displays.
Split screen editing.
The following example shows a .exrc file
with some extended options enabled.
set showmode ruler
set filec=^[
set cedit=^[
The first line enables the display of the cursor position (row and column) and of the current mode (Command, Insert, Append) on the status line. The second line (where ^[ is the ESC character) enables filename completion with the ESC character. The third line enables command line history editing (also with the ESC character.) For example, writing “:” and then pressing ESC opens a window with a list of the previous commands which can be edited and executed (pressing Enter on a command executes it.)
The misc installation set
(misc.tgz) contains a lot of useful
documentation on (n)vi and ex, and when installed it is available in
/usr/share/doc directory.
For example:
Edit: A tutorial -
/usr/share/doc/usd/edit/edit.{ps.gz,txt}Ex Reference Manual -
/usr/share/doc/reference/ref1/ex/reference.{ps.gz,txt}Vi man page - vi(1)
An Introduction to Display Editing with Vi by William Joy and Mark Horton -
/usr/share/doc/usd/vi/vitut.{ps.gz,txt}Vi/Ex Reference Manual by Keith Bostic -
/usr/share/doc/reference/ref1/vi/vi.{ps.gz,txt}Ex/Vi Quick Reference -
/usr/share/doc/usd/vi/summary.{ps.gz,txt}
If you have never used vi, An Introduction to Display Editing with Vi by William Joy and Mark Horton is a very good starting point.
If you want to learn more about vi and the nvi extensions you should read the Vi/Ex Reference Manual by Keith Bostic which documents all the editor's commands and options.
This topic is not directly related to NetBSD but it can be useful, for example, for examining the kernel sources.
When you examine a set of sources in a tree of directories and subdirectories you can simplify your work using the tag feature of vi. The method is the following:
-
cd to the base directory of the sources.
$cd/path -
Write the following commands:
$find . -name "*.[ch]" >filelist$catfilelist| xargs ctags -
Add the following line to
.exrcset tags=
/path/tags(substitute the correct path instead of
path.)
Table of Contents
NetBSD uses individual scripts for controlling services, similar to what System V does, but without runlevels. This chapter is an overview of the rc.d system and its configuration.
The system startup files reside in the /etc
directory. They are:
/etc/rc/etc/rc.conf/etc/rc.d/*/etc/rc.local/etc/rc.shutdown/etc/rc.subr/etc/defaults/*/etc/rc.conf.d/*
First, an overview of the control and support scripts (also documented in rc(8)).
After the kernel has initialized all devices at startup, it starts init(8), which in turn runs
/etc/rc./etc/rcsorts the scripts in/etc/rc.dusing rcorder(8) and then runs them in that order. See the rcorder(8) man page for details of how the order of rc.d scripts is determined./etc/rc.subrcontains common functions used by/etc/rcand various rc.d scripts.When shutting down the system with shutdown(8),
/etc/rc.shutdownis run, which runs the scripts in/etc/rc.din reverse order (as defined by rcorder(8)). Note that if you shut down the system using the halt(8) command, these scripts will not be run.
Additional scripts outside of the rc.d
directory:
/etc/rc.localis almost the last script called at boot up. This script can be edited by the administrator to start local daemons that don't fit the rc.d model.
rc.d scripts are controlled by a central configuration file,
/etc/rc.conf, which loads its default settings from
/etc/defaults/rc.conf. If you want to change a
default setting, do not edit /etc/defaults/rc.conf;
instead, apply the setting in /etc/rc.conf.
This will override the default.
It is a good idea to read the rc.conf(5) man page to learn about the services that are available to you.
The following example shows how to enable the SSH daemon, which is disabled by default:
#cd /etc; grep ssh defaults/rc.confsshd=NO sshd_flags=""#echo "sshd=YES" >> rc.conf
Now sshd(8) will be started automatically at system startup. The next section describes how to start and stop services at any time.
Last but not least, files can be created in the
/etc/rc.conf.d/ directory to override the behavior
of a given rc.d script without editing the script itself.
The actual scripts that control services are in
/etc/rc.d. These scripts are automatically
run at boot time, but they can be called manually if necessary,
either through the service(8) alias or directly.
The following example shows how to start the SSH daemon
that we enabled in the previous section:
#service sshd startStarting sshd.
Later, if you wish to stop the SSH daemon, run the following command:
#service sshd stopStopping sshd. Waiting for PIDS: 123.
The rc.d scripts take one of the following arguments:
start
stop
restart
status
Some scripts may support other arguments (e.g., “reload”), but every script will support at least the above commands.
As an example, after adding a new record to a named(8) database, the daemon can be told to reload its configuration files with the following command:
#service named reloadReloading named config files.
Note that all of the commands discussed above will only take action
if the particular service is enabled in
/etc/rc.conf. It is possible to bypass this
requirement by prepending “one” to the command, as in:
#service httpd onestartStarting httpd.
The above command will allow you to start the httpd(8) service one time. To stop a service that has been started in this manner, pass “onestop” to the script.
Several packages install rc.d scripts. By default package
rc.d scripts can be found in
/usr/pkg/share/examples/rc.d and need to be
manually copied to /etc/rc.d in order to
be used. Setting PKG_RCD_SCRIPTS=yes
environment variable prior installing packages enable automatic
copying rc.d scripts to /etc/rc.d.
The startup system of every Unix system determines, in one way
or another, the order in which services are started. On some Unix
systems this is done by numbering the files and/or putting them in
separate run level directories. Solaris relies on wildcards like
/etc/rc[23].d/S* being sorted numerically when
expanded. Some simply put all the commands that should be started
into a single monolithic script (this is the traditional BSD method,
and is what NetBSD did before the rc.d system). On modern NetBSD this
is done by the rc.d scripts and their contents. Please note that NetBSD
does not use multiple runlevels.
At the beginning of each rc.d script there is a series of commented out lines that have one of the following items in them:
REQUIRE
PROVIDE
BEFORE
KEYWORD
These describe the dependencies of that particular script and
allow rcorder to easily work either “up” or
“down” as the situation requires. As an example, here
is the ordering information contained in
/etc/rc.d/nfsd:
...
 PROVIDE: nfsd
 REQUIRE: rpcbind mountd
...
Here we can see that this script provides the “nfsd” service and that it requires “rpcbind” and “mountd” to be running first. The rcorder(8) utility is used at system startup time to read through all the rc.d scripts and determine the order in which they should be run.
Luke Mewburn, one of the principal designers of the rc.d system, gave a presentation on the system at USENIX 2001. It is available in PDF format.
Table of Contents
Wscons is NetBSD's platform-independent workstation console driver. It handles complete abstraction of keyboards and mice. This means that you can plug in several keyboards or mice and they will be multiplexed onto a single terminal, but also that it can multiplex several virtual terminals onto one physical terminal.
Wscons support is enabled by default on most architectures. This
can be done manually by adding wscons=YES to your
/etc/rc.conf. Then configure the desired number
of virtual consoles as described in Section 8.1.1.1, “Virtual consoles”
and start wscons by entering
service wscons start followed by
service ttys restart. You can now switch
virtual consoles by pressing Ctrl+Alt+Fn or
similar, depending on the platform.
Wscons comprises three subsystems: wsdisplay, wskbd and wsmouse. These subsystems handle abstraction for all display, keyboard and mouse devices respectively. The following sections discuss the configuration of wscons per subsystem.
This section will explain how to configure display and screen-related options.
The number of pre-allocated virtual console is controlled by the following kernel configuration option
options WSDISPLAY_DEFAULTSCREENS=4
Other consoles can be added by enabling the relevant lines in the
/etc/wscons.conf file: the comment mark (#) must
be removed from the lines beginning with screen x.
In the following example a fifth console is added to the four
pre-allocated ones:
# screens to create
#       idx     screen  emul
#screen 0       -       vt100
screen  1       -       vt100
screen  2       -       vt100
screen  3       -       vt100
screen  4       -       -
#screen 4       80x25bf vt100
#screen 5       80x50   vt100
The /etc/rc.d/wscons script transforms each of the non
commented lines in a call to the wsconscfg command:
the columns become the parameters of the call. The
idx column becomes the index
parameter, the screen column becomes the
-t type parameter (which defines the type of screen:
rows and columns, number of colors, ...) and the
emul column becomes the -e emul
parameter, which defines the emulation. For example:
screen 3 - vt100
becomes a call to:
wsconscfg -e vt100 3
Please note that it is possible to have a (harmless)
conflict between the consoles
pre-allocated by the kernel and the consoles allocated at boot time
through /etc/wscons.conf.
If during boot the system tries to allocate an already allocated
screen, the following message will be displayed:
wsconscfg: WSDISPLAYIO_ADDSCREEN: Device busy
The solution is to comment out the offending lines in
/etc/wscons.conf.
Note that while it is possible to delete a screen and add it with different settings, it is, technically speaking, not possible to actually modify the settings of a screen.
screen 0 cannot be deleted if used as system console.
This implies that the setting of screen 0 cannot be
changed in a running system, if used as system console.
The virtual console must also be active in
/etc/ttys, so that NetBSD runs the
getty(8) program to ask for login. For example:
console "/usr/libexec/getty Pc"         pc3     off secure
ttyE0   "/usr/libexec/getty Pc"         vt220   on secure
ttyE1   "/usr/libexec/getty Pc"         vt220   on secure
ttyE2   "/usr/libexec/getty Pc"         vt220   on secure
ttyE3   "/usr/libexec/getty Pc"         vt220   off secure
...
When starting up the X server, it will look for a virtual
console with no getty(8) program running, e.g. one console
should left as "off" in /etc/ttys. The
line
ttyE3 "/usr/libexec/getty Pc" vt220 off secure
of /etc/ttys is used by the X server
for this purpose. To use a screen different from number 4, a
parameter of the form vtn must be passed to
the X server, where n is the number of the
function key used to activate the screen for X.
For example, screen 7 could be enabled in
/etc/wscons.conf and X could be started with
vt8. If you use xdm you must
edit /etc/X11/xdm/Xservers. For
example:
:0 local /usr/X11R7/bin/X +kb dpms -bpp 16 dpms vt8
This error message usually occurs when wsconscfg tries
to add a screen which already exists. This occurs
if you have a screen 0 line in your
/etc/wscons.conf file, because the
kernel always allocates a screen 0 as the console device.
The error message is harmless in this case, and you can get
rid of it by deleting (or commenting out) the
screen 0 line.
This mode is activated in the
/etc/wscons.conf. The following line must be
uncommented:
font ibm - 8 ibm /usr/share/pcvt/fonts/vt220l.808
Then the following lines must be modified:
#screen 0       80x50   vt100
screen  1       80x50   vt100
screen  2       80x50   vt100
screen  3       80x50   vt100
screen  4       80x50   vt100
screen  5       80x50   vt100
screen  6       80x50   vt100
screen  7       80x50   vt100
This configuration enables eight screens, which can be accessed with
the key combination Ctrl-Alt-Fn (where
n varies from 1 to 8); the corresponding devices
are ttyE0..ttyE7. To enable them and get a login prompt,
/etc/ttys must be modified:
ttyE0   "/usr/libexec/getty Pc"         vt220   on secure
ttyE1   "/usr/libexec/getty Pc"         vt220   on secure
ttyE2   "/usr/libexec/getty Pc"         vt220   on secure
ttyE3   "/usr/libexec/getty Pc"         vt220   on secure
ttyE4   "/usr/libexec/getty Pc"         vt220   on secure
ttyE5   "/usr/libexec/getty Pc"         vt220   on secure
ttyE6   "/usr/libexec/getty Pc"         vt220   on secure
ttyE7   "/usr/libexec/getty Pc"         vt220   on secure
screen 0 as system console can be set to another
screen type at boot time on VGA displays. This
is a kernel configuration option. If a non-80x25 setting
is selected, it must be made sure that a usable font is
compiled into the kernel, which would be an 8x8 one
for 80x50.
There is a problem with many ATI graphics cards which don't implement the standard VGA font switching logics: These need another kernel option to make a nonstandard console font work.
An example set of kernel configuration options might be:
options VGA_CONSOLE_SCREENTYPE="\"80x50\""
options VGA_CONSOLE_ATI_BROKEN_FONTSEL
options FONT_VT220L8x8
On many architectures, there is only one type of screen mode: a graphical framebuffer mode. On machines with VGA graphics cards, there is a second mode: textmode. This is an optimized mode specially made for displaying text. Hence, this is the default console mode for GENERIC kernels on architectures where the graphics card is typically a VGA card (i386, amd64).
However, you can enable a framebuffer on machines with VGA cards that support the VESA BIOS extension (VBE).
VESA framebuffer mode is configured during boot(8)
using the vesa command.
You can enable scrolling back on wscons consoles by compiling
the WSDISPLAY_SCROLLSUPPORT option into your
kernel. Make sure you don't have option
VGA_RASTERCONSOLE enabled at the same time
though! See Chapter 34, Compiling the kernel for instructions on
building a kernel.
When you have a kernel with options
WSDISPLAY_SCROLLSUPPORT running, you can
scroll up on the console by pressing LEFT SHIFT plus PAGE
UP/DOWN. Please note that this may not work on your system
console (ttyE0)!
It is possible to change the foreground and background color of kernel messages by setting the following options in kernel config files:
options WS_KERNEL_FG=WSCOL_xxx
options WS_KERNEL_BG=WSCOL_xxx
The WSCOL_xxx color constants are defined in
src/sys/dev/wscons/wsdisplayvar.h.
You can easily customize many aspects of your display appearance: the colors used to print normal messages, the colors used to print kernel messages and the color used to draw a border around the screen.
All of these details can be changed either from kernel
options or through the wsconsctl(8) utility; the latter
may be preferable if you don't want to compile your own
kernel, as the default options in GENERIC
are suitable to get this tip working.
The following options can be set through wsconsctl(8):
border: The color of the screen border. Its respective kernel option isWSDISPLAY_BORDER_COLOR.msg.default.attrs: The attributes used to print normal console messages. Its respective kernel options areWS_DEFAULT_COLATTRandWS_DEFAULT_MONOATTR(the former is used in color displays, while the latter is used in monochrome displays).msg.default.bg: The background color used to print normal console messages. Its respective kernel option isWS_DEFAULT_BG.msg.default.fg: The foreground color used to print normal console messages. Its respective kernel option isWS_DEFAULT_FG.msg.kernel.attrs: The attributes used to print kernel messages and warnings. Its respective kernel options areWS_KERNEL_COLATTRandWS_KERNEL_MONOATTR(the former is used in color displays, while the latter is used in monochrome displays).msg.kernel.bg: The background color used to print kernel messages and warnings. Its respective kernel option isWS_KERNEL_BG.msg.kernel.fg: The foreground color used to print kernel messages and warnings. Its respective kernel option isWS_KERNEL_FG.
The values accepted as colors are: black, red, green, brown, blue, magenta, cyan and white. The attributes are a comma separated list of one or more flags, which can be: reverse, hilit, blink and/or underline.
For example, to emulate the look of one of those old Amstrad machines:
wsconsctl -d -w border=blue msg.default.bg=blue msg.default.fg=white msg.default.attrs=hilit
Or, to make your kernel messages appear red:
wsconsctl -d -w msg.kernel.fg=red
Note that, in older versions of NetBSD, only a subset of this functionality is available; more specifically, you can only change the kernel colors by changing kernel options, as explained above. Also note that not all drivers support these features, so you may not get correct results on all architectures.
NetBSD uses the terminfo database to
tell applications what the current terminal's capabilities are.
For example, some terminals don't support colors, some don't
support underlining (PC VGA terminals don't, for example) etc.
The TERM environment variable tells the terminfo
library the type of terminal. It then refers to its database
for the options.
The default setting for TERM can be
inspected by typing echo $TERM
on the terminal of interest. Usually this is something like
vt220. This terminal type doesn't support
colors. On a typical PC console with 25 lines, you can change
this value to wsvt25 instead, to get colors.
This is done in the C shell (csh) by entering:
setenv TERM wsvt25
In a Bourne-compatible shell (sh, ksh), you can enter:
export TERM=wsvt25
If this does not work for you, you can try the
ansi terminal type, which supports
ANSI color codes. However, other functionality may be
missing with this terminal type. You can have a look
at the file /usr/share/misc/terminfo
to see if you can find a useful match for your
console type.
There are several fonts in
/usr/share/wscons/fonts
that can be loaded as console fonts. This can be done with the
wsfontload(8) command, for example:
wsfontload -N ibm -h 8 -e ibm /usr/share/wscons/fonts/vt220l.808.
This command loads the IBM-encoded (-e ibm)
font in the file vt2201.808 which has a height
of eight pixels (-h 8). Name it ibm for later
reference (-N ibm).
To actually display the font on the console, use the command
wsconsctl -dw font=ibm.
If you want to edit a font, you can use the old pcvt
utils that are available in the
sysutils/pcvt-utils
package.
Wscons also allows setting the keymap to map the keys on various national keyboards to the right characters. E.g. to set the keymap for an Italian keymap, run:
#wsconsctl -k -w encoding=itencoding -> it
This setting will last until the next reboot.
To make it permanent, add a encoding line to
/etc/wscons.conf: it will be executed
automatically the next time you reboot.
#cp /etc/wscons.conf /etc/wscons.conf.orig#echo encoding it >>/etc/wscons.conf
Please be careful and type two > characters.
If you type only one >, you will overwrite
the file instead of adding a line. But that's why we always
make backup files before touching critical files!
A full list of keyboard mappings and variants can be found in wskbd(4).
You can change the compiled in kernel default by adding
options PCKBD_LAYOUT=KB_
where encoding is an uppercase entry
from the list above
(e.g.: encodingPCKBD_LAYOUT=KB_FR). Variants can be
bitwise or'd in
(e.g.: PCKBD_LAYOUT=KB_US|KB_SWAPCTRLCAPS).
Configuring the keyboard layout under X is described elsewhere.
If your favourite keymap is not supported, you can start
digging in src/sys/dev/wscons/wsksymdef.h
and src/sys/dev/pckbport/wskbdmap_mfii.c
to make your own. Be sure to send-pr a change-request PR with your work, so others can
make use of it!
You can test your keymap by using wsconsctl instead of directly hacking the keymaps into the keyboard mapping file. For example, to say keycode 51 without any modifiers should map to a comma, with shift it should map to a question mark, with alt it should map to a semicolon and with both alt and shift it should map to colon, issue the following command:
wsconsctl -w "map += keycode 51=comma question semicolon colon"
Keyboard repeat speed can be tuned using the
wsconsctl(8) utility.
There are two variables of interest:
repeat.del1, which specifies the delay before
character repetition starts, and repeat.deln,
which sets the delay between each character repetition (once
started).
Let's see an example, assuming you want to accelerate keyboard speed. You could do, from the command line:
wsconsctl -w repeat.del1=300
wsconsctl -w repeat.deln=40
Or, if you want this to happen automatically every time
you boot up the system, you could add the following lines to
/etc/wscons.conf:
setvar repeat.del1=300
setvar repeat.deln=40
The wsmouse device (part of wscons) does not directly support serial mice. The moused(8) daemon is provided to read serial mouse data, convert it into wsmouse events and inject them in wscons' event queue, so the mouse can be used through the abstraction layer provided by wsmouse.
A typical use can be: moused -p /dev/tty00.
This will try to determine the type of mouse connected to
the first serial port and start reading its data. The
moused(8) man page contains more examples.
It is possible to use the mouse on the wscons console to mark (cut) text with one mouse button, and insert (paste) it again with another button.
To do this, enable "wsmoused" in
/etc/rc.conf, and start it:
#echo wsmoused=yes >>/etc/rc.conf#service wsmoused start
After that you can use the mouse to mark text with the left
mouse button, and paste it with the right one. To tune the
behaviour of wsmoused(8) see its manpage, which also
describes the format of the wsmoused.conf(5) config file,
an example of which can be found in
/usr/share/examples/wsmoused.
Table of Contents
NetBSD uses the X Window System to provide a graphical interface.
Please note that the X Window System is a rather bare bones framework. It acts as a base for modern desktop environments like MATE, or Xfce, but they are not part of the X Window System. NetBSD ships with the X Window System, but it does not include these desktop environments; they must be added via pkgsrc.
When you start using X you'll find many new terms which you may find confusing at first. The basic elements are:
An X server running on top of the hardware. The X server provides a standard way to display graphics (including fonts for text display) and get mouse/keyboard/other input. On most NetBSD ports, the Xorg(1) display server is used. Other X servers included with NetBSD include Xnest(1), which runs an X server inside another X server as a window, and Xvfb(1), which runs an off-screen X server, and is typically used to provide a full remote-only desktop with
x11/x11vnc.X clients. These are the programs you directly interact with. They run on top of the X server. A web browser like Firefox is an example of an X client. X is network-transparent, which means that you can run X clients on one machine, and the X server (i.e., the display, with video hardware) on another machine. The X client picks a server to use as a display based on the
DISPLAYenvironment variable, typically:0for the first server, and:1for the second.A window manager running on top of the X server. The window manager is a special X client that is allowed to control the placement of windows. It can also “decorate” windows with standard “widgets” (usually these provide actions like window motion, resizing, iconifying, window killing, etc.). ctwm(1) is NetBSD's default window manager.
A desktop environment such as MATE, or Xfce. These are suites of integrated software designed to give you a well-defined range of software and a more or less common interface to each program. These typically include a window manager, file manager, web browser, email client, multimedia player, text editor, address book, help browser, etc. As you may have guessed, a desktop environment is not needed to use X, but many users will want to install one.
A compositor or compositing manager runs on the X server and redirects rendering to an off-screen buffer, typically using the GPU (Graphics Processing Unit) hardware for final rendering. It can provide additional eye-candy and often VSync (vertical sync). Some window managers, typically those included with large desktop environments, include their own compositing managers. xcompmgr and
x11/picomare external compositing managers.
The X Window System is included with NetBSD as separate distribution sets, see Section 3.10, “Installation type”. It can be added to an installed system with sysinst(8).
On NetBSD, X11 lives under the filesystem hierarchy
/usr/X11R7. Therefore, to use X,
/usr/X11R7/bin must be in your shell's
PATH. See ~/.profile.
In most cases, you will be able to start using X without any configuration at all, and startx will work just fine.
In rare cases, however, configuration of the X
server is required. This configuration file is located at
/etc/X11/xorg.conf. The structure of the
configuration file is described formally in xorg.conf(5).
To generate an initial configuration file for your X server, run the command
#X -configure
This command should create a configuration file and place it in your home directory. To test the generated configuration file, run, e.g.,
#X -config ~/xorg.conf.new
If this succeeds, you should see a crosshatched background and a cursor in the shape of an X. Try moving the cursor around to verify that the mouse is functional. You can then switch to another virtual terminal (Ctrl-Alt-F#) or log in remotely and kill the X process.
If the above test was successful, move the file into place
as /etc/X11/xorg.conf and you are ready to go.
Even if you have already configured your keyboard for wscons (see Section 8.1, “wscons”), you need to configure it for X as well, at least if you want to use a non-US layout.
An easy solution is to use setxkbmap(1) .
Here is an example that shows how to use a Hebrew keyboard, with Ctrl-Alt used to switch layouts, and with the position of the Escape and Caps Lock keys swapped as an additional option:
setxkbmap -option grp:alt_shift_toggle us,il \
 -option caps:swapescape -option terminate:ctrl_alt_bksp
If you wish to change the repeat rate of your keyboard, you can set it with the xset(1) command, which takes two arguments: delay and rate, respectively. The following example sets the initial delay to 200 milliseconds and the repeat rate to 30 per second:
$xset r 200 30
You can also run this command in your .xinitrc
or .xsession file.
See below (Section 9.6, “Customizing X”) for more
information.
If X does not run at the resolution you think it should, first run xrandr and see if the resolution you want is listed. If your preferred resolution is listed in that command's output, you can change resolutions with, e.g.,
$xrandr -s 1680x1050
xrandr can also be used to enable output to hot-plugged monitors.
Managing outputs can be done graphically with the
pkgsrc package x11/arandr.
You can start X with the following command:
$startx
If your basic X server configuration is correct, you are left in the X environment with the default window manager (ctwm). If you want a more advanced window manager or desktop environment, many are available in pkgsrc. See Section 9.7, “Other window managers or desktop environments” for information about adding and changing window managers.
One of the first things you will want to do is to change the
programs that run when X is first started. The easiest way to do this
is to copy the default .xinitrc file to your home
directory and modify it, or create a simple new one from scratch.
For example:
$cp /etc/X11/xinit/xinitrc ~/.xinitrc$chmod u+w ~/.xinitrc$vi ~/.xinitrc
If you use xdm(1), ~/.xsession is used
in place of ~/.xinitrc.
The following example shows how to start the window manager
(ctwm) and open an instance of the
xterm and xterm
programs. The screen background color is set to “bisque4”,
which is defined in /usr/X11R7/lib/X11/rgb.txt.
...
# start some programs - a basic clcok
xclock -geometry 50x50-1-1 &
# change the color of the "root window" ("desktop background")
xsetroot -solid bisque4 &
# spawn a terminal
uxterm -geometry 80x34-1+1 -bg OldLace &
exec ctwm -W   # no '&' here
With this type of setup, to quit X you must exit the window manager, which is usually done by selecting "exit" from its menu.
The above example is very simple, but illustrates the basics
of controlling the clients that are run when X is started. You can
run any number of commands from your .xinitrc,
including basic X configuration commands like
xset b off to turn off the bell.
If you don't like ctwm, which is a very
simple window manager, you can install another window manager or
a desktop environment from pkgsrc.
The following example uses the Openbox window manager, but there are
many others available in pkgsrc/wm.
Openbox can be installed via binary packages or compiled with pkgsrc. As always, assuming a properly set PKG_PATH, the binary package method is:
#pkgin in openbox
To build it with pkgsrc, run:
#cd /usr/pkgsrc/wm/openbox#make install
Openbox is now installed; to start it you must modify your
.xinitrc file:
substitute the line which calls ctwm with
a line which calls openbox.
For example:
# start some useful programs
xclock -geometry 50x50-1-1 &
# start window manager:
exec openbox   # no '&' here
The startx command will start the X11 session
with Openbox. As configured in the example .xinitrc
file above, choosing “Log Out” from Openbox's
menu will end the X11 session.
Installing a desktop environment is almost as easy. The following example shows how to use the Xfce desktop environment.
#pkgin in xfce4
Depending on your requirements, you may wish to enable dbus as a system-wide service. The following example demonstates how. (If you don't enable dbus to run as a system-wide service, startxfce4 will start dbus under your user account during initialization.)
#cp /usr/pkg/share/examples/rc.d/dbus /etc/rc.d#echo dbus=YES >> /etc/rc.conf#service dbus start
If you wish to be able to control your system's power state from within the desktop, the account you intend to run X under must also be a member of the “operator” group (see Section 5.6, “Adding users”).
After running the above commands, edit your
.xinitrc as above and change
“openbox” (or “ctwm”) to
“startxfce4”. The next time you run
startx the Xfce desktop environment will be
started.
If you always use X and the first thing you do after you log in is run startx, you can set up a graphical login to do this automatically. It is very easy:
-
Create the
.xsessionfile in your home directory. This file is similar to.xinitrcand can, in fact, be a link to it.$ln -s .xinitrc ~/.xsession -
Modify
/etc/rc.conf, adding the following line:xdm=YES # x11 display manager
-
Start xdm(1) (or reboot your system, as this will be done automatically from now on):
#service xdm start
The configuration files for xdm
are in the /etc/X11/xdm
directory. The Xservers file specifies the
virtual console that X is started on. It defaults to
“vt05”, which is the console you reach via
“Ctrl+Alt+F5”. If you want to use a different virtual
console, change vt05 as desired. In order to avoid keyboard contention
between getty and xdm, be sure to start xdm on a virtual terminal
where getty is disabled. For example, if in
Xservers you have:
:0 local /usr/X11R7/bin/X :0 vt04
then in /etc/ttys you should have
ttyE3 "/usr/libexec/getty Pc" wsvt25 off secure
(Please note that vt04 corresponds to ttyE3; in
/etc/X11/xdm/Xservers, numbering starts at 1,
but in /etc/ttys, numbering starts at 0.)
If you are using xdm to start various
modern desktop environments, such as Xfce or MATE, you will need to
override its default permitted authorization mechanisms, by adding
the following to /etc/X11/xdm/xdm-config:
DisplayManager*authName: MIT-MAGIC-COOKIE-1
If you want to change the look of your xdm login screen, you can
modify the xdm configuration file.
For example, to change the background color you can add the
following line to the Xsetup_0 file:
xsetroot -solid SeaGreen
This is intended as a simple example of how to use multiple
X servers. For illustration purposes, we'll simply use
Xnest(1), which creates a new X server
:1 as a window on the existing server
:0:
$Xnest :1 &
It's then possible to run programs on the second server, or even a different window manager:
$DISPLAY=:1 uxterm &$DISPLAY=:1 ctwm &
Using X11 forwarding, programs
can run on a remote machine while displaying on the local
machine. This must typically be enabled in
/etc/ssh/sshd_config:
X11Forwarding yes
Log in with ssh(1) and run X programs the normal way:
$ssh -X remote.machine.example.com$uxterm &
On a completely headless system (with no monitor),
Xvfb(1) (X virtual framebuffer)
can be used in a similar manner. The fully virtual
screen of the X server can be exported over the network with
x11/x11vnc:
$Xvfb :1 &$DISPLAY=:1 ctwm &$x11vnc -display :1 -localhost -passwdfile /path/to/password &
Notice we use the -localhost option.
In theory this stops remote connections, however, in practice
we're using a SSH tunnel to forward the VNC port, adding an extra
layer of security. To connect to the headless machine:
$ssh -L 5900:hostname:5900 hostname$vncviewer localhost &
An X Window System Tutorial is a video series that attempts to explain basic concepts of the X Window System, including the role of the window manager.
X Window System User's Guide for X11R3 and R4 (PDF, Web) by Valerie Quercia and Tim O'Reilley is a classic book describing some X features that is now available to read for free online.
Table of Contents
audiocfg(1) can be used to list, test and set default audio devices.
All available audio devices can be listed with audiocfg list:
$audiocfg list0: [*] audio0 @ hdafg0: Realtek ALC292 playback: 2ch, 48000Hz record: 2ch, 48000Hz (PR) slinear_le 16/16, 2ch, { 32000, 44100, 48000, 88200, 96000, 192000 } (PR) slinear_le 20/32, 2ch, { 32000, 44100, 48000, 88200, 96000, 192000 } (PR) slinear_le 24/32, 2ch, { 32000, 44100, 48000, 88200, 96000, 192000 } ( ) ac3 16/16, 2ch, { 32000, 44100, 48000, 88200, 96000, 192000 } 1: [ ] audio1 @ uaudio0: USB audio playback: 2ch, 48000Hz record: 1ch, 48000Hz (P-) slinear_le 16/16, 2ch, { 48000, 44100 } (-R) slinear_le 16/16, 1ch, { 48000, 44100 }
The asterisk next to the Realtek ALC292 device
indicates it is currently the default device, so if any application writes
or reads to /dev/audio it will play or record from it.
It is also available as /dev/audio0,
and for mixer commands, /dev/mixer0.
The other device, USB audio, is a secondary
device that has been plugged in. Since it isn't the default, it is only
used if specifically selected in an application. It is available as
/dev/audio1, and for mixer commands,
/dev/mixer1.
The playback: and record: rows indicate the currently selected hardware audio format. Below this, the other supported formats are listed. Some devices set the playback and recording formats separately, while others set both at the same time. This is indicated by PR.
audiocfg test index
can be used to test playback, and plays a tone of 2 seconds for each
channel of the index device:
$audiocfg test 00: [*] audio0 @ hdafg0: Realtek ALC292 testing channel 0... done testing channel 1... done
If more than one audio device is available,
audiocfg default index
can be used to change the default one. This persists between reboots.
Please note that unlike other audiocfg(1) commands,
audiocfg default needs to be run as root.
In NetBSD, mixerctl(1) is used to adjust audio mixing, e.g. volume for recording and playback, and the sources and sinks currently in use.
Set the current playback volume:
$mixerctl -w outputs.master=50
List the available controls and settings:
$mixerctl -avoutputs.master=255,255 volume inputs.dac=255,255 volume outputs.auto=255,255 volume delta=13 outputs.headphones=0,0 volume delta=13 outputs.hdmi=255,255 volume delta=13 outputs.select=headphones [ auto headphones hdmi ]
Secondary devices can also be configured using mixerctl(1).
For example, if you've just plugged in an USB audio device, it
may have attached as /dev/audio1 and
/dev/mixer1 - this is visible using
audiocfg(1).
You would therefore configure it with
mixerctl -d /dev/mixer1.
Default mixer device settings can be applied on boot by setting
mixerctl=YES in /etc/rc.conf,
then providing arguments in /etc/mixerctl.conf.
For example, this /etc/mixerctl.conf
sets the playback volume and playback sink:
outputs.master=120,120
outputs.select=headphones
To automatically load and save the settings of mixer devices
on boot and shutdown, you can specify each device to save individually
in /etc/rc.conf:
mixerctl=YES
mixerctl_mixers="mixer0 mixer1"
NetBSD's pad(4) device allows feeding back data from an application using a virtual audio device. It can be used to redirect playback elsewhere, or record an application's playback.
/dev/padN devices produce a raw
stream of audio in a fixed format when opened for reading.
At the time of opening, they also create a
/dev/audioN device for an
application to use for output. You can observe the device creation
happening with dmesg(8).
The following example records the output of a game,
games/jumpnbump,
using the program
multimedia/ffmpeg4 for encoding the
data from the pad device to a file and writing it back to the real
audio device simultaneously.
Both are available from the NetBSD Packages Collection.
$ffmpeg4 -f s16le -ar 44100 -ac 2 -i /dev/pad0 \ -f wav output.wav -f oss /dev/audio$SDL_PATH_DSP=/dev/audio1 jumpnbump
NetBSD comes with a number of commands that allow users to play and record audio from scripts or the command-line interface.
10.4.1. audioplay(1)
With this command you can play audio files in simple formats like ULAW and WAVE. For more sophisticated needs you might want to install one of the many programs available in the package system which let you play audio files in different formats (e.g. MP3, etc.)
10.4.2. audiorecord(1)
Allows recording audio from a microphone or other input to the same simple or raw formats that audioplay(1) supports.
The following command records CD quality audio to a WAVE file from the default audio device. Recording will stop when the process is terminated:
$audiorecord -d /dev/audio -F wav -e linear -c 2 -P 16 -s 44100 recording.wav
Play the recording back (its format is inferred from the WAVE headers):
$audioplay recording.wav
10.4.3. audioctl(1)
audioctl(1) is used to
manually set some variables regarding audio I/O, like the
frequencies for playing and recording.
This is useful when writing raw samples to
/dev/sound without access to the full
audio(4) API, e.g. from a shell script, but otherwise is not
used during regular operation.
NetBSD includes built-in MIDI support through the machine-independent midi(4) system. This includes support for USB MIDI devices.
Access to MIDI devices is supported through raw access to the
/dev/rmidiX devices, or through the sequencer
device, /dev/music.
Digital Audio Workstations and other software with support for
NetBSD MIDI in the Packages Collection include
audio/lmms
and audio/fluidsynth.
Several MIDI programs are also included with NetBSD:
10.5.1. midirecord(1)
A program that allows recording MIDI events from a device to files in the Standard MIDI (SMF) format. It can also be used to test a device and verify it works as expected with the -D and -V options.
10.5.2. midiplay(1)
A program that allows playing Standard MIDI and RMID files to the MIDI sequencer device.
Since the 2010s, most x86 machines have hardware compliant with the Intel HD Audio specification. These use NetBSD's hdaudio(4) driver and require some special consideration.
For hdaudio(4) devices, the currently selected playback
ports (or, e.g. internal speaker and headphone jack on a laptop) are
controlled by selecting a DAC/ADC. The available DACs and ADCs can be
seen in /var/run/dmesg.boot:
hdafg0 at hdaudio1: Realtek ALC292
hdafg0: DAC00 2ch: Speaker [Built-In], HP Out [Jack]
hdafg0: ADC01 2ch: Mic In [Jack]
hdafg0: ADC02 2ch: Mic In [Built-In]
Therefore, to use only the built-in mic for recording:
$mixerctl -w record.source=ADC02
Use all available sources:
$mixerctl -w record.source=ADC01,ADC02
Some laptops may need outputs.dacsel
changed to only play audio from the headphone jack,
others have hardware speaker mute and there's no need for this.
Table of Contents
For power management, NetBSD supports sensor monitoring (including battery state, CPU temperature, and so on), CPU frequency adjustment, low-power mode for devices, hardware poweroff, and sleep (suspend-to-RAM) on some hardware.
Power management on NetBSD primarily takes the form of acpi(4) (Advanced Configuration and Power Interface) support, although sensors are also supported on many other types of non-ACPI hardware.
A NetBSD system with ACPI support can be physically powered off by running the poweroff(8) and reboot(8) commands, however, it is usually best to use shutdown(8) so the system shuts down with appropriate warning and has time to properly stop any running applications and services.
Shut the system down immediately:
#shutdown -p now
Reboot with a 10 minute warning to any users:
#shutdown -r +10
An ACPI system is always in one of any "sleep states":
- S0
fully running
- S1
power on suspend (CPU and hard disks are off)
- S2
similar to S3, usually not implemented
- S3
suspend-to-RAM ("sleep", most of the system is inactive to save power, but can quickly be brought back up)
- S4
suspend-to-disk ("hibernate", not currently supported on NetBSD)
- S5
powered off
The sleep state can be modified with sysctl(8), e.g. to suspend-to-RAM:
#sysctl -w hw.acpi.sleep.state=3
The way the system wakes up is dependent on the hardware, and may include pressing the power button or lifting the lid. If supported, the system can resume from a suspended state much quicker than a full reboot.
If you've tested this and verified it works as expected, you may wish to trigger it automatically through a powerd(8) event, such as closing the lid of a laptop.
If your machine does not support full ACPI suspend and resume, it may still be possible to suspend and resume individual devices to save power while they are inactive. This can be accomplished with drvctl(8).
For example, /var/run/dmesg.boot
reports our hardware has a SD card reader, rtsx0.
rtsx0 at pci1 dev 0 function 0: Realtek Semiconductor RTS5227 PCI-E Card Reader (rev. 0x01)
rtsx0: interrupting at msi4 vec 0
sdmmc0 at rtsx0
We can suspend it:
#drvctl -S rtsx0
And we can also resume it:
#drvctl -R rtsx0
If a specific device is failing to suspend or resume, this can also be used for debugging.
Many modern machines allow the CPU frequency to be dynamically adjusted. A higher frequency provides better performance, but increased battery usage and generates more heat. On NetBSD, CPU frequency can be adjusted at runtime with sysctl(8).
For example, this machine is currently running at 1400 MHz, but also supports a 600 MHz low-power mode:
$sysctl -a | grep freqmachdep.cpu.frequency.target = 1400 machdep.cpu.frequency.current = 1400 machdep.cpu.frequency.min = 600 machdep.cpu.frequency.max = 1400 machdep.cpu.frequency.available = 600 1400
We can enter the low power mode by setting the target frequency:
#sysctl -w machdep.cpu.frequency.target=600
Many modern hardware supports an "automatic adjustment" frequency,
usually this will be a reported frequency that ends in 1.
On systems without this functionality,
sysutils/estd can be installed from
pkgsrc to perform automatic adjustment depending on load in software,
although it will be less efficient than hardware scaling.
Some IEEE 802.11 (Wi-Fi) networking devices support a low power mode, which can be enabled with ifconfig(8):
#ifconfig iwm0 powersave
You may notice an increase in reported latency from ping(8) and a decrease in performance. However, it may improve your device's battery life, as the radios in such devices can consume a lot of energy. It can be disabled again with ifconfig:
#ifconfig iwm0 -powersave
The primary command-line frontend to NetBSD's sensor monitoring framework is envstat(8). Here is a typical example of envstat output:
$envstatCurrent CritMax WarnMax WarnMin CritMin Unit [acpiacad0] connected: FALSE [acpibat0] present: TRUE design voltage: 11.100 V voltage: 12.270 V design cap: 23.200 Wh last full cap: 16.940 Wh charge: 16.770 5.000% 1.181% Wh (99.00%) charge rate: N/A discharge rate: N/A charging: FALSE charge state: NORMAL [acpitz0] temperature: 48.000 128.000
acpiacad0 is the machine's AC adapter.
It is not currently connected.
acpibat0 is the machine's battery, currently 99%
full. At 5%, a warning will be printed to the console and an event
sent to powerd(8). At 1%, the system will shut down to prevent
data loss from loss of power.
A CPU temperature sensor is also detected, acpitz0.
It indicates that the CPU's current temperature is 48 degrees Celsius,
and the critical temperature is 128 degrees Celsius.
If the critical temperature is reached, the system will shut down
to prevent damage to hardware.
powerd(8) can be notified of changes in temperature.
powerd(8) is a daemon that allows the system to respond to power management events, such as the AC adapter being unplugged, battery state changing, a laptop's lid being closed, or a "sleep" button being pressed.
As with other services, powerd can be enabled by editing
/etc/rc.conf:
powerd=YES
And started with service(8):
#service powerd start
powerd works by executing a named sh(1) script from the
directory /etc/powerd/scripts whenever a power
event occurs.
We can use commands we learned in previous sections of this chapter
to our advantage in the scripts.
Example 11.1. /etc/powerd/scripts/lid_switch
#!/bin/sh -
#
# Generic script for lid switch events.
#
# Arguments passed by powerd(8):
#
#	device event

case "${2}" in
pressed)
	# Lock the X11 display to prevent tampering
	DISPLAY=:0 /usr/pkg/bin/xlock -mode blank &
	# Wait for 1 second
	sleep 1
	# Suspend
	/sbin/sysctl -w hw.acpi.sleep.state=3
	exit 0
	;;

released)
	exit 0
	;;

*)
	logger -p warning "${0}: unsupported event ${2} on device ${1}" >&1
	exit 1
esacExample 11.2. /etc/powerd/scripts/acadapter
#!/bin/sh -
#
# Generic script for acadapter events.
#
# Arguments passed by powerd(8):
#
#	device event

case "${2}" in
pressed)
	logger -p info "${0}: Full performance mode" >&1

	# Disable power saving mode on all network interfaces.
	for intf in $(/sbin/ifconfig -l); do
		/sbin/ifconfig $intf -powersave >/dev/null 2>&1
	done

	# Increase CPU frequency
	/sbin/sysctl -w machdep.cpu.frequency.target=2300

	exit 0
	;;

released)
	logger -p info "${0}: Power saving mode" >&1

	# Enable power saving mode on all network interfaces.
	for intf in $(/sbin/ifconfig -l); do
		/sbin/ifconfig $intf powersave >/dev/null 2>&1
	done

	# Reduce CPU frequency
	/sbin/sysctl -w machdep.cpu.frequency.target=1400

	exit 0
	;;

*)
	logger -p warning "${0}: unsupported event ${2} on device ${1}" >&1
	exit 1
	;;
esacTable of Contents
This chapter describes a simple configuration for printing,
using an HP Deskjet 690C printer connected to the first parallel port
and the lpd printing system that comes with NetBSD.
First, the system will be configured to print text documents, and
next the configuration will be extended to print PostScript
documents using the Ghostscript program
(print/ghostscript).
Please note that there are other, alternative printing systems
available from the
packages collection, like LPRng
(print/LPRng) and the
Common Unix Printing System (CUPS)
(print/cups)
which are not covered here.
After installation it is not yet possible to print, because the
lpd printer spooler daemon is not enabled.
To enable lpd, one line in the
/etc/rc.conf file must be changed from:
lpd=NO
to
lpd=YES
The change will come into effect at the next boot, but the daemon can be started manually now:
#service lpd start
To check if lpd is active, type the following command:
#service lpd status
If you don't see an entry for lpd in the output of the previous command, the daemon is not active.
The lpd system is configured via
/etc/printcap. Before configuring
/etc/printcap it is a good idea
to make a printer test, to check if the physical connection
between your computer and the printer is working.
The test sends out some data directly to the printer
device. Assuming you use a printer connected to the parallel
port, this is /dev/lpt0; if you use an USB
printer try /dev/ulpt0. Please check the
manpages of these devices (lpt(4), ulpt(4)) for more
information!
In our example we have a printer attached to the parallel port, so we run this:
#lptest 70 5 > /dev/lpt0
To see what the output should look like, try the same command without redirecting the output to the printer:
#lptest 70 5!"#$%&'()*+,-./0123456789:;<=>?@ABCDEFGHIJKLMNOPQRSTUVWXYZ[\]^_`abcdef "#$%&'()*+,-./0123456789:;<=>?@ABCDEFGHIJKLMNOPQRSTUVWXYZ[\]^_`abcdefg #$%&'()*+,-./0123456789:;<=>?@ABCDEFGHIJKLMNOPQRSTUVWXYZ[\]^_`abcdefgh $%&'()*+,-./0123456789:;<=>?@ABCDEFGHIJKLMNOPQRSTUVWXYZ[\]^_`abcdefghi %&'()*+,-./0123456789:;<=>?@ABCDEFGHIJKLMNOPQRSTUVWXYZ[\]^_`abcdefghij
A frequent problem is that the output on the printer is not correctly aligned in columns but has a “staircase” configuration. This usually means that the printer is configured to begin a new line at the left margin after receiving both a <CR> (carriage return, ASCII 13) character and a <LF> (line feed, ASCII 10) character. NetBSD only sends a <LF> character. You can fix this problem in two ways:
by changing the configuration of the printer
by using a simple printer filter (described later)
Note
In the previous example the lpd
spooler is not involved because the program output is sent
directly to the printer device (/dev/lpt0)
and is not spooled.
This section explains how to configure the example printer to print text documents.
The printer must have an entry in the
/etc/printcap file; the entry contains the
printer id (the name of the printer) and the printer
description. The lp id is the default
used by many programs. Here is an example entry:
Example 12.1. /etc/printcap
lp|local printer|HP DeskJet 690C:\
        :lp=/dev/lpa0:sd=/var/spool/lpd/lp:lf=/var/log/lpd-errs:\
        :sh:pl#66:pw#80:if=/usr/local/libexec/lpfilter:
The file format and options are described in detail in the printcap(5) manpage. Please note that an input filter has been specified (with the if option) which will take care of eliminating the staircase problem:
if=/usr/local/libexec/lpfilter
Printer driver and HP printers
Example 12.1, “/etc/printcap” uses the
lpa0 device (polled driver) for the
printer, instead of the lpd0 (interrupt
driven driver). Using interrupts there is a communication
problem with some printers, and the HP Deskjet 690C is one of
them: printing is very slow and one PostScript page can take
hours. The problem is solved using the
lpa driver. It is also possible to
compile a custom kernel where lpt is polled.
The printcap entry for the printer also specifies a spool directory, which must be created; this directory will be used by the lpd daemon to accumulate the data to be printed:
#cd /var/spool/lpd#mkdir lp#chown daemon:daemon lp#chmod 770 lp
The only missing part is the
lpfilter input filter, which must be written.
The only task performed by this filter is to configure the printer for
the elimination of the staircase problem before sending the text to be
printed.
The printer used in this example requires the following initialization
string:
“<ESC>&k2G”.
Example 12.2. /usr/local/libexec/lpfilter
#!/bin/sh
# Treat LF as CR+LF
printf "\033&k2G" && cat && exit 0
exit 2
After saving this script into the name you used in
/etc/printcap, you need to make sure it's
executable:
#chmod 755 /usr/local/libexec/lpfilter*
Note
There is another filter that can be used:
if=/usr/libexec/lpr/lpf:
This filter is much more complex than the one presented before.
It is written to process the output of nroff
and handles underline and overprinting, expands tab characters
and converts LF to CR + LF.
The source to this filter program can be found in
/usr/src/usr.sbin/lpr/filters/lpf.c.
After everything is in place now, the lptest command can be run again now, this time using the lpr command, which will first send the data to the lpd spooler, then runs the filter and sends the data off to the printer:
#lptest 70 5 | lpr -h
The lpr program prints text using the
spooler to send data to the printer; the -h
option turns off the printing of a banner page (not really
necessary, because of the sh option in
/etc/printcap). Users more familiar with
the System V printing system can also use the lp(1) command
that comes as an alternative to lpr(1).
Now that basic printing works, the functionality for printing PostScript files can be added. The simple printer used in this example does not support native printing of PostScript files; a program must be used which is capable of converting a PostScript document in a sequence of commands that the printer understands. The Ghostscript program, which can be found in packages collection, can be used to this purpose. This section explains how to configure lpd to use Ghostscript to print PostScript files on the HP Deskjet 690C.
A second id for the printer will be created in
/etc/printcap: this new id will use a different
input filter, which will call Ghostscript to perform the actual print
of the PostScript document.
Therefore, text documents will be printed on the
lp printer and PostScript documents on the
ps printer: both entries use the same physical
printer but have different printing filters.
The same result can be achieved using different configurations. For example, a single entry with only one filter could be used. For this, the filter should be able to automatically determine the format of the document being printed, and use the appropriate printing program. This approach is simpler but leads to a more complex filter; if you like it you should consider installing the magicfilter program from the packages collection: it does this and many other things automatically.
For our approach, the new /etc/printcap
file looks like this:
Example 12.3. /etc/printcap
lp|local printer|HP DeskJet 690C:\
        :lp=/dev/lpa0:sd=/var/spool/lpd/lp:lf=/var/log/lpd-errs:\
        :sh:pl#66:pw#80:if=/usr/local/libexec/lpfilter:

ps|Ghostscript driver:\
        :lp=/dev/lpa0:sd=/var/spool/lpd/ps:lf=/var/log/lpd-errs:\
        :mx#0:sh:if=/usr/local/libexec/lpfilter-ps:
Option mx#0 is very important for printing PostScript
files because it eliminates size restrictions on the input file;
PostScript documents tend to be very big.
The if option points to the new filter.
There is also a new spool directory.
The next steps are the creation of the new spool directory and of the filter program. The procedure for the spool directory is the same as above:
#cd /var/spool/lpd#mkdir ps#chown daemon:daemon ps#chmod 770 ps
The filter program for PostScript output is more complex than
the text base one: the file to be printed is fed to the
interpreter which converts it into a sequence of
commands in the printer's control language, and then sends that
off to the printer. We have achieved to
transform a cheap color printer in a device suitable for
PostScript output, by virtue of the NetBSD operating system and
some powerful freeware packages. The options used to configure
Ghostscript are described in the
Ghostscript documentation: cdj550 is the
device used to drive the HP printer.
Example 12.4. /usr/local/libexec/lpfilter-ps
#!/bin/sh
# Treat LF as CR+LF
printf "\033&k2G" || exit 2
# Print the postscript file
/usr/pkg/bin/gs -dSAFER -dBATCH -dQUIET -dNOPAUSE -q -sDEVICE=cdj550 \
-sOutputFile=- -sPAPERSIZE=a4 - && exit 0
exit 2
To summarize: two different printer names have been created on the system, which point to the same physical printer but use different options, different filters and different spool directories. Text files and PostScript files can be printed. To print PostScript files the Ghostscript package must be installed on the system.
This section lists some useful BSD commands for printer and print jobs administration. Besides the already mentioned lpr and lpd commands, we have:
- lpq
examine the printer job queue.
- lprm
delete jobs from the printer's queue.
- lpc
check the printing system, enable/disable printers and printer features.
It is possible to configure the printing system in order to
print on a printer connected to a remote host.
Let's say that, for example, you work on the wotan
host and you want to print on the printer connected to the
loge host.
The /etc/printcap file of loge is the one
of Example 12.3, “/etc/printcap”.
From wotan it will be possible to print Postscript files using
Ghostscript on loge.
The first step is to accept the print jobs submitted
from the wotan host to the loge host.
To accomplish this, a line with the wotan host name must be added
to the /etc/hosts.lpd file on loge:
#hostnameloge#cat /etc/hosts.lpdwotan
The format of this file is very simple: each line contains the
name of a host which is permitted to print on the local system.
By default the lpd daemon only listens on UNIX domain sockets
for local connections, it won't accept any network connects.
To ensure the daemon also accepts incoming network traffic, the
following will need to be added to
/etc/rc.conf:
lpd_flags=""
Next, the /etc/printcap file on wotan
must be configured in order to send print jobs to loge.
For example:
lp|line printer on loge:\
	:lp=:sd=/var/spool/lpd/lp:lf=/var/log/lp-errs:\
	:rm=loge:rp=lp

ps|Ghostscript driver on loge:\
	:lp=:sd=/var/spool/lpd/ps:lf=/var/log/lp-errs:\
	:mx#0:\
	:rm=loge:rp=ps
There are four main differences between this configuration and
the one of Example 12.3, “/etc/printcap”.
The definition of “lp” is empty.
The “rm” (remote machine) entry defines the name of the host to which the printer is connected.
The “rp” (remote printer) entry defines the name of the printer connected to the remote host.
It is not necessary to specify input filters because the definitions on the loge host will be used.
-
The spool directories must still be created locally on wotan:
#cd /var/spool/lpd#mkdir lp#chown daemon:daemon lp#chmod 770 lp#mkdir ps#chown daemon:daemon ps#chmod 770 ps
Now the print jobs for the “lp” and “ps” queues on wotan will be sent automatically to the printer connected to loge.
Table of Contents
- 13.1. Initializing and using USB flash drives
- 13.2. Initializing and using floppy disks
- 13.3. How to use a ZIP disk
- 13.4. Reading data CDs with NetBSD
- 13.5. Reading multi-session CDs with NetBSD
- 13.6. Allowing normal users to access CDs
- 13.7. Mounting an ISO image
- 13.8. Using video CDs with NetBSD
- 13.9. Using audio CDs with NetBSD
- 13.10. Creating an MP3 (MPEG layer 3) file from an audio CD
- 13.11. Using a CD-R writer with data CDs
- 13.12. Using a CD-R writer to create audio CDs
- 13.13. Creating an audio CD from MP3s
- 13.14. Copying an audio CD
- 13.15. Copying a data CD with two drives
- 13.16. Using CD-RW rewritables
- 13.17. DVD support
- 13.18. Creating ISO images from a CD
- 13.19. Getting volume information from CDs and ISO images
USB flash drives can be used to share data among machines.
After attaching it we can see via dmesg(8) that it is
recognised as sd0:
#dmesg[...] sd0 at scsibus0 target 0 lun 0: <Kingston, DataTraveler 3.0, > disk removable sd0: fabricating a geometry sd0: 14755 MB, 14755 cyl, 64 head, 32 sec, 512 bytes/sect x 30218842 sectors sd0: fabricating a geometry [...]
Warning
Please note that the following commands will erase all the previous contents on the USB flash drive!
To initialize it we can write zeros in the first 1MB of the USB flash drive:
#dd if=/dev/zero of=/dev/rsd0d bs=1m count=11+0 records in 1+0 records out 1048576 bytes transferred in 0.118 secs (8886237 bytes/sec)
Via fdisk(8) we can create a partition table. MS-DOS
partition and filesystem is supported by most operating systems
and devices that accept an USB disk, so let's update the
partition table (-u), creating an MS-DOS
partition and set the new partition as active
(-a):
#fdisk -au sd0fdisk: primary partition table invalid, no magic in sector 0 fdisk: Cannot determine the number of heads Disk: /dev/rsd0d NetBSD disklabel disk geometry: cylinders: 14755, heads: 64, sectors/track: 32 (2048 sectors/cylinder) total sectors: 30218842, bytes/sector: 512 BIOS disk geometry: cylinders: 1023, heads: 255, sectors/track: 63 (16065 sectors/cylinder) total sectors: 30218842 Partitions aligned to 16065 sector boundaries, offset 63 Do you want to change our idea of what BIOS thinks? [n]Partition table: 0: <UNUSED> 1: <UNUSED> 2: <UNUSED> 3: <UNUSED> Bootselector disabled. No active partition. Drive serial number: 0 (0x00000000) Which partition do you want to change?: [none]0The data for partition 0 is: <UNUSED> sysid: [0..255 default: 169]11start: [0..1881cyl default: 63, 0cyl, 0MB]size: [0..1881cyl default: 30218779, 1881cyl, 14755MB]bootmenu: [] (space to clear)Partition table: 0: Primary DOS with 32 bit FAT (sysid 11) start 63, size 30218779 (14755 MB, Cyls 0-1881/9/10) PBR is not bootable: All bytes are identical (0x00) 1: <UNUSED> 2: <UNUSED> 3: <UNUSED> Bootselector disabled. No active partition. Drive serial number: 0 (0x00000000) Which partition do you want to change?: [none]Do you want to change the active partition? [n]yChoosing 4 will make no partition active. active partition: [0..4 default: 4]0Are you happy with this choice? [n]yWe haven't written the MBR back to disk yet. This is your last chance. Partition table: 0: Primary DOS with 32 bit FAT (sysid 11) start 63, size 30218779 (14755 MB, Cyls 0-1881/9/10), Active PBR is not bootable: All bytes are identical (0x00) 1: <UNUSED> 2: <UNUSED> 3: <UNUSED> Bootselector disabled. First active partition: 0 Drive serial number: 0 (0x00000000) Should we write new partition table? [n]y
Then we can see via disklabel(8):
#disklabel sd0# /dev/rsd0d: type: SCSI disk: DataTraveler 3.0 label: fictitious flags: removable bytes/sector: 512 sectors/track: 32 tracks/cylinder: 64 sectors/cylinder: 2048 cylinders: 14755 total sectors: 30218842 rpm: 3600 interleave: 1 trackskew: 0 cylinderskew: 0 headswitch: 0 # microseconds track-to-track seek: 0 # microseconds drivedata: 0 5 partitions: # size offset fstype [fsize bsize cpg/sgs] d: 30218842 0 unused 0 0 # (Cyl. 0 - 14755*) e: 30218779 63 MSDOS # (Cyl. 0*- 14755*) disklabel: boot block size 0 disklabel: super block size 0
that an sd0e MSDOS partition is
present.
We can finally create an MS-DOS filesystem via newfs_msdos(8):
#newfs_msdos /dev/rsd0e/dev/rsd0e: 30189264 sectors in 1886829 FAT32 clusters (8192 bytes/cluster) MBR type: 11 bps=512 spc=16 res=32 nft=2 mid=0xf0 spt=32 hds=64 hid=0 bsec=30218779 bspf=14741 rdcl=2 infs=1 bkbs=2
It is ready to be used and mounted via mount_msdos(8).
PC-style floppy disks work mostly like other disk devices like hard disks, except that you need to low-level format them first. To use an common 1440 KB floppy in the first floppy drive, first (as root) format it:
# fdformat -f /dev/rfd0aThen create a single partition on the disk using disklabel(8):
# disklabel -rw /dev/rfd0a floppy3Creating a small filesystem optimized for space:
# newfs -m 0 -o space -i 16384 -c 80 /dev/rfd0aNow the floppy disk can be mounted like any other disk. Or if you already have a floppy disk with an MS-DOS filesystem on it that you just want to access from NetBSD, you can just do something like this:
# mount -t msdos /dev/fd0a /mntHowever, rather than using floppies like normal (bigger) disks, it is often more convenient to bypass the filesystem altogether and just splat an archive of files directly to the raw device. E.g.:
# tar cvfz /dev/rfd0a file1 file2 ...A variation of this can also be done with MS-DOS floppies using
the sysutils/mtools package which
has the benefit of not going through the kernel buffer cache
and thus not being exposed to the danger of the floppy being
removed while a filesystem is mounted on it.
-
See if your system has a ZIP drive:
#dmesg | grep -i zipsd0 at atapibus0 drive 1: <IOMEGA ZIP 100 ATAPI, , 14.A> type 0 direct removableSeems it has one, and it's recognized as sd0, just like any SCSI disk. The fact that the ZIP here is an ATAPI one doesn't matter - a SCSI ZIP will show up here, too. The ZIP is marked as "removable", which means you can eject it with:
#eject sd0 Insert ZIP disk
-
Check out what partitions are on the ZIP:
#disklabel sd0#/dev/rsd0d: type: ATAPI ... 8 partitions:#size offset fstype [fsize bsize cpg] d: 196608 0 unused 0 0 # (Cyl. 0 - 95) h: 196576 32 MSDOS # (Cyl. 0*- 95) disklabel: boot block size 0 disklabel: super block size 0- Partition d
is the whole disk, as usual on i386.
- Partition h
is what you want, and you can see it's a msdos filesystem even.
Hence, use /dev/sd0h to access the zip's partition.
-
Mount it:
#mount -t msdos /dev/sd0h /mnt -
Access your files:
#ls -la /mnttotal 40809 drwxr-xr-x 1 root wheel 16384 Dec 31 1979 . drwxr-xr-x 28 root wheel 1024 Aug 2 22:06 .. -rwxr-xr-x 1 root wheel 1474560 Feb 23 1999 boot1.fs -rwxr-xr-x 1 root wheel 1474560 Feb 23 1999 boot2.fs -rwxr-xr-x 1 root wheel 548864 Feb 23 1999 boot3.fs -rwxr-xr-x 1 root wheel 38271173 Feb 23 1999 netbsd19990223.tar.gz -
Unmount the ZIP:
#umount /mnt# -
Eject the ZIP:
#eject sd0#
Data CDs can contain anything from programs, sound files (MP3, wav), movies (MP3, QuickTime) to source code, text files, etc. Before accessing these files, a CD must be mounted on a directory, much like hard disks are. Just as hard disks can use different filesystems (ffs, lfs, ext2fs, ...), CDs have their own filesystem, "cd9660". The NetBSD cd9660 filesystem can handle filesystems without and with Rockridge and Joliet extensions.
CD devices are named /dev/cd0a for both SCSI and IDE (ATAPI).
With this information, we can start:
-
See if your system has some CD drive:
#dmesg | grep 'cd[0-9]*:'cd0 at atapibus0 drive 0: <CD-R/RW RW8040A, , 1.12> type 5 cdrom removable cd0: 32-bit data port cd0: drive supports PIO mode 4, DMA mode 0We have one drive here, "cd0". It is an IDE/ATAPI drive, as it is found on atapibus0. Of course the drive (rather, its medium) is removable, i.e., you can eject it. See below.
Insert a CD
-
Mount the CD manually:
#mount -t cd9660 /dev/cd0a /mnt#This command shouldn't print anything. It instructs the system to mount the CD found on /dev/cd0a on /mnt, using the "cd9660" filesystem. The mountpoint "/mnt" must be an existing directory.
-
Check the contents of the CD:
#ls /mntINSTALL.html INSTALL.ps TRANS.TBL boot.catalog INSTALL.more INSTALL.txt binary installation#Everything looks fine! This is a NetBSD CD, of course. :)
-
Unmount the CD:
#umount /mnt#If the CD is still accessed (e.g. some other shell's still "cd"'d into it), this will not work. If you shut down the system, the CD will be unmounted automatically for you, there's nothing to worry about there.
-
Making an entry in /etc/fstab:
If you don't want to type the full "mount" command each time, you can put most of the values into a line in /etc/fstab:
# Device        mountpoint      filesystem  mount options
/dev/cd0a       /cdrom          cd9660      ro,noauto
Make sure that the mountpoint,
/cdromin our example, exists:#mkdir /cdrom#Now you can mount the cd with the following command:
#mount /cdrom#Access and unmount as before.
The CD is not mounted at boot time due to the "noauto" mount option - this is useful as you'll probably not have a CD in the drive all the time. See mount(8) and mount_cd9660(8) for some other useful options.
-
Eject the CD:
#eject cd0#If the CD is still mounted, it will be unmounted if possible, before being ejected.
Use mscdlabel(8) to add all sessions to the CDs
disklabel, and
then use the appropriate device node to mount the session you want.
You might have to create the corresponding device nodes in
/dev manually.
For example:
#mscdlabel cd1track (ctl=4) at sector 142312 adding as 'a' track (ctl=4) at sector 0 adding as 'b'#ls -l /dev/cd1bls: /dev/cd1b: No such file or directory#cd /dev#ls -l cd1*brw-r----- 1 root operator 6, 8 Mar 18 21:55 cd1a brw-r----- 1 root operator 6, 11 Mar 18 21:55 cd1d#mknod cd1b b 6 9
to create /dev/cd1b.
Make sure you fix the permissions of any new device
nodes you create:
#ls -l cd1*brw-r----- 1 root operator 6, 8 Mar 18 21:55 cd1a brw-r--r-- 1 root wheel 6, 9 Mar 18 22:23 cd1b brw-r----- 1 root operator 6, 11 Mar 18 21:55 cd1d#chgrp operator cd1b#chmod 640 cd1b#ls -l cd1*brw-r----- 1 root operator 6, 8 Mar 18 21:55 cd1a brw-r----- 1 root operator 6, 9 Mar 18 22:24 cd1b brw-r----- 1 root operator 6, 11 Mar 18 21:55 cd1d
Now you should be able to mount it.
#mount /dev/cd1b /mnt
By default, NetBSD only allows "root" to mount a filesystem. If you want any user to be able to do this, perform the following steps:
-
Give groups and other the access rights to the device.
#chmod go+rw /dev/cd0a -
Ask NetBSD to let users mounting filesystems.
#sysctl -w vfs.generic.usermount=1Note that this works for any filesystem and device, not only for CDs with a ISO 9660 filesystem.
To perform the mount operation after these commands, the user must own the mount point. So, for example:
$cd $HOME$mkdir cdrom$mount -t cd9660 -o nodev,nosuid /dev/cd0a `pwd`/cdrom
Please also see mount(8) and as an alternative the
auto mount daemon amd(8), for which
example config files can be found in
/usr/share/examples/amd.
Sometimes, it is interesting to mount an ISO9660 image file before you burn the CD; this way, you can examine its contents or even copy files to the outside. If you are a Linux user, you should know that this is done with the special loop filesystem. NetBSD does it another way, using the vnode pseudo-disk.
We will illustrate how to do this with an example. Suppose you have an ISO image in your home directory, called "mycd.iso":
-
Start by setting up a new vnode, "pointing" to the ISO file:
#vnconfig -c vnd0 ~/mycd.iso -
Now, mount the vnode:
#mount -t cd9660 /dev/vnd0a /mnt Yeah, image contents appear under
/mnt! Go to that directory and explore the image.-
When you are happy, you have to umount the image:
#umount /mnt -
And at last, deconfigure the vnode:
#vnconfig -u vnd0
Note that these steps can also be used for any kind of file that contains a filesystem, not just ISO images.
See the vnd(4) and vnconfig(8) man pages for more information.
To play MPEG Video streams as many DVD players can play them
under NetBSD, mount the CD as you would do with any normal (data)
CD (see Section 13.4, “Reading data CDs with NetBSD”), then use the
multimedia/xine-ui,
multimedia/mplayer or
multimedia/gmplayer
package to play the mpeg files stored on the CD.
There are two ways to handle audio CDs:
-
Tell the CD drive to play to the headphone or to a soundcard, to which CDROMs are usually connected internally. Use programs like cdplay(1),
audio/xmcd, "kscd" from themultimedia/kdemultimedia3package, mixer programs like mixerctl(1),audio/xmix,audio/xmmix, the Curses basedaudio/cam, or kmix, which is part ofmultimedia/kdemultimedia3.This usually works well on both SCSI and IDE (ATAPI) CDROMs, CDRW and DVD drives.
-
To read ("rip") audio tracks in binary form without going through digital->analog conversion and back. There are several programs available to do this:
-
For most ATAPI, SCSI and several proprietary CDROM drives, the
audio/cdparanoiapackage can be used. With cdparanoia the data can be saved to a file or directed to standard output in WAV, AIFF, AIFF-C or raw format. Currently the -g option is required by the NetBSD version of cdparanoia. A hypothetical example of how to save track 2 as a WAV file is as follows:$cdparanoia -g /dev/rcd0d 2 track-02.wavIf you want to grab all files from a CD, cdparanoia's batch mode is useful:
$cdparanoia -g /dev/rcd0d -B -
For ATAPI or SCSI CD-ROMs the
audio/cddpackage can be used. To extract track 2 with cdd, type:#cdd -t 2 `pwd`This will put a file called
track-02.cdain the current directory. -
For SCSI CD-ROMS the
audio/toshapackage can be used. To extract track 2 with tosha, you should be able to type:#tosha -d-t 2 -o track-02.cdaCD-ROM-device
The data can then be post-processed e.g. by encoding it into MP3 streams (see Section 13.10, “Creating an MP3 (MPEG layer 3) file from an audio CD”) or by writing them to CD-Rs (see Section 13.12, “Using a CD-R writer to create audio CDs”).
-
To streamline the process, from obtaining audio to populating the metadata for a track to normalising audio and such, the
audio/abcdepackage can be used.#abcde -d /dev/rcd0d -o mp3 -p -PThis will encode the disc track-by-track padding the tracknumbers with a leading 0 and using UNIX pipes to read+encode without leaving the WAV files
-
The basic steps in creating an MPEG layer 3 (MP3) file from an audio CD (using software from the NetBSD packages collection) are:
Extract (rip) the audio data of the CD as shown in Section 13.9, “Using audio CDs with NetBSD”.
-
Convert the CD audio format file to WAV format. You only need to perform this job if your ripping program (e.g. tosha, cdd) didn't already do the job for you!
-
Using the
audio/soxpackage, type:$sox -s -w -c 2 -r 44100 -t cdr track-02.cda track-02.wavThis will convert
track-02.cdain raw CD format totrack-02.wavin WAV format, using signed 16-bit words with 2 channels at a sampling rate of 44100kHz.
-
-
Encode the WAV file into MP3 format.
-
Using the
audio/bladeencpackage, type:$bladeenc -128 -QUIT track-02.wavThis will encode
track-02.wavintotrack-02.mp3in MP3 format, using a bit rate if 128kBit/sec. The documentation for bladeenc describes bit-rates in more detail. -
Using the
audio/lamepackage, type:$lame -p -o -v -V 5 -h track-02.wav track-02.mp3You may wish to use a lower quality, depending on your taste and hardware.
-
The resultant MP3 file can be played with any of the
audio/gqmpeg,
audio/maplay,
audio/mpg123 or
audio/splay packages.
The process of writing a CD consists of two steps: First, a "image" of the data must be generated, which can then be written to CD-R in a second step.
-
Reading a pre-existing ISO image
#dd if=/dev/rcd0a of=filename.iso bs=2k#Alternatively, you can create a new ISO image yourself:
-
Generating the ISO image
Put all the data you want to put on CD into one directory. Next you need to generate a disk-like ISO image of your data. The image stores the data in the same form as they're later put on CD, using the ISO 9660 format. The basic ISO9660 format only understands 8+3 filenames (max. eight letters for filename, plus three more for an extension). As this is not practical for Unix filenames, a so-called "Rockridge Extension" needs to be employed to get longer filenames. (A different set of such extension exists in the Microsoft world, to get their long filenames right; that's what's known as Joliet filesystem).
The ISO image is created using the mkisofs command, which is part of the
sysutils/cdrtoolspackage.Example: if you have your data in /usr/tmp/data, you can generate a ISO image file in /usr/tmp/data.iso with the following command:
$cd /usr/tmp$mkisofs -o data.iso -r data Using NETBS000.GZ;1 for data/binary/kernel/netbsd.INSTALL.gz (netbsd.INSTALL_TINY.gz) Using NETBS001.GZ;1 for data/binary/kernel/netbsd.GENERIC.gz (netbsd.GENERIC_TINY.gz) 5.92% done, estimate finish Wed Sep 13 21:28:11 2000 11.83% done, estimate finish Wed Sep 13 21:28:03 2000 17.74% done, estimate finish Wed Sep 13 21:28:00 2000 23.64% done, estimate finish Wed Sep 13 21:28:03 2000 ... 88.64% done, estimate finish Wed Sep 13 21:27:55 2000 94.53% done, estimate finish Wed Sep 13 21:27:55 2000 Total translation table size: 0 Total rockridge attributes bytes: 5395 Total directory bytes: 16384 Path table size(bytes): 110 Max brk space used 153c4 84625 extents written (165 Mb)$Please see the mkisofs(8) man page for other options like noting publisher and preparer. The Bootable CD ROM How-To explains how to generate a bootable CD.
-
Writing the ISO image to CD-R
When you have the ISO image file, you just need to write it on a CD. This is done with the "cdrecord" command from the
sysutils/cdrtoolspackage. Insert a blank CD-R, and off we go:#cdrecord -v dev=/dev/rcd0d data.iso...#After starting the command, 'cdrecord' shows you a lot of information about your drive, the disk and the image you're about to write. It then does a 10 seconds countdown, which is your last chance to stop things - type ^C if you want to abort. If you don't abort, the process will write the whole image to the CD and return with a shell prompt.
Note that cdrecord(8) works on both SCSI and IDE (ATAPI) drives.
-
Test
Mount the just-written CD and test it as you would do with any "normal" CD, see Section 13.4, “Reading data CDs with NetBSD”.
If you want to make a backup copy of one of your audio CDs, you can do so by extracting ("ripping") the audio tracks from the CD, and then writing them back to a blank CD. Of course this also works fine if you only extract single tracks from various CDs, creating your very own mix CD!
The steps involved are:
Extract ("rip") the audio tracks as described as in Section 13.9, “Using audio CDs with NetBSD” to get a couple of .wav files.
-
Write the .wav files using cdrecord command from the
sysutils/cdrtoolspackage:#cdrecord -v dev=/dev/rcd0d -audio -pad *.wav
If you have converted all your audio CDs to MP3 and now want to make a mixed CD for your (e.g.) your car, you can do so by first converting the .mp3 files back to .wav format, then write them as a normal audio CD.
The steps involved here are:
-
Create .wav files from your .mp3 files:
$mpg123 -w foo.wav foo.mp3Do this for all of the MP3 files that you want to have on your audio CD. The .wav filenames you use don't matter.
Write the .wav files to CD as described under Section 13.12, “Using a CD-R writer to create audio CDs”.
To copy an audio CD while not introducing any pauses as mandated by the CDDA standard, you can use cdrdao for that:
#cdrdao read-cd --device /dev/rcd0d data.toc#cdrdao write --device /dev/rcd1d data.toc
If you have both a CD-R and a CD-ROM drive in your machine, you can copy a data CD with the following command:
#cdrecord dev=/dev/rcd1d /dev/rcd0d
Here the CD-ROM (cd0) contains the CD you want to copy, and the CD-R
(cd1) contains the blank disk. Note that this only works with computer
disks that contain some sort of data, it does
not work with
audio CDs! In practice you'll also want to add something like
"speed=8" to make things a bit
faster.
You can treat a CD-RW drive like a CD-R drive (see Section 13.11, “Using a CD-R writer with data CDs”) in NetBSD, creating images with mkisofs(8) and writing them on a CD-RW medium with cdrecord(8).
If you want to blank a CD-RW, you can do this with cdrecord's
"blank" option:
#cdrecord dev=/dev/rcd0d blank=fast
There are several other ways to blank the CD-RW,
call cdrecord(8) with
"blank=help" for a list. See the cdrecord(8)
man page for more information.
Currently, NetBSD supports ISO 9660 and UDF DVD media.
Information about mounting ISO 9660 and UDF filesystems can be found
in the mount_cd9660(8) and mount_udf(8) manual pages
respectively. DVDs, DivX and many avi files be played with
multimedia/ogle
or multimedia/gmplayer.
For some hints on creating DVDs, see this postings about growisofs and this article about recording CDs and DVDs with NetBSD.
To create an ISO image and save the checksum do this:
#readcd dev=/dev/cd0d f=/tmp/cd.iso
Here is an alternative using dd(1):
#dd if=/dev/cd0d of=/tmp/cd.iso bs=2048
If the CD has errors you can recover the rest with this:
#dd if=/dev/cd0d of=/tmp/cd.iso bs=2048 conv=noerror
To create an ISO image from a mounted data CD first, mount the CD disk by:
#mount -t cd9660 -r /dev/cd0d /mnt/cdrom
Second, get the image:
#mkhybrid -v -l -J -R -o /tmp/my_cd.iso /mnt/cdrom/
You can read the volume data from an unmounted CD with this command:
#file -s /dev/cd0d
You can read the volume data from an ISO image with this command:
#isoinfo -d -i /tmp/my_cd.iso
You can get the unique disk number from an unmounted CD with this:
#cd-discid /dev/cd0d
You can read the table of contents of an unmounted CD with this command:
#cdrecord -v dev=/dev/cd0d -toc
Table of Contents
The cgd driver provides functionality
which allows you to use disks or partitions for encrypted storage.
After providing the appropriate key, the encrypted partition is
accessible using cgd pseudo-devices.
People often store sensitive information on their hard disks and are concerned about this information falling into the wrong hands. This is particularly relevant to users of laptops and other portable devices, or portable media, which might be stolen or accidentally misplaced.
File-oriented encryption tools like GnuPG are great for encrypting individual files, which can then be sent across untrusted networks as well as stored encrypted on disk. But sometimes they can be inconvenient, because the file must be decrypted each time it is to be used; this is especially cumbersome when you have a large collection of files to protect. Any time a security tool is cumbersome to use, there's a chance you'll forget to use it properly, leaving the files unprotected for the sake of convenience.
Worse, readable copies of the encrypted contents might still exist on the hard disk. Even if you overwrite these files (using rm -P) before unlinking them, your application software might make temporary copies you don't know about, or have been paged to swapspace—and even your hard disk might have silently remapped failing sectors with data still in them.
The solution is to simply never write the information unencrypted to the hard disk. Rather than taking a file-oriented approach to encryption, consider a block-oriented approach—a virtual hard disk, that looks just like a normal hard disk with normal filesystems, but which encrypts and decrypts each block on the way to and from the real disk.
The cgd device looks and behaves to the rest of
the operating system like any other disk driver. Rather than
driving real hardware directly, it provides a logical function
layered on top of another block device. It has a special
configuration program, cgdconfig, to create and
configure a cgd device and point it at the
underlying disk device that will hold the encrypted data.
NetBSD includes several other similar logical block devices, each
of which provides some other function where cgd
provides encryption. You can stack several of these logical block
devices together:
cgd on top of
vnd is handy to make an encrypted volume in a
regular file without repartitioning, or
you can make an encrypted
raid to protect your encrypted data against
hard disk failure as well.
Once you have created a cgd disk, you can
use disklabel to divide it up into
partitions, swapctl to enable swapping to
those partitions or newfs to make
filesystems, then mount and use those
filesystems, just like any other new disk.
A number of components and tools work together to make the
cgd system effective.
To use cgd you need a kernel with support
for the cgd pseudo-device. Make sure the
sure the module is loaded:
#modload cgd
If the cgd driver was not already
present/loaded (it is loaded by default in some ports), add
cgd to
/etc/modules.conf.
The following ciphers are supported:
-
adiantum(key size: 256 bits) -
The Adiantum tweakable wide-block cipher. The Adiantum tweak for each disk sector is taken to be the little-endian encoding of the disk sector number.
Adiantum provides the best security by encrypting entire disk sectors at a time (512 bytes), and generally provides the best performance on machines without CPU support for accelerating AES.
-
aes-cbc(key sizes: 128, 192, or 256 bits) AES in CBC mode. The CBC initialization vector for each disk sector is chosen to be the encryption under AES of the little-endian encoding of the disk sector number. The default key length is 128 bits.
-
aes-xts(key sizes: 256 or 512 bits) AES in XTS mode. The XTS tweak for each disk sector is chosen to be the little-endian encoding of the disk sector number. AES-XTS uses a 256-bit or 512-bit key, composed of a pair of AES-128 or AES-256 keys. The default key length is 256, meaning AES-128.
The following obsolete ciphers are supported for compatibility with old disks.
WARNING: These obsolete ciphers are implemented without timing side channel protection, so, for example, JavaScript code in a web browser that can measure the timing of disk activity may be able to recover the secret key. These are also based on 64-bit block ciphers and are therefore unsafe for disks much larger than a gigabyte. You should not use these except where compatibility with old disks is necessary.
-
3des-cbc(key size: 192 bits) -
3DES (Triple DES with EDE3) in CBC mode. The CBC initialization vector for each disk sector is chosen to be the encryption under 3DES of the little-endian encoding of the disk sector number, which has no impact on security but reduces performance.
Note: Internally, the “parity bits” of the 192-bit key are ignored, so there are only 168 bits of key material, and owing to generic attacks on 64-bit block ciphers and to meet-in-the-middle attacks on compositions of ciphers as in EDE3 the security is much lower than one might expect even for a 168-bit key.
-
blowfish-cbc(key sizes: 40, 48, 56, 64, …, 432, 440, or 448 bits) Blowfish in CBC mode. The CBC initialization vector for each disk sector is chosen to be the encryption under Blowfish of the little-endian encoding of the disk sector number. It is strongly encouraged that keys be at least 128 bits long. There are no performance advantages of using shorter keys. The default key length is 128 bits.
cgdconfig can examine the disk to verify that it was decrypted using the correct key. The following verification methods are available:
noneNo verification is performed. This is dangerous unless you are configuring a new
cgddevice for the first time, because the key is not verified at all. Entering the wrong passphrase, for example, may destroy any data on the volume—any data read will be garbage, and any data written will turn into garbage if you ever re-open thecgdvolume with the correct passphrase.disklabelcgdconfig scans for a valid BSD disklabel; see disklabel(5) and disklabel(8).
mbrcgdconfig scans for a valid Master Boot Record, traditionally used on PCs; see fdisk(8).
gptcgdconfig scans for a valid GUID partition table; see gpt(8).
ffscgdconfig scans for a valid FFS file system, the default file system used in NetBSD; see mount_ffs(8).
re-enterRather than scanning anything on disk, cgdconfig will compute the key twice—for example, by asking the user to enter the passphrase twice—and fail if the results are different.
This section works through a step-by-step example of converting
an existing system to use cgd,
performing the following actions:
Preparing the disk and partitions
Scrub off all data
Create the cgd
Adjust config-files
Restoring your backed-up files to the encrypted disk
First, decide which filesystems you want to move to an encrypted
device. You're going to need to leave at least the small root
(/) filesystem unencrypted, in order to load
the kernel and run init,
cgdconfig and the rc.d
scripts that configure your cgd. In this
example, we'll encrypt everything except the root
(/) filesystem.
We are going to delete and re-make partitions and filesystems, and will require a backup to restore the data. So make sure you have a current, reliable backup stored on a different disk or machine. Do your backup in single-user mode, with the filesystems unmounted, to ensure you get a clean dump. Make sure you back up the disklabel of your hard disk as well, so you have a record of the partition layout before you started.
With the system at single user, / mounted
read-write and everything else unmounted, use
disklabel to delete all the data partitions
you want to move into cgd.
Then make a single new partition in all the space you just
freed up, say, wd0e. Set the
partition type for this partition to cgd
Though it doesn't really matter what it is, it will help remind
you that it's not a normal filesystem later. When finished,
label the disk to save the new partition table.
We have removed the partition table information, but the
existing filesystems and data are still on disk. Even after
we make a cgd device, create filesystems,
and restore our data, some of these disk blocks might not yet
be overwritten and still contain our data in plaintext. This
is especially likely if the filesystems are mostly empty. We
want to scrub the disk before we go further.
We could use dd to copy
/dev/zero over the new
wd0e partition, but this will leave
our disk full of zeros, except where we've written encrypted
data later. We might not want to give an attacker any clues
about which blocks contain real data, and which are free
space, so we want to write "noise" into all the disk
blocks. So we'll create a temporary cgd,
configured with a random, unknown key.
First, we configure a cgd to use a random key:
#cgdconfig -s cgd0 /dev/wd0e aes-xts 256 < /dev/urandom
Now we can write zeros into the raw partition of our
cgd (/dev/rcgd0d on
NetBSD/i386 and amd64, /dev/rcgd0c on most other
platforms):
#dd if=/dev/zero of=/dev/rcgd0d bs=64k
The encrypted zeros will look like random data on disk. This might
take a while if you have a large disk. Once finished, unconfigure the
random-key cgd:
#cgdconfig -u cgd0
The cgdconfig program, which manipulates
cgd devices, uses parameters files to store
such information as the encryption type, key length, and a
random password salt for each cgd. These
files are very important, and need to be kept safe—without
them, you will not be able to decrypt the data!
We'll generate a parameters file and write it into the default
location (make sure the directory
/etc/cgd exists and is mode 700):
#cgdconfig -g -V disklabel -o /etc/cgd/wd0e aes-cbc 256
This creates a parameters file
/etc/cgd/wd0e describing a
cgd using the
aes-cbc cipher method, a key
verification method of disklabel,
and a key length of 256
bits. It will look something like this:
algorithm aes-cbc;
iv-method encblkno;
keylength 256;
verify_method disklabel;
keygen pkcs5_pbkdf2/sha1 {
        iterations 6275;
        salt AAAAgHTg/jKCd2ZJiOSGrgnadGw=;
};
Note
Consider this file being SACRED, BACK IT UP , and BACK IT UP AGAIN!
Tip
When creating the parameters file,
cgdconfig reads from
/dev/random to create the password
salt. This read may block if there is not enough collected
entropy in the random pool. This is unlikely, especially if
you just finished overwriting the disk as in the previous
step, but if it happens you can press keys on the console
and/or move your mouse until the
rnd device gathers enough
entropy.
Now it's time to create our cgd, for which
we'll need a passphrase. This passphrase needs to be entered
every time the cgd is opened, which is
usually at each reboot. The encryption key is derived from this
passphrase and the salt. Make sure you choose something you won't
forget, and others won't guess.
The first time we configure the cgd, there
is no valid disklabel on the logical device, so the validation
mechanism we want to use later won't work. We override it this
one time:
#cgdconfig -V re-enter cgd0 /dev/wd0e
This will prompt twice for a matching passphrase, just in case
you make a typo, which would otherwise leave you with a
cgd encrypted with a passphrase that's
different to what you expected.
Now that we have a new cgd, we need to
partition it and create filesystems. Recreate your previous
partitions with all the same sizes, with the same letter
names.
Tip
Remember to use the disklabel -I argument, because you're creating an initial label for a new disk.
Note
Although you want the sizes of your new partitions to be the same as the old, unencrypted ones, the offsets will be different because they're starting at the beginning of this virtual disk.
Then, use newfs to create filesystems on
all the relevant partitions. This time your partitions will
reflect the cgd disk names, for example:
#newfs /dev/rcgd0h
We've moved several filesystems to another (logical) disk, and
we need to update /etc/fstab
accordingly. Each partition will have the same letter (in this
example), but will be on cgd0 rather than
wd0. So you'll have
/etc/fstab entries something like this:
/dev/wd0a   /     ffs     rw    1 1
/dev/cgd0b  none  swap    sw            0 0
/dev/cgd0b  /tmp  mfs     rw,-s=132m    0 0
/dev/cgd0e  /var  ffs     rw            1 2
/dev/cgd0f  /usr  ffs     rw            1 2
/dev/cgd0h  /home ffs     rw            1 2
Note
/tmp should be a separate filesystem,
either mfs or ffs,
inside the cgd, so that your temporary
files are not stored in plain text in the
/ filesystem.
Each time you reboot, you're going to need your
cgd configured early, before
fsck runs and filesystems are mounted.
Put the following line in
/etc/cgd/cgd.conf:
cgd0 /dev/wd0e
This will use /etc/cgd/wd0e as config
file for cgd0.
To finally enable cgd on each boot, put the following line
into /etc/rc.conf:
cgd=YES
You should now be prompted for
/dev/cgd0's passphrase whenever
/etc/rc starts.
Next, mount your new filesystems, and
restore your data into them. It often helps
to have /tmp mounted properly first, as
restore can use a fair amount of temporary
space when extracting a large dumpfile.
To test your changes to the boot configuration,
umount the filesystems and unconfigure the
cgd, so when you exit the single-user
shell, rc will run like on a clean boot,
prompting you for the passphrase and mounting your filesystems
correctly. Now you can bring the system up to multi-user, and
make sure everything works as before.
cgd(4) provides highly secure encryption of whole partitions
or disks. Unfortunately, creating "normal" CDs is not
disklabeling something and running newfs on it. Neither can you
just put a CDR into the drive, configure cgd and assume it to
write encrypted data when syncing. Standard CDs contain at
least an ISO-9660 filesystem created with mkisofs(8) from the
sysutils/cdrtools package.
ISO images may not contain disklabels or
cgd partitions.
But of course CD reader/writer hardware doesn't care about filesystems at all. You can write raw data to the CD if you like—or an encrypted FFS filesystem, which is what we'll do here. But be warned, there is NO way to read this CD with any OS except NetBSD—not even other BSDs due to the lack of cgd.
The basic steps when creating an encrypted CD are:
Create an (empty) imagefile
Register it as a virtual disk using vnd(4)
Configure cgd inside the vnd disk
Copy content to the cgd
Unconfigure all (flush!)
Write the image on a CD
The first step when creating an encrypted CD is to create a single image file with dd. The image may not grow, so make it large enough to allow all CD content to fit into. Note that the whole image gets written to the CD later, so creating a 700 MB image for 100 MB content will still require a 700 MB write operation to the CD. Some info on DVDs here: DVDs are only 4.7 GB in marketing language. 4.7GB = 4.7 x 1024 x 1024 x 1024 = 5046586573 bytes. In fact, a DVD can only approximately hold 4.7 x 1000 x 1000 x 1000 = 4700000000 bytes, which is about 4482 MB or about 4.37 GB. Keep this in mind when creating DVD images. Don't worry for CDs, they hold "real" 700 MB (734003200 Bytes).
Invoke all following commands as root!
For a CD:
#dd if=/dev/zero of=image.img bs=1m count=700
or, for a DVD:
#dd if=/dev/zero of=image.img bs=1m count=4482
Now configure a vnd(4)-pseudo disk with the image:
#vnconfig vnd0 image.img
In order to use cgd, a so-called parameter file, describing
encryption parameters and a containing "password salt" must be
generated. We'll call it /etc/cgd/image
here. You can use one parameter file for several encrypted
partitions (I use one different file for each host and a
shared file image for all removable
media, but that's up to you).
AES-CBC with a keylength of 256 bits will be used in this example. Refer to cgd(4) and cgdconfig(8) for further details and alternative ciphers.
The following command will create the parameter file as
/etc/cgd/image. YOU DO NOT WANT
TO INVOKE THE FOLLOWING COMMAND AGAIN after you
burnt any CD, since a recreated parameter file is a lost
parameter file and you'll never access your encrypted CD again
(the "salt" this file contains will differ among each
call). Consider this file being SACRED, BACK IT UP
and BACK IT UP AGAIN! Use
switch -V to specify verification method "disklabel" for the CD
(cgd cannot detect whether you entered a valid password for the
CD later when mounting it otherwise).
#cgdconfig -g -V disklabel aes-cbc 256 > /etc/cgd/image
Now it's time to configure a cgd for our vnd drive. (Replace slice "d" with "c" for all platforms that use "c" as the whole disk (where "sysctl kern.rawpartition" prints "2", not "3"); if you're on i386 or amd64, "d" is OK for you):
#cgdconfig -V re-enter cgd1 /dev/vnd0d /etc/cgd/image
The "-V re-enter" option is necessary
as long as the
cgd doesn't have a disklabel yet so we can access and
configure
it. This switch asks for a password twice and uses it for
encryption.
Now it's time to create a disklabel inside the cgd. The defaults of the label are ok, so invoking disklabel with
#disklabel -e -I cgd1
and leaving vi with ":wq" immediately will do.
Let's create a filesystem on the cgd, and finally mount it somewhere:
#newfs /dev/rcgd1a#mount /dev/cgd1a /mnt
The cgd is alive! Now fill /mnt with
content. When finished, reverse the configuration process. The
steps are:
-
Unmounting the cgd1a:
#umount /mnt -
Unconfiguring the cgd:
#cgdconfig -u cgd1 -
Unconfiguring the vnd:
#vnconfig -u vnd0
The following commands are examples to burn the images on CD
or DVD. Please adjust the dev= for
cdrecord or the /dev/rcd0d for
growisofs. Note the
"rcd0d"
is necessary with NetBSD. Growisofs is
available in the sysutils/dvd+rw-tools
package. Again, use "c" instead of
"d" if this is the raw partition on your
platform.
Finally, write the image file to a CD:
#cdrecord dev=/dev/rcd0d -v image.img
...or to a DVD:
#growisofs -dvd-compat -Z /dev/rcd0d=image.img
Congratulations! You've just created a really secure CD!
After creating an encrypted CD as described above, we're not
done yet—what about mounting it again? One might guess,
configuring the cgd on /dev/cd0d is
enough—no, it is not.
NetBSD cannot access FFS file systems on media that is not 512 bytes/sector format. It doesn't matter that the cgd on the CD is, since the CD's disklabel the cgd resides in has 2048 bytes/sector.
But the CD driver cd(4) is smart enough to grant "write" access to the (emulated) disklabel on the CD. So before configuring the cgd, let's have a look at the disklabel and modify it a bit:
#disklabel -e cd0# /dev/rcd0d: type: ATAPI disk: mydisc label: fictitious flags: removable bytes/sector: 2048# -- Change to 512 (= orig / 4)sectors/track: 100# -- Change to 400 (= orig * 4)tracks/cylinder: 1 sectors/cylinder: 100# -- Change to 400 (= orig * 4)cylinders: 164 total sectors: 16386# -- Change to value of slice "d" (=65544)rpm: 300 interleave: 1 trackskew: 0 cylinderskew: 0 headswitch: 0 # microseconds track-to-track seek: 0 # microseconds drivedata: 0 4 partitions: # size offset fstype [fsize bsize cpg/sgs] a: 65544 0 4.2BSD 0 0 0 # (Cyl. 0 - 655+) d: 65544 0 ISO9660 0 0 # (Cyl. 0 - 655+)
If you don't want to do these changes every time by hand, you
can use Florian Stoehr's tool neb-cd512 which is (at time of writing
this) in pkgsrc-wip and will move to
sysutils/neb-cd512 soon.
You can also download the neb-cd512 source from
http://sourceforge.net/projects/neb-stoehr/ (be sure
to use neb-cd512, not neb-wipe!).
It is invoked with the disk name as parameter, by root:
#neb-cd512 cd0
Now as the disklabel is in 512 b/s format, accessing the CD is as easy as:
#cgdconfig cgd1 /dev/cd0d /etc/cgd/image#mount -o ro /dev/cgd1a /mnt
Note that the cgd MUST be mounted read-only or you'll get illegal command errors from the cd(4) driver which can in some cases make even mounting a CD-based cgd impossible!
Now we're done! Enjoy your secure CD!
#ls /mnt
Remember you have to reverse all steps to remove the CD:
#umount /mnt#cgdconfig -u cgd1#eject cd0
To encrypt the iSCSI device, we use the NetBSD iSCSI initiator, available in NetBSD-6 and newer, and the standard cgd device. In all, setting up an encrypted device in this manner should take less than 15 minutes, even for someone unfamiliar with iSCSI or cgd.
The approach is to layer a vnd on top of the "storage" file presented by the iSCSI target. This is exactly the same as normal. On top of that vnd, we layer a cgd device, which ensures that all data is encrypted on the iSCSI device.
WARNING:
cgd only keeps the content of the
volume secret—it doesn't keep the access patterns
secret, and it doesn't prevent or even detect a malicious
network or iSCSI target tampering with the volume.
Firstly, the initiator is started, pointing at the machine which is presenting the iSCSI storage (i.e. the machine on which the iSCSI target is running). In this example, the target is running on the same machine as the initiator (a laptop called, in a moment of inspiration, inspiron1300). A 50 MB iSCSI target is being presented as target1.
#iscsi-initiator -u agc -h inspiron1300.wherever.co.uk /mnt &[1] 11196
#dfFilesystem 1K-blocks Used Avail %Cap Mounted on /dev/dk0 28101396 20862004 5834324 78% / kernfs 1 1 0 100% /kern procfs 4 4 0 100% /proc ptyfs 1 1 0 100% /dev/pts /dev/puffs 0 0 0 100% /mnt
Looking at the last line, we can see that the initiator is running via the puffs device.
A vnd device is created on top of the storage which the target is presenting:
#vnconfig vnd0 /mnt/inspiron1300.wherever.co.uk/target1/storage
A disklabel which is offset 63 blocks into the iSCSI device needs to be added. This is so that the encrypted device which we shall put on top of the vnd does not clash with the vnd's label. The cgd's type should be set to "cgd".
#disklabel -e vnd0# /dev/rvnd0d: type: vnd disk: vnd label: fictitious flags: bytes/sector: 512 sectors/track: 32 tracks/cylinder: 64 sectors/cylinder: 2048 cylinders: 50 total sectors: 102400 rpm: 3600 interleave: 1 trackskew: 0 cylinderskew: 0 headswitch: 0 # microseconds track-to-track seek: 0 # microseconds drivedata: 0 4 partitions: # size offset fstype [fsize bsize cpg/sgs] a: 102336 63 cgd 2048 16384 28360 # (Cyl. 0 - 49) d: 102400 0 unused 0 0 # (Cyl. 0 - 49)
The cgd device can now be created on the vnd device
#cgdconfig -s cgd0 /dev/vnd0a aes-xts 256 < /dev/urandom
and the cgd device's storage zeroed
#dd if=/dev/zero of=/dev/rcgd0d bs=32kdd: /dev/rcgd0d: Invalid argument 1601+0 records in 1600+0 records out 52428800 bytes transferred in 16.633 secs (3152095 bytes/sec)
Unconfigure the cgd device and write a disklabel using the verification method onto the cgd. Note: sometimes, this process does not always complete properly, and so it has to be repeated.
#cgdconfig -g -V disklabel -o /etc/cgd/vnd0a aes-cbc 256cgdconfig: could not calibrate pkcs5_pbkdf2 cgdconfig: Failed to generate defaults for keygen#cgdconfig -g -V disklabel -o /etc/cgd/vnd0a aes-cbc 256
A password can then be added to the cgd device
#cgdconfig -V re-enter cgd0 /dev/vnd0a/dev/vnd0a's passphrase: re-enter device's passphrase:
Then create a disklabel inside the cgd itself
#disklabel -I -e cgd0# /dev/rcgd0d: type: cgd disk: cgd label: fictitious flags: bytes/sector: 512 sectors/track: 2048 tracks/cylinder: 1 sectors/cylinder: 2048 cylinders: 49 total sectors: 102336 rpm: 3600 interleave: 1 trackskew: 0 cylinderskew: 0 headswitch: 0 # microseconds track-to-track seek: 0 # microseconds drivedata: 0 4 partitions: # size offset fstype [fsize bsize cpg/sgs] a: 102336 0 4.2BSD 2048 16384 28360 # (Cyl. 0 - 49*) d: 102336 0 unused 0 0 # (Cyl. 0 - 49*)
Having placed a disklabel inside the cgd, we can now make a filesystem on there:
#newfs /dev/rcgd0a/dev/rcgd0a: 50.0MB (102336 sectors) block size 8192, fragment size 1024 using 4 cylinder groups of 12.49MB, 1599 blks, 3136 inodes. super-block backups (for fsck_ffs -b #) at: 32, 25616, 51200, 76784,
the new file system in the cgd can now be mounted
#dfFilesystem 1K-blocks Used Avail %Cap Mounted on /dev/dk0 28101396 20910216 5786112 78% / kernfs 1 1 0 100% /kern procfs 4 4 0 100% /proc ptyfs 1 1 0 100% /dev/pts /dev/puffs 0 0 0 100% /mnt#mount /dev/cgd0a /iscsi#dfFilesystem 1K-blocks Used Avail %Cap Mounted on /dev/dk0 28101396 20910216 5786112 78% / kernfs 1 1 0 100% /kern procfs 4 4 0 100% /proc ptyfs 1 1 0 100% /dev/pts /dev/puffs 0 0 0 100% /mnt /dev/cgd0a 49519 1 47043 0% /iscsi
The new file system, mounted on /iscsi, can now be used as normal.
The device can be freed up using the following commands
#umount /iscsi#cgdconfig -u cgd0#vnconfig -u vnd0
In normal usage, the device can be mounted. Firstly, the initiator must be configured to connect to the device:
#vnconfig vnd0 /mnt/inspiron1300.wherever.co.uk/target1/storage#cgdconfig cgd0 /dev/vnd0a/dev/vnd0a's passphrase:#mount /dev/cgd0a /iscsi#ls -al /iscsitotal 3 drwxr-xr-x 2 root wheel 512 Jan 1 1970 . drwxr-xr-x 35 root wheel 1536 Jan 5 08:59 ..#dfFilesystem 1K-blocks Used Avail %Cap Mounted on /dev/dk0 28101396 20910100 5786228 78% / kernfs 1 1 0 100% /kern procfs 4 4 0 100% /proc ptyfs 1 1 0 100% /dev/pts /dev/puffs 0 0 0 100% /mnt /dev/cgd0a 49519 1 47043 0% /iscsi
You now have your filesystems encrypted within a
cgd. When your machine is shut down, the data
is protected, and can't be decrypted without the passphrase.
However, there are still some dangers you should be aware of,
and more you can do with cgd. This section
documents several further suggestions and warnings that will
help you use cgd effectively.
Use multiple
cgd's for different kinds of data, one mounted all the time and others mounted only when needed.Use a
cgdconfigured on top of avndmade from a file on a remote network fileserver (NFS, SMBFS, CODA, etc) to safely store private data on a shared system. This is similar to the procedure for using encrypted CDs and DVDs described in Section 14.4, “Example: encrypted CDs/DVDs”.
The following section will be replaced in NetBSD 10 by a sysctl knob “vm.swap_encrypt=1”, which provides better security and simpler setup.
You may want to use a dedicated random-key
cgd for swap space, regenerating the key
each reboot. The advantage of this is that once your machine
is rebooted, any sensitive program memory contents that may
have been paged out are permanently unrecoverable, because the
decryption key is never known to you.
We created a temporary cgd with a random
key when scrubbing the disk in the example above, using a
shorthand cgdconfig -s invocation to avoid
creating a parameters file.
The cgdconfig params file includes a “randomkey” keygen method. This is more appropriate for "permanent" random-key configurations, and facilitates the easy automatic configuration of these volumes at boot time.
For example, if you wanted to convert your existing
/dev/wd0b partition to a dedicated
random-key cgd1, use the following command to generate
/etc/cgd/wd0b:
# cgdconfig -g -o /etc/cgd/wd0b -V none -k randomkey blowfish-cbcWhen using the randomkey keygen method, only verification
method "none" can be used, because the contents of the new
cgd are effectively random each time (the
previous data decrypted with a random key). Likewise, the new
disk will not have a valid label or partitions, and
swapctl will complain about configuring
swap devices not marked as such in a disklabel.
In order to automate the process of labeling the disk,
prepare an appropriate disklabel and save it to a file, for
example /etc/cgd/wd0b.disklabel. Please
refer to disklabel(8) for information about
how to use disklabel to set up a swap
partition.
On each reboot, to restore this saved label to the new
cgd, create the
/etc/rc.conf.d/cgd file as below:
swap_device="cgd1"
swap_disklabel="/etc/cgd/wd0b.disklabel"
start_postcmd="cgd_swap"

cgd_swap()
{
	if [ -f $swap_disklabel ]; then
		disklabel -R -r $swap_device $swap_disklabel
	fi
}
The same technique could be extended to encompass using
newfs to re-create an
ffs filesystem for
/tmp if you didn't want to use
mfs.
Avoid data loss by making sure you can always recover your passphrase and parameters file. Protect the parameters file from disclosure, perhaps by storing it on removable media as above, because the salt it contains helps protect against dictionary attacks on the passphrase.
Keeping the data encrypted on your disk is all very well, but what about other copies? You already have at least one other such copy (the backup we used during this setup), and it's not encrypted. Piping dump through file-based encryption tools like gpg can be one way of addressing this issue, but make sure you have all the keys and tools you need to decrypt it to restore after a disaster.
Like any form of software encryption, the
cgd key stays in kernel memory while the
device is configured, and may be accessible to privileged
programs and users, such as /dev/kmem
grovellers. Taking other system security steps, such as
running with elevated securelevel, is highly recommended.
Once the cgd volumes are mounted as normal
filesystems, their contents are accessible like any other
file. Take care of file permissions and ensure your running
system is protected against application and network security
attack.
Avoid using suspend/resume, especially for laptops with a BIOS
suspend-to-disk function. If an attacker can resume your
laptop with the key still in memory, or read it from the
suspend-to-disk memory image on the hard disk later, the whole
point of using cgd is lost.
The following resources contain more information on CGD and the cryptography underlying it:
[nycbug-cgd] I want my cgd aka: I want an encrypted pseudo-device on my laptop.
[elric-cgd] “The CryptoGraphic Disk Driver”. Proceedings of the FREENIX Track: 2003 USENIX Annual Technical Conference. USENIX Association. 179-186. June 9-14, 2003.
[hubertf-cgd] CryptoGraphicFile (CGF), or how to keep sensitive data on your laptop.
[adiantum] “Adiantum: length-preserving encryption for entry-level processors”. Transactions on Symmetric Cryptology. 4. International Association of Cryptologic Research. 39-61.
[fips46-3] FIPS PUB 46-3: Data Encryption Standard (DES). National Institute of Standards and Technology. United States Department of Commerce. October 25, 1999, withdrawn May 19, 2005.
[fips197] FIPS PUB 197: Advanced Encryption Standard (DES). National Institute of Standards and Technology. United States Department of Commerce. November 2001.
[nist-sp800-38a] Recommendation for Block Cipher Modes of Operation: Methods and Techniques. National Institute of Standards and Technology. United States Department of Commerce. December 2001.
[nist-sp800-38e] Recommendation for Block Cipher Modes of Operation: the XTS-AES Mode for Confidentiality on Storage Devices. National Institute of Standards and Technology. United States Department of Commerce. January 2010.
[blowfish] The Blowfish Encryption Algorithm. superseded by Twofish, superseded by Threefish. 1993.
Table of Contents
The CCD driver allows the user to “concatenate” several physical disks into one pseudo volume. While RAIDframe (see Chapter 16, NetBSD RAIDframe) also allows doing this to create RAID level 0 sets, it does not allow you to do striping across disks of different geometry, which is where CCD comes in handy. CCD also allows for an “interleave” to improve disk performance with a gained space loss. This example will not cover that feature.
The steps required to setup a CCD are as follows:
Install physical media
Configure kernel support
Disklabel each volume member of the CCD
Configure the CCD conf file
Initialize the CCD device
Create a filesystem on the new CCD device
Mount the CCD filesystem
This example features a CCD setup on NetBSD/sparc 1.5. The CCD will reside on 4 SCSI disks in a generic external Sun disk pack chassis connected to the external 50 pin SCSI port.
This step is at your own discretion, depending on your platform and the hardware at your disposal.
From my DMESG:
Disk #1:
  probe(esp0:0:0): max sync rate 10.00MB/s
  sd0 at scsibus0 target 0 lun 0: <SEAGATE, ST32430N SUN2.1G, 0444> SCSI2 0/direct fixed
  sd0: 2049 MB, 3992 cyl, 9 head, 116 sec, 512 bytes/sect x 4197405 sectors

Disk #2
  probe(esp0:1:0): max sync rate 10.00MB/s
  sd1 at scsibus0 target 1 lun 0: <SEAGATE, ST32430N SUN2.1G, 0444> SCSI2 0/direct fixed
  sd1: 2049 MB, 3992 cyl, 9 head, 116 sec, 512 bytes/sect x 4197405 sectors

Disk #3
  probe(esp0:2:0): max sync rate 10.00MB/s
  sd2 at scsibus0 target 2 lun 0: <SEAGATE, ST11200N SUN1.05, 9500> SCSI2 0/direct fixed
  sd2: 1005 MB, 1872 cyl, 15 head, 73 sec, 512 bytes/sect x 2059140 sectors

Disk #4
  probe(esp0:3:0): max sync rate 10.00MB/s
  sd3 at scsibus0 target 3 lun 0: <SEAGATE, ST11200N SUN1.05, 8808 > SCSI2 0
  sd3: 1005 MB, 1872 cyl, 15 head, 73 sec, 512 bytes/sect x 2059140 sectors
The following kernel configuration directive is needed to provide CCD device support. It is enabled in the GENERIC kernel:
pseudo-device ccd 4 # concatenated disk devices
In my kernel config, I also hard code SCSI ID associations
to /dev device entries to prevent bad
things from happening:
sd0     at scsibus0 target 0 lun ?
# SCSI disk drives
sd1     at scsibus0 target 1 lun ?
# SCSI disk drives
sd2     at scsibus0 target 2 lun ?
# SCSI disk drives
sd3     at scsibus0 target 3 lun ?
# SCSI disk drives
sd4     at scsibus0 target 4 lun ?
# SCSI disk drives
sd5     at scsibus0 target 5 lun ?
# SCSI disk drives
sd6     at scsibus0 target 6 lun ?
# SCSI disk drives
Each member disk of the CCD will need a special file system established. In this example, I will need to disklabel:
/dev/rsd0c
/dev/rsd1c
/dev/rsd2c
/dev/rsd3c
Note
Always remember to disklabel the character device,
not the block device, in
/dev/r{s,w}d*
Note
On all platforms, the c slice is
symbolic of the entire NetBSD partition and is reserved.
You will probably want to remove any pre-existing disklabels on the disks in the CCD. This can be accomplished in one of two ways with the dd(1) command:
#dd if=/dev/zero of=/dev/rsd0c bs=8k count=1#dd if=/dev/zero of=/dev/rsd1c bs=8k count=1#dd if=/dev/zero of=/dev/rsd2c bs=8k count=1#dd if=/dev/zero of=/dev/rsd3c bs=8k count=1
If your port uses a MBR (Master Boot Record) to partition the disks so that the NetBSD partitions are only part of the overall disk, and other OSs like Windows or Linux use other parts, you can void the MBR and all partitions on disk by using the command:
#dd if=/dev/zero of=/dev/rsd0d bs=8k count=1#dd if=/dev/zero of=/dev/rsd1d bs=8k count=1#dd if=/dev/zero of=/dev/rsd2d bs=8k count=1#dd if=/dev/zero of=/dev/rsd3d bs=8k count=1
This will make all data on the entire disk inaccessible. Note
that the entire disk is slice d on i386
(and some other ports), and c elsewhere (e.g. on
sparc). See the “kern.rawpartition” sysctl - "3"
means "d", "2" means "c".
The default disklabel for the disk will look similar to this:
#disklabel -r sd0[...snip...] bytes/sector: 512 sectors/track: 116 tracks/cylinder: 9 sectors/cylinder: 1044 cylinders: 3992 total sectors: 4197405 [..snip...] 3 partitions: # size offset fstype [fsize bsize cpg] c: 4197405 0 unused 1024 8192 # (Cyl. 0 - 4020*)
You will need to create one “slice” on the NetBSD partition of the disk that consumes the entire partition. The slice must begin at least one cylinder offset from the beginning of the disk/partition to provide space for the special CCD disklabel. The offset should be 1x sectors/cylinder (see following note). Therefore, the “size” value should be “total sectors” minus 1x “sectors/cylinder”. Edit your disklabel accordingly:
#disklabel -e sd0
Note
The offset of a slice of type “ccd” must be a multiple of the “sectors/cylinder” value.
Note
Be sure to export EDITOR=[path to your favorite editor] before editing the disklabels.
Note
The slice must be fstype ccd.
Because there will only be one slice on this partition,
you can recycle the c slice (normally
reserved for symbolic uses). Change your disklabel to
the following:
3 partitions:
#        size   offset    fstype   [fsize bsize   cpg]
  c:  4196361     1044       ccd                       # (Cyl. 1 - 4020*)
Optionally you can setup a slice other than
c to use, simply adjust accordingly
below:
3 partitions:
#        size   offset    fstype   [fsize bsize   cpg]
  a:  4196361     1044       ccd                       # (Cyl. 1 - 4020*)
  c:  4197405       0     unused     1024  8192        # (Cyl. 0 - 4020*)
Be sure to write the label when you have completed. Disklabel will object to your disklabel and prompt you to re-edit if it does not pass its sanity checks.
Once all disks are properly labeled, you will need to
generate a configuration file,
/etc/ccd.conf. The file does not exist by
default, and you will need to create a new one. The format
is:
#ccd ileave flags component devices
Note
For the “ileave”, if a value of zero is used then the disks are concatenated, but if you use a value equal to the “sectors/track” number the disks are interleaved.
Example in this case:
#more /etc/ccd.confccd0 0 none /dev/sd0c /dev/sd1c /dev/sd2c /dev/sd3c
Note
The CCD driver expects block device files as components. Be sure not to use character device files in the configuration.
Once you are confident that your CCD configuration is sane, you can initialize the device using the ccdconfig(8) command: Configure:
#ccdconfig -C -f /etc/ccd.conf
Unconfigure:
#ccdconfig -u -f /etc/ccd.conf
Initializing the CCD device will activate
/dev entries:
/dev/{,r}ccd#:
#ls -la /dev/{,r}ccd0*brw-r----- 1 root operator 9, 0 Apr 28 21:35 /dev/ccd0a brw-r----- 1 root operator 9, 1 Apr 28 21:35 /dev/ccd0b brw-r----- 1 root operator 9, 2 May 12 00:10 /dev/ccd0c brw-r----- 1 root operator 9, 3 Apr 28 21:35 /dev/ccd0d brw-r----- 1 root operator 9, 4 Apr 28 21:35 /dev/ccd0e brw-r----- 1 root operator 9, 5 Apr 28 21:35 /dev/ccd0f brw-r----- 1 root operator 9, 6 Apr 28 21:35 /dev/ccd0g brw-r----- 1 root operator 9, 7 Apr 28 21:35 /dev/ccd0h crw-r----- 1 root operator 23, 0 Jun 12 20:40 /dev/rccd0a crw-r----- 1 root operator 23, 1 Apr 28 21:35 /dev/rccd0b crw-r----- 1 root operator 23, 2 Jun 12 20:58 /dev/rccd0c crw-r----- 1 root operator 23, 3 Apr 28 21:35 /dev/rccd0d crw-r----- 1 root operator 23, 4 Apr 28 21:35 /dev/rccd0e crw-r----- 1 root operator 23, 5 Apr 28 21:35 /dev/rccd0f crw-r----- 1 root operator 23, 6 Apr 28 21:35 /dev/rccd0g crw-r----- 1 root operator 23, 7 Apr 28 21:35 /dev/rccd0h
You may now disklabel the new virtual disk device associated with your CCD:
#disklabel -e ccd0
Once again, there will be only one slice, so you may either
recycle the c slice or create a separate
slice for use.
#disklabel -r ccd0# /dev/rccd0c: type: ccd disk: ccd label: default label flags: bytes/sector: 512 sectors/track: 2048 tracks/cylinder: 1 sectors/cylinder: 2048 cylinders: 6107 total sectors: 12508812 rpm: 3600 interleave: 1 trackskew: 0 cylinderskew: 0 headswitch: 0 # microseconds track-to-track seek: 0 # microseconds drivedata: 0 # size offset fstype [fsize bsize cpg] c: 12508812 0 4.2BSD 1024 8192 16 # (Cyl. 0 - 6107*)
The filesystem will then need to be formatted:
#newfs /dev/rccd0cWarning: 372 sector(s) in last cylinder unallocated /dev/rccd0c: 12508812 sectors in 6108 cylinders of 1 tracks, 2048 sectors 6107.8MB in 382 cyl groups (16 c/g, 16.00MB/g, 3968 i/g) super-block backups (for fsck -b #) at: [...]
Once you have a created a file system on the CCD device,
you can then mount the file system against a mount point
on your system. Be sure to mount the slice labeled type
ffs or 4.2BSD:
#mount /dev/ccd0c /mnt
Then:
#export BLOCKSIZE=1024; dfFilesystem 1K-blocks Used Avail Capacity Mounted on /dev/sd6a 376155 320290 37057 89% / /dev/ccd0c 6058800 1 5755859 0% /mnt
Congratulations, you now have a working CCD. To configure
the CCD device at boot time, set
ccd=yes in
/etc/rc.conf. You can adjust
/etc/fstab to get the filesystem mounted at
boot:
/dev/ccd0c /home ffs rw 1 2
Table of Contents
- 16.1. RAIDframe Introduction
- 16.2. Setup RAIDframe Support
- 16.3. Example: RAID-1 Root Disk
- 16.3.1. Pseudo-Process Outline
- 16.3.2. Hardware Review
- 16.3.3. Initial Install on Disk0/wd0
- 16.3.4. Preparing Disk1/wd1
- 16.3.5. Initializing the RAID Device
- 16.3.6. Setting up Filesystems
- 16.3.7. Migrating System to RAID
- 16.3.8. The first boot with RAID
- 16.3.9. Adding Disk0/wd0 to RAID
- 16.3.10. Testing Boot Blocks
NetBSD uses the CMU RAIDframe software for its RAID subsystem. NetBSD is the primary platform for RAIDframe development. NetBSD also has another in-kernel RAID level 0 system in its ccd(4) subsystem (see Chapter 15, Concatenated Disk Device (CCD) configuration). You should possess some basic knowledge about RAID concepts and terminology before continuing. You should also be at least familiar with the different levels of RAID - Adaptec provides an excellent reference, and the raid(4) manpage contains a short overview too.
RAIDframe is a Software RAID implementation, as opposed to Hardware RAID. As such, it does not need special disk controllers supported by NetBSD. System administrators should give a great deal of consideration to whether software RAID or hardware RAID is more appropriate for their “Mission Critical” applications. For some projects you might consider the use of many of the hardware RAID devices supported by NetBSD. It is truly at your discretion what type of RAID you use, but it is recommend that you consider factors such as: manageability, commercial vendor support, load-balancing and failover, etc.
Depending on the RAID level used, RAIDframe does provide redundancy in the event of a hardware failure. However, it is not a replacement for reliable backups! Software and user-error can still cause data loss. RAIDframe may be used as a mechanism for facilitating backups in systems without backup hardware, but this is not an ideal configuration. Finally, with regard to "high availability", RAID is only a very small component to ensuring data availability.
Once more for good measure: Back up your data!
If you encounter problems using RAIDframe, you have several options for obtaining help.
Read the RAIDframe man pages: raid(4) and raidctl(8) thoroughly.
Search the mailing list archives. Unfortunately, there is no NetBSD list dedicated to RAIDframe support. Depending on the nature of the problem, posts tend to end up in a variety of lists. At a very minimum, search netbsd-users@NetBSD.org, current-users@NetBSD.org. Also search the list for the NetBSD platform on which you are using RAIDframe: port-
${ARCH}@NetBSD.org.Search the Problem Report database.
If your problem persists: Post to the mailing list most appropriate (judgment call). Collect as much verbosely detailed information as possible before posting: Include your dmesg(8) output from
/var/run/dmesg.boot, your kernel config(5) , your/etc/raid[0-9].conf, any relevant errors on/dev/console,/var/log/messages, or tostdout/stderrof raidctl(8). The output of raidctl -s (if available) will be useful as well. Also include details on the troubleshooting steps you've taken thus far, exactly when the problem started, and any notes on recent changes that may have prompted the problem to develop. Remember to be patient when waiting for a response.
The use of RAID will require software and hardware configuration changes.
The GENERIC kernel already has support for RAIDframe. If you have built a custom kernel for your environment the kernel configuration must have the following options:
pseudo-device   raid            8       # RAIDframe disk driver
options         RAID_AUTOCONFIG         # auto-configuration of RAID components
The RAID support must be detected by the NetBSD kernel, which can be checked by looking at the output of the dmesg(8) command.
# dmesg|grep -i raid
Kernelized RAIDframe activated
Historically, the kernel must also contain static mappings between bus
addresses and device nodes in /dev. This
used to
ensure consistency of devices within RAID sets in the event of a
device failure after reboot. Since NetBSD 1.6, however, using
the auto-configuration features of RAIDframe has been
recommended over statically mapping devices. The
auto-configuration features allow drives to move around on the
system, and RAIDframe will automatically determine which
components belong to which RAID sets.
If your system has an Uninterruptible Power Supply (UPS), and/or if your system has redundant power supplies, you should consider enabling the read and write caches on your drives. On systems with redundant power, this will improve drive performance. On systems without redundant power, the write cache could endanger the integrity of RAID data in the event of a power loss.
The dkctl(8) utility can be used for this on all kinds of disks that support the operation (SCSI, EIDE, SATA, ...):
#dkctlwd0getcache /dev/rwd0d: read cache enabled /dev/rwd0d: read cache enable is not changeable /dev/rwd0d: write cache enable is changeable /dev/rwd0d: cache parameters are not savable#dkctlwd0setcache rw#dkctlwd0getcache /dev/rwd0d: read cache enabled /dev/rwd0d: write-back cache enabled /dev/rwd0d: read cache enable is not changeable /dev/rwd0d: write cache enable is changeable /dev/rwd0d: cache parameters are not savable
This example explains how to setup RAID-1 root disk. With RAID-1 components are mirrored and therefore the server can be fully functional in the event of a single component failure. The goal is to provide a level of redundancy that will allow the system to encounter a component failure on either component disk in the RAID and:
Continue normal operations until a maintenance window can be scheduled.
Or, in the unlikely event that the component failure causes a system reboot, be able to quickly reconfigure the system to boot from the remaining component (platform dependent).
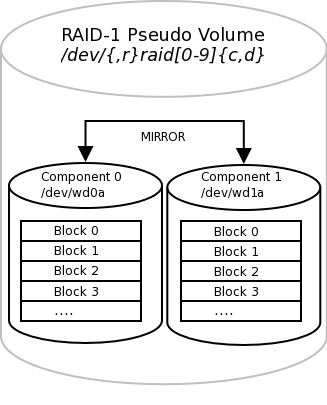
Because RAID-1 provides both redundancy and performance
improvements, its most practical application is on critical
"system" partitions such as /,
/usr, /var,
swap, etc., where read operations are more
frequent than write operations. For other file systems, such as
/home or
/var/,
other RAID levels might be considered (see the references above).
If one were simply creating a generic RAID-1 volume for a non-root
file system, the cookie-cutter examples from the man page could be
followed, but because the root volume must be bootable, certain
special steps must be taken during initial setup. {application}
Note
This example will outline a process that differs only slightly between the x86 and sparc64 platforms. In an attempt to reduce excessive duplication of content, where differences do exist and are cosmetic in nature, they will be pointed out using a section such as this. If the process is drastically different, the process will branch into separate, platform dependent steps.
Although a much more refined process could be developed using a custom copy of NetBSD installed on custom-developed removable media, presently the NetBSD install media lacks RAIDframe tools and support, so the following pseudo process has become the de facto standard for setting up RAID-1 Root.
-
Install a stock NetBSD onto Disk0 of your system.
-
Use the installed system on Disk0/wd0 to setup a RAID Set composed of Disk1/wd1 only.
-
Reboot the system off the Disk1/wd1 with the newly created RAID volume.
-
Add / re-sync Disk0/wd0 back into the RAID set.
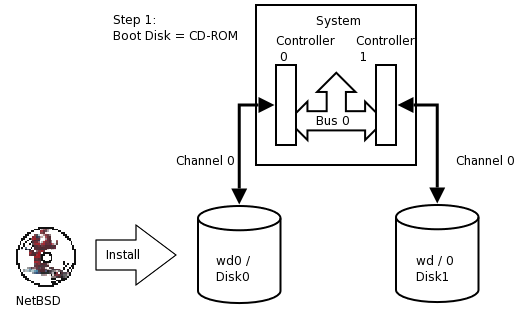
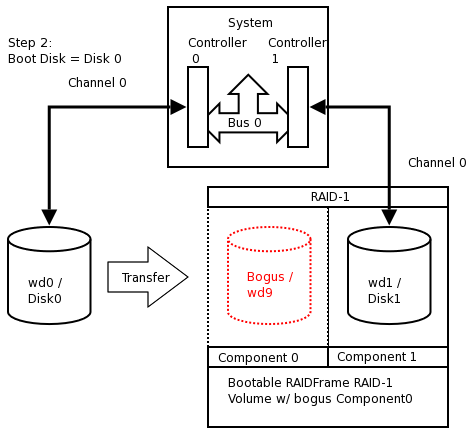
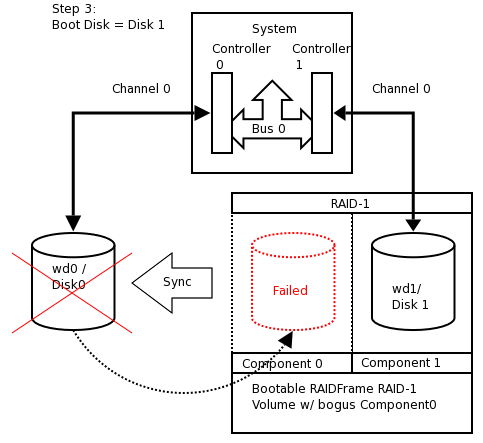
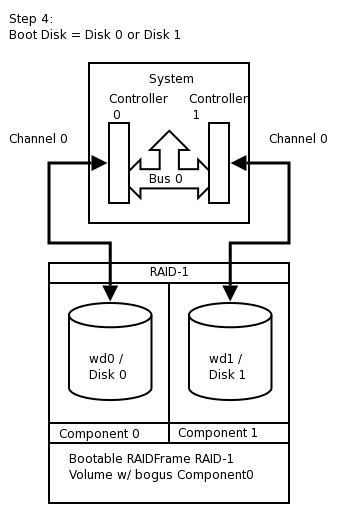
At present, the alpha, amd64, i386, pmax, sparc, sparc64, and vax NetBSD platforms support booting from RAID-1. Booting is not supported from any other RAID level. Booting from a RAID set is accomplished by teaching the 1st stage boot loader to understand both 4.2BSD/FFS and RAID partitions. The 1st boot block code only needs to know enough about the disk partitions and file systems to be able to read the 2nd stage boot blocks. Therefore, at any time, the system's BIOS / firmware must be able to read a drive with 1st stage boot blocks installed. On the x86 platform, configuring this is entirely dependent on the vendor of the controller card / host bus adapter to which your disks are connected. On sparc64 this is controlled by the IEEE 1275 Sun OpenBoot Firmware.
This article assumes two identical
IDE disks (/dev/wd)
which we are going to mirror (RAID-1). These disks are identified
as:{0,1}
# grep ^wd /var/run/dmesg.boot
wd0 at atabus0 drive 0: <WDC WD100BB-75CLB0>
wd0: drive supports 16-sector PIO transfers, LBA addressing
wd0: 9541 MB, 19386 cyl, 16 head, 63 sec, 512 bytes/sect x 19541088 sectors
wd0: drive supports PIO mode 4, DMA mode 2, Ultra-DMA mode 5 (Ultra/100)
wd0(piixide0:0:0): using PIO mode 4, Ultra-DMA mode 2 (Ultra/33) (using DMA data transfers)

wd1 at atabus1 drive 0: <WDC WD100BB-75CLB0>
wd1: drive supports 16-sector PIO transfers, LBA addressing
wd1: 9541 MB, 19386 cyl, 16 head, 63 sec, 512 bytes/sect x 19541088 sectors
wd1: drive supports PIO mode 4, DMA mode 2, Ultra-DMA mode 5 (Ultra/100)
wd1(piixide0:1:0): using PIO mode 4, Ultra-DMA mode 2 (Ultra/33) (using DMA data transfers)
Note
If you are using SCSI, replace
/dev/{,r}wd{0,1} with
/dev/{,r}sd{0,1}
In this example, both disks are jumpered as Master on separate channels on the same controller. You would never want to have both disks on the same bus on the same controller; this creates a single point of failure. Ideally you would have the disks on separate channels on separate controllers. Some SCSI controllers have multiple channels on the same controller, however, a SCSI bus reset on one channel could adversely affect the other channel if the ASIC/IC becomes overloaded. The trade-off with two controllers is that twice the bandwidth is used on the system bus. For purposes of simplification, this example shows two disks on different channels on the same controller.
Note
RAIDframe requires that all components be of the same size. Actually, it will use the lowest common denominator among components of dissimilar sizes. For purposes of illustration, the example uses two disks of identical geometries. Also, consider the availability of replacement disks if a component suffers a critical hardware failure.
Tip
Two disks of identical vendor model numbers could have different geometries if the drive possesses "grown defects". Use a low-level program to examine the grown defects table of the disk. These disks are obviously suboptimal candidates for use in RAID and should be avoided.
Perform a very generic installation onto your Disk0/wd0. Follow the INSTALL instructions for your platform. Install all the sets but do not bother customizing anything other than the kernel as it will be overwritten. See also Chapter 2, Installing NetBSD: Preliminary considerations and preparations.
Tip
On x86, during the sysinst install, when prompted if you want to "use the entire disk for NetBSD", answer "yes".
Once the installation is complete, you should examine the disklabel(8) and fdisk(8) / sunlabel(8) outputs on the system:
# df
Filesystem   1K-blocks        Used       Avail %Cap Mounted on
/dev/wd0a       9487886      502132     8511360   5% /
On x86:
#disklabel -r wd0 type: unknown disk: Disk00 label: flags: bytes/sector: 512 sectors/track: 63 tracks/cylinder: 16 sectors/cylinder: 1008 cylinders: 19386 total sectors: 19541088 rpm: 3600 interleave: 1 trackskew: 0 cylinderskew: 0 headswitch: 0 # microseconds track-to-track seek: 0 # microseconds drivedata: 0 16 partitions: # size offset fstype [fsize bsize cpg/sgs] a: 19276992 63 4.2BSD 1024 8192 46568 # (Cyl. 0* - 19124*) b: 264033 19277055 swap # (Cyl. 19124* - 19385) c: 19541025 63 unused 0 0 # (Cyl. 0* - 19385) d: 19541088 0 unused 0 0 # (Cyl. 0 - 19385)#fdisk /dev/rwd0d Disk: /dev/rwd0d NetBSD disklabel disk geometry: cylinders: 19386, heads: 16, sectors/track: 63 (1008 sectors/cylinder) total sectors: 19541088 BIOS disk geometry: cylinders: 1023, heads: 255, sectors/track: 63 (16065 sectors/cylinder) total sectors: 19541088 Partition table: 0: NetBSD (sysid 169) start 63, size 19541025 (9542 MB, Cyls 0-1216/96/1), Active 1: <UNUSED> 2: <UNUSED> 3: <UNUSED> Bootselector disabled. First active partition: 0
On Sparc64 the command / output differs slightly:
#disklabel -r wd0 type: unknown disk: Disk0 [...snip...] 8 partitions: # size offset fstype [fsize bsize cpg/sgs] a: 19278000 0 4.2BSD 1024 8192 46568 # (Cyl. 0 - 19124) b: 263088 19278000 swap # (Cyl. 19125 - 19385) c: 19541088 0 unused 0 0 # (Cyl. 0 - 19385)#sunlabel /dev/rwd0c sunlabel> P a: start cyl = 0, size = 19278000 (19125/0/0 - 9413.09Mb) b: start cyl = 19125, size = 263088 (261/0/0 - 128.461Mb) c: start cyl = 0, size = 19541088 (19386/0/0 - 9541.55Mb)
Once you have a stock install of NetBSD on Disk0/wd0, you are ready to begin. Disk1/wd1 will be visible and unused by the system. To setup Disk1/wd1, you will use disklabel(8) to allocate the entire second disk to the RAID-1 set.
Tip
The best way to ensure that Disk1/wd1 is completely empty is to 'zero' out the first few sectors of the disk with dd(1) . This will erase the MBR (x86) or Sun disk label (sparc64), as well as the NetBSD disk label. If you make a mistake at any point during the RAID setup process, you can always refer to this process to restore the disk to an empty state.
Note
On sparc64, use /dev/rwd1c instead of
/dev/rwd1d!
# dd if=/dev/zero of=/dev/rwd1d bs=8k count=1
1+0 records in
1+0 records out
8192 bytes transferred in 0.003 secs (2730666 bytes/sec)
Once this is complete, on x86, verify that both the MBR and NetBSD disk labels are gone. On sparc64, verify that the Sun Disk label is gone as well.
On x86:
#fdisk /dev/rwd1d fdisk: primary partition table invalid, no magic in sector 0 Disk: /dev/rwd1d NetBSD disklabel disk geometry: cylinders: 19386, heads: 16, sectors/track: 63 (1008 sectors/cylinder) total sectors: 19541088 BIOS disk geometry: cylinders: 1023, heads: 255, sectors/track: 63 (16065 sectors/cylinder) total sectors: 19541088 Partition table: 0: <UNUSED> 1: <UNUSED> 2: <UNUSED> 3: <UNUSED> Bootselector disabled.#disklabel -r wd1 [...snip...] 16 partitions: # size offset fstype [fsize bsize cpg/sgs] c: 19541025 63 unused 0 0 # (Cyl. 0* - 19385) d: 19541088 0 unused 0 0 # (Cyl. 0 - 19385)
On sparc64:
#sunlabel /dev/rwd1c sunlabel: bogus label on `/dev/wd1c' (bad magic number)#disklabel -r wd1 [...snip...] 3 partitions: # size offset fstype [fsize bsize cpg/sgs] c: 19541088 0 unused 0 0 # (Cyl. 0 - 19385) disklabel: boot block size 0 disklabel: super block size 0
Now that you are certain the second disk is empty, on x86 you must establish the MBR on the second disk using the values obtained from Disk0/wd0 above. We must remember to mark the NetBSD partition active or the system will not boot. You must also create a NetBSD disklabel on Disk1/wd1 that will enable a RAID volume to exist upon it. On sparc64, you will need to simply disklabel(8) the second disk which will write the proper Sun Disk Label.
Tip
disklabel(8) will use your shell' s environment
variable $EDITOR variable to edit the
disklabel. The default is vi(1)
On x86:
#fdisk -0ua /dev/rwd1d fdisk: primary partition table invalid, no magic in sector 0 Disk: /dev/rwd1d NetBSD disklabel disk geometry: cylinders: 19386, heads: 16, sectors/track: 63 (1008 sectors/cylinder) total sectors: 19541088 BIOS disk geometry: cylinders: 1023, heads: 255, sectors/track: 63 (16065 sectors/cylinder) total sectors: 19541088 Do you want to change our idea of what BIOS thinks? [n] Partition 0: <UNUSED> The data for partition 0 is: <UNUSED> sysid: [0..255 default: 169] start: [0..1216cyl default: 63, 0cyl, 0MB] size: [0..1216cyl default: 19541025, 1216cyl, 9542MB] bootmenu: [] Do you want to change the active partition? [n] y Choosing 4 will make no partition active. active partition: [0..4 default: 0] 0 Are you happy with this choice? [n] y We haven't written the MBR back to disk yet. This is your last chance. Partition table: 0: NetBSD (sysid 169) start 63, size 19541025 (9542 MB, Cyls 0-1216/96/1), Active 1: <UNUSED> 2: <UNUSED> 3: <UNUSED> Bootselector disabled. Should we write new partition table? [n] y#disklabel -r -e -I wd1 type: unknown disk: Disk1 label: flags: bytes/sector: 512 sectors/track: 63 tracks/cylinder: 16 sectors/cylinder: 1008 cylinders: 19386 total sectors: 19541088 [...snip...] 16 partitions: # size offset fstype [fsize bsize cpg/sgs] a: 19541025 63 RAID # (Cyl. 0*-19385) c: 19541025 63 unused 0 0 # (Cyl. 0*-19385) d: 19541088 0 unused 0 0 # (Cyl. 0 -19385)
On sparc64:
#disklabel -r -e -I wd1 type: unknown disk: Disk1 label: flags: bytes/sector: 512 sectors/track: 63 tracks/cylinder: 16 sectors/cylinder: 1008 cylinders: 19386 total sectors: 19541088 [...snip...] 3 partitions: # size offset fstype [fsize bsize cpg/sgs] a: 19541088 0 RAID # (Cyl. 0 - 19385) c: 19541088 0 unused 0 0 # (Cyl. 0 - 19385)#sunlabel /dev/rwd1c sunlabel> P a: start cyl = 0, size = 19541088 (19386/0/0 - 9541.55Mb) c: start cyl = 0, size = 19541088 (19386/0/0 - 9541.55Mb)
Note
On x86, the c: and d: slices are reserved. c: represents the NetBSD portion of the disk. d: represents the entire disk. Because we want to allocate the entire NetBSD MBR partition to RAID, and because a: resides within the bounds of c:, the a: and c: slices have same size and offset values. The offset must start at a track boundary (an increment of sectors matching the sectors/track value in the disk label). On sparc64 however, c: represents the entire NetBSD partition in the Sun disk label and d: is not reserved. Also note that sparc64's c: and a: require no offset from the beginning of the disk, however if they should need to be, the offset must start at a cylinder boundary (an increment of sectors matching the sectors/cylinder value).
Next we create the configuration file for the RAID set /
volume. Traditionally, RAIDframe configuration files belong in
/etc and would be read and initialized at
boot time, however, because we are creating a bootable RAID
volume, the configuration data will actually be written into the
RAID volume using the "auto-configure" feature. Therefore, files
are needed only during the initial setup and should not reside in
/etc.
# vi /var/tmp/raid0.conf
START array
1 2 0

START disks
absent
/dev/wd1a

START layout
128 1 1 1

START queue
fifo 100
Note that absent means a non-existing disk.
This will allow us to establish the RAID volume with a bogus
component that we will substitute for Disk0/wd0 at a later
time.
Next we configure the RAID device and initialize the serial
number to something unique. In this example we use a
"YYYYMMDDRevision" scheme. The format
you choose is entirely at your discretion, however the scheme you
choose should ensure that no two RAID sets use the same serial
number at the same time.
After that we initialize the RAID set for the first time, safely ignoring the errors regarding the bogus component.
#raidctl -v -C /var/tmp/raid0.conf raid0 Ignoring missing component at column 0 raid0: Component absent being configured at col: 0 Column: 0 Num Columns: 0 Version: 0 Serial Number: 0 Mod Counter: 0 Clean: No Status: 0 Number of columns do not match for: absent absent is not clean! raid0: Component /dev/wd1a being configured at col: 1 Column: 0 Num Columns: 0 Version: 0 Serial Number: 0 Mod Counter: 0 Clean: No Status: 0 Column out of alignment for: /dev/wd1a Number of columns do not match for: /dev/wd1a /dev/wd1a is not clean! raid0: There were fatal errors raid0: Fatal errors being ignored. raid0: RAID Level 1 raid0: Components: component0[**FAILED**] /dev/wd1a raid0: Total Sectors: 19540864 (9541 MB)#raidctl -v -I 2009122601 raid0#raidctl -v -i raid0 Initiating re-write of parity raid0: Error re-writing parity! Parity Re-write status:#tail -1 /var/log/messages Dec 26 00:00:30 /netbsd: raid0: Error re-writing parity!#raidctl -v -s raid0 Components: component0: failed /dev/wd1a: optimal No spares. component0 status is: failed. Skipping label. Component label for /dev/wd1a: Row: 0, Column: 1, Num Rows: 1, Num Columns: 2 Version: 2, Serial Number: 2009122601, Mod Counter: 7 Clean: No, Status: 0 sectPerSU: 128, SUsPerPU: 1, SUsPerRU: 1 Queue size: 100, blocksize: 512, numBlocks: 19540864 RAID Level: 1 Autoconfig: No Root partition: No Last configured as: raid0 Parity status: DIRTY Reconstruction is 100% complete. Parity Re-write is 100% complete. Copyback is 100% complete.
Caution
The root filesystem must begin at sector 0 of the RAID device. Else, the primary boot loader will be unable to find the secondary boot loader.
The RAID device is now configured and available. The RAID
device is a pseudo disk-device. It will be created with a default
disk label. You must now determine the proper sizes for disklabel
slices for your production environment. For purposes of
simplification in this example, our system will have 8.5 gigabytes
dedicated to / as
/dev/raid0a and the rest allocated to
swap as
/dev/raid0b.
Caution
This is an unrealistic disk layout for a production server; the NetBSD Guide can expand on proper partitioning technique. See Chapter 2, Installing NetBSD: Preliminary considerations and preparations
Note
Note that 1 GB is 2*1024*1024=2097152 blocks (1 block is 512 bytes, or 0.5 kilobytes). Despite what the underlying hardware composing a RAID set is, the RAID pseudo disk will always have 512 bytes/sector.
Note
In our example, the space allocated to the underlying
a: slice composing the RAID set differed
between x86 and sparc64, therefore the total sectors of the RAID
volumes differs:
On x86:
 # disklabel -r -e -I raid0
type: RAID
disk: raid
label: fictitious
flags:
bytes/sector: 512
sectors/track: 128
tracks/cylinder: 8
sectors/cylinder: 1024
cylinders: 19082
total sectors: 19540864
rpm: 3600
interleave: 1
trackskew: 0
cylinderskew: 0
headswitch: 0 # microseconds
track-to-track seek: 0 # microseconds
drivedata: 0

#        size    offset     fstype [fsize bsize cpg/sgs]
 a:  19015680         0     4.2BSD      0     0     0  # (Cyl.      0 - 18569)
 b:    525184  19015680       swap                     # (Cyl.  18570 - 19082*)
 d:  19540864         0     unused      0     0        # (Cyl.      0 - 19082*)
On sparc64:
# disklabel -r -e -I raid0
[...snip...]
total sectors: 19539968
[...snip...]
3 partitions:
#        size    offset     fstype [fsize bsize cpg/sgs]
 a:  19251200         0     4.2BSD      0     0     0  # (Cyl.      0 -  18799)
 b:    288768  19251200       swap                     # (Cyl.  18800 -  19081)
 c:  19539968         0     unused      0     0        # (Cyl.      0 -  19081)
Next, format the newly created /
partition as a 4.2BSD FFSv1 File System:
#newfs -O 1 /dev/rraid0a /dev/rraid0a: 9285.0MB (19015680 sectors) block size 16384, fragment size 2048 using 51 cylinder groups of 182.06MB, 11652 blks, 23040 inodes. super-block backups (for fsck -b #) at: 32, 372896, 745760, 1118624, 1491488, 1864352, 2237216, 2610080, 2982944, ...............................................................................#fsck -fy /dev/rraid0a ** /dev/rraid0a ** File system is already clean ** Last Mounted on ** Phase 1 - Check Blocks and Sizes ** Phase 2 - Check Pathnames ** Phase 3 - Check Connectivity ** Phase 4 - Check Reference Counts ** Phase 5 - Check Cyl groups 1 files, 1 used, 4679654 free (14 frags, 584955 blocks, 0.0% fragmentation)
The new RAID filesystems are now ready for use. We mount
them under /mnt and copy all files from the
old system. This can be done using dump(8) or pax(1).
#mount /dev/raid0a /mnt#df -h /mnt Filesystem Size Used Avail %Cap Mounted on /dev/raid0a 8.9G 2.0K 8.5G 0% /mnt#cd /; pax -v -X -rw -pe . /mnt [...snip...]
The NetBSD install now exists on the RAID filesystem. We need
to fix the mount-points in the new copy of
/etc/fstab or the system will not come up
correctly. Replace instances of wd0 with
raid0.
The swap should be unconfigured upon shutdown to avoid
parity errors on the RAID device. This can be done with a simple,
one-line setting in /etc/rc.conf.
# vi /mnt/etc/rc.conf
swapoff=YES
Next the boot loader must be installed on Disk1/wd1. Failure to install the loader on Disk1/wd1 will render the system un-bootable if Disk0/wd0 fails making the RAID-1 pointless.
Tip
Because the BIOS/CMOS menus in many x86 based systems are misleading with regard to device boot order. I highly recommend utilizing the "-o timeout=X" option supported by the x86 1st stage boot loader. Setup unique values for each disk as a point of reference so that you can easily determine from which disk the system is booting.
Caution
Although it may seem logical to install the 1st stage boot block into
/dev/rwd1
with installboot(8) , this is no longer the case since NetBSD 1.6.x.
If you make this mistake, the boot sector will become irrecoverably damaged
and you will need to start the process over again.{c,d}
On x86, install the boot loader into /dev/rwd1a
:
# /usr/sbin/installboot -o timeout=30 -v /dev/rwd1a /usr/mdec/bootxx_ffsv2
File system:         /dev/rwd1a
Primary bootstrap:   /usr/mdec/bootxx_ffsv2
Ignoring PBR with invalid magic in sector 0 of `/dev/rwd1a'
Boot options:        timeout 30, flags 0, speed 9600, ioaddr 0, console pc
Note
As of NetBSD 6.x, the default filesystem type on x86 platforms
is FFSv2 instead of FFSv1. Make sure you use the correct 1st stage boot block file
/usr/mdec/bootxx_ffsv
when running the installboot(8) command.{1,2}
To find out which filesystem type is currently in use, the command file(1) or dumpfs(8) can be used:
# /usr/bin/file -s /dev/rwd1a
/usr/bin/file -s /dev/rwd1a
/dev/rwd1a: Unix Fast File system [v2] (little-endian), last mounted on ...
or
# /usr/sbin/dumpfs -s /dev/rwd1a
file system: /dev/rwd1a
format  FFSv2
endian  little-endian
...
On sparc64, install the boot loader into
/dev/rwd1a as well, however the "-o" flag is
unsupported (and un-needed thanks to OpenBoot):
# /usr/sbin/installboot -v /dev/rwd1a /usr/mdec/bootblk
File system:         /dev/rwd1a
Primary bootstrap:   /usr/mdec/bootblk
Bootstrap start sector: 1
Bootstrap byte count:   5140
Writing bootstrap
Finally the RAID set must be made auto-configurable and the system should be rebooted. After the reboot everything is mounted from the RAID devices.
#raidctl -v -A root raid0 raid0: Autoconfigure: Yes raid0: Root: Yes#tail -2 /var/log/messages raid0: New autoconfig value is: 1 raid0: New rootpartition value is: 1#raidctl -v -s raid0 [...snip...] Autoconfig: Yes Root partition: Yes Last configured as: raid0 [...snip...]#shutdown -r now
Warning
Always use shutdown(8) when shutting down. Never simply use reboot(8). reboot(8) will not properly run shutdown RC scripts and will not safely disable swap. This will cause dirty parity at every reboot.
At this point, temporarily configure your system to boot Disk1/wd1. See notes in Section 16.3.10, “Testing Boot Blocks” for details on this process. The system should boot now and all filesystems should be on the RAID devices. The RAID will be functional with a single component, however the set is not fully functional because the bogus drive (wd9) has failed.
#egrep -i "raid|root" /var/run/dmesg.boot raid0: RAID Level 1 raid0: Components: component0[**FAILED**] /dev/wd1a raid0: Total Sectors: 19540864 (9541 MB) boot device: raid0 root on raid0a dumps on raid0b root file system type: ffs#df -h Filesystem Size Used Avail Capacity Mounted on /dev/raid0a 8.9G 196M 8.3G 2% / kernfs 1.0K 1.0K 0B 100% /kern#swapctl -l Device 1K-blocks Used Avail Capacity Priority /dev/raid0b 262592 0 262592 0% 0#raidctl -s raid0 Components: component0: failed /dev/wd1a: optimal No spares. component0 status is: failed. Skipping label. Component label for /dev/wd1a: Row: 0, Column: 1, Num Rows: 1, Num Columns: 2 Version: 2, Serial Number: 2009122601, Mod Counter: 65 Clean: No, Status: 0 sectPerSU: 128, SUsPerPU: 1, SUsPerRU: 1 Queue size: 100, blocksize: 512, numBlocks: 19540864 RAID Level: 1 Autoconfig: Yes Root partition: Yes Last configured as: raid0 Parity status: DIRTY Reconstruction is 100% complete. Parity Re-write is 100% complete. Copyback is 100% complete.
We will now add Disk0/wd0 as a component of the RAID. This will destroy the original file system structure. On x86, the MBR disklabel will be unaffected (remember we copied wd0's label to wd1 anyway) , therefore there is no need to "zero" Disk0/wd0. However, we need to relabel Disk0/wd0 to have an identical NetBSD disklabel layout as Disk1/wd1. Then we add Disk0/wd0 as "hot-spare" to the RAID set and initiate the parity reconstruction for all RAID devices, effectively bringing Disk0/wd0 into the RAID-1 set and "synching up" both disks.
#disklabel -r wd1 > /tmp/disklabel.wd1#disklabel -R -r wd0 /tmp/disklabel.wd1
As a last-minute sanity check, you might want to use diff(1) to ensure that the disklabels of Disk0/wd0 match Disk1/wd1. You should also backup these files for reference in the event of an emergency.
#disklabel -r wd0 > /tmp/disklabel.wd0#disklabel -r wd1 > /tmp/disklabel.wd1#diff /tmp/disklabel.wd0 /tmp/disklabel.wd1#fdisk /dev/rwd0 > /tmp/fdisk.wd0#fdisk /dev/rwd1 > /tmp/fdisk.wd1#diff /tmp/fdisk.wd0 /tmp/fdisk.wd1#mkdir /root/RFbackup#cp -p /tmp/{disklabel,fdisk}* /root/RFbackup
Once you are certain, add Disk0/wd0 as a spare component, and start reconstruction:
#raidctl -v -a /dev/wd0a raid0 /netbsd: Warning: truncating spare disk /dev/wd0a to 241254528 blocks#raidctl -v -s raid0 Components: component0: failed /dev/wd1a: optimal Spares: /dev/wd0a: spare [...snip...]#raidctl -F component0 raid0 RECON: initiating reconstruction on col 0 -> spare at col 2 11% |**** | ETA: 04:26 \
Depending on the speed of your hardware, the reconstruction time will vary. You may wish to watch it on another terminal:
# raidctl -S raid0
Reconstruction is 0% complete.
Parity Re-write is 100% complete.
Copyback is 100% complete.
Reconstruction status:
  17% |******                                 | ETA: 03:08 -
After reconstruction, both disks should be “optimal”.
#tail -f /var/log/messages raid0: Reconstruction of disk at col 0 completed raid0: Recon time was 1290.625033 seconds, accumulated XOR time was 0 us (0.000000) raid0: (start time 1093407069 sec 145393 usec, end time 1093408359 sec 770426 usec) raid0: Total head-sep stall count was 0 raid0: 305318 recon event waits, 1 recon delays raid0: 1093407069060000 max exec ticks#raidctl -v -s raid0 Components: component0: spared /dev/wd1a: optimal Spares: /dev/wd0a: used_spare [...snip...]
When the reconstruction is finished we need to install the
boot loader on the Disk0/wd0. On x86, install the boot loader
into /dev/rwd0a:
# /usr/sbin/installboot -o timeout=15 -v /dev/rwd0a /usr/mdec/bootxx_ffsv2
File system:         /dev/rwd0a
Primary bootstrap:   /usr/mdec/bootxx_ffsv2
Boot options:        timeout 15, flags 0, speed 9600, ioaddr 0, console pc
On sparc64:
# /usr/sbin/installboot -v /dev/rwd0a /usr/mdec/bootblk
File system:         /dev/rwd0a
Primary bootstrap:   /usr/mdec/bootblk
Bootstrap start sector: 1
Bootstrap byte count:   5140
Writing bootstrap
And finally, reboot the machine one last time before proceeding. This is required to migrate Disk0/wd0 from status "used_spare" as "Component0" to state "optimal". Refer to notes in the next section regarding verification of clean parity after each reboot.
# shutdown -r nowAt this point, you need to ensure that your system's hardware can properly boot using the boot blocks on either disk. On x86, this is a hardware-dependent process that may be done via your motherboard CMOS/BIOS menu or your controller card's configuration menu.
On x86, use the menu system on your machine to set the boot device order / priority to Disk1/wd1 before Disk0/wd0. The examples here depict a generic Award BIOS.

Save changes and exit.
>> NetBSD/i386 BIOS Boot, Revision 5.2 (from NetBSD 5.0.2)
>> (builds@b7, Sun Feb 7 00:30:50 UTC 2010)
>> Memory: 639/130048 k
Press return to boot now, any other key for boot menu
booting hd0a:netbsd - starting in 30
You can determine that the BIOS is reading Disk1/wd1 because the timeout of the boot loader is 30 seconds instead of 15. After the reboot, re-enter the BIOS and configure the drive boot order back to the default:

Save changes and exit.
>> NetBSD/x86 BIOS Boot, Revision 5.9 (from NetBSD 6.0)
>> Memory: 640/261120 k

     1. Boot normally
     2. Boot single use
     3. Disable ACPI
     4. Disable ACPI and SMP
     5. Drop to boot prompt

Choose an option; RETURN for default; SPACE to stop countdown.Option 1 will be chosen in 0 seconds.
Notice how your custom kernel detects controller/bus/drive assignments independent of what the BIOS assigns as the boot disk. This is the expected behavior.
On sparc64, use the Sun OpenBoot devalias to confirm that both disks are bootable:
Sun Ultra 5/10 UPA/PCI (UltraSPARC-IIi 400MHz), No Keyboard
OpenBoot 3.15, 128 MB memory installed, Serial #nnnnnnnn.
Ethernet address 8:0:20:a5:d1:3b, Host ID: nnnnnnnn.

ok devalias
[...snip...]
cdrom /pci@1f,0/pci@1,1/ide@3/cdrom@2,0:f
disk /pci@1f,0/pci@1,1/ide@3/disk@0,0
disk3 /pci@1f,0/pci@1,1/ide@3/disk@3,0
disk2 /pci@1f,0/pci@1,1/ide@3/disk@2,0
disk1 /pci@1f,0/pci@1,1/ide@3/disk@1,0
disk0 /pci@1f,0/pci@1,1/ide@3/disk@0,0
[...snip...]

ok boot disk0 netbsd
Initializing Memory [...]
Boot device /pci/pci/ide@3/disk@0,0 File and args: netbsd
NetBSD IEEE 1275 Bootblock
>> NetBSD/sparc64 OpenFirmware Boot, Revision 1.13
>> (builds@b7.netbsd.org, Wed Jul 29 23:43:42 UTC 2009)
loadfile: reading header
elf64_exec: Booting [...]
symbols @ [....]
 Copyright (c) 1996, 1997, 1998, 1999, 2000, 2001, 2002, 2003, 2004, 2005,
     2006, 2007, 2008, 2009
     The NetBSD Foundation, Inc.  All rights reserved.
 Copyright (c) 1982, 1986, 1989, 1991, 1993
     The Regents of the University of California.  All rights reserved.
[...snip...]
And the second disk:
ok boot disk2 netbsd
Initializing Memory [...]
Boot device /pci/pci/ide@3/disk@2,0: File and args:netbsd
NetBSD IEEE 1275 Bootblock
>> NetBSD/sparc64 OpenFirmware Boot, Revision 1.13
>> (builds@b7.netbsd.org, Wed Jul 29 23:43:42 UTC 2009)
loadfile: reading header
elf64_exec: Booting [...]
symbols @ [....]
 Copyright (c) 1996, 1997, 1998, 1999, 2000, 2001, 2002, 2003, 2004, 2005,
     2006, 2007, 2008, 2009
     The NetBSD Foundation, Inc.  All rights reserved.
 Copyright (c) 1982, 1986, 1989, 1991, 1993
     The Regents of the University of California.  All rights reserved.
[...snip...]
At each boot, the following should appear in the NetBSD kernel dmesg(8) :
Kernelized RAIDframe activated
raid0: RAID Level 1
raid0: Components: /dev/wd0a /dev/wd1a
raid0: Total Sectors: 19540864 (9541 MB)
boot device: raid0
root on raid0a dumps on raid0b
root file system type: ffs
Once you are certain that both disks are bootable, verify the RAID parity is clean after each reboot:
# raidctl -v -s raid0
Components:
          /dev/wd0a: optimal
          /dev/wd1a: optimal
No spares.
[...snip...]
Component label for /dev/wd0a:
   Row: 0, Column: 0, Num Rows: 1, Num Columns: 2
   Version: 2, Serial Number: 2009122601, Mod Counter: 67
   Clean: No, Status: 0
   sectPerSU: 128, SUsPerPU: 1, SUsPerRU: 1
   Queue size: 100, blocksize: 512, numBlocks: 19540864
   RAID Level: 1
   Autoconfig: Yes
   Root partition: Yes
   Last configured as: raid0
Component label for /dev/wd1a:
   Row: 0, Column: 1, Num Rows: 1, Num Columns: 2
   Version: 2, Serial Number: 2009122601, Mod Counter: 67
   Clean: No, Status: 0
   sectPerSU: 128, SUsPerPU: 1, SUsPerRU: 1
   Queue size: 100, blocksize: 512, numBlocks: 19540864
   RAID Level: 1
   Autoconfig: Yes
   Root partition: Yes
   Last configured as: raid0
Parity status: clean
Reconstruction is 100% complete.
Parity Re-write is 100% complete.
Copyback is 100% complete.Table of Contents
- 17.1. Anatomy of NetBSD Logical Volume Manager
- 17.2. Install physical media
- 17.3. Configure Kernel Support
- 17.4. Disklabel each physical volume member of the LVM
- 17.5. Create Physical Volumes
- 17.6. Create Volume Group
- 17.7. Create Logical Volume
- 17.8. Example: LVM with Volume groups located on raid1
NetBSD LVM allows logical volume management on NetBSD systems, with a well known user interface, which is the same as the Linux LVM2 tools.
NetBSD LVM is built on Linux lvm2tools and libdevmapper, together with a BSD-licensed device-mapper kernel driver specially written for NetBSD.
The LVM driver allows the user to manage available disk space effectively and efficiently. Disk space from several disks, and partitions, known as “Physical Volumes”, can be added to “Volume Groups”, which is the pool of available disk space for “Logical Partitions” aka Logical Volumes.
Logical Volumes can be grown and shrunk at will using the LVM utilities.
The basic building block is the Physical Volume. This is a disk, or a part of a disk, which is used to store data.
Physical Volumes are aggregated together to make Volume Groups, or VGs. Typically, Volume Groups are used to aggregate storage for the same functional unit. Typical Volume Groups could thus be named “Audio”, “Multimedia” or “Documents”. By segregating storage requirements in this functional way, the same type of resilience and redundancy is applied to the whole of the functional unit.
The steps required to setup a LVM are as follows:
Install physical media
Configure kernel support
Configure system, install tools
-
Optional step
Disklabel each volume member of the LVM
Initialize the LVM disk devices
Create a volume group from initialized disks
Create Logical volume from created Volume group
Create a filesystem on the new LV device
Mount the LV filesystem
This example features a LVM setup on NetBSD/i386.
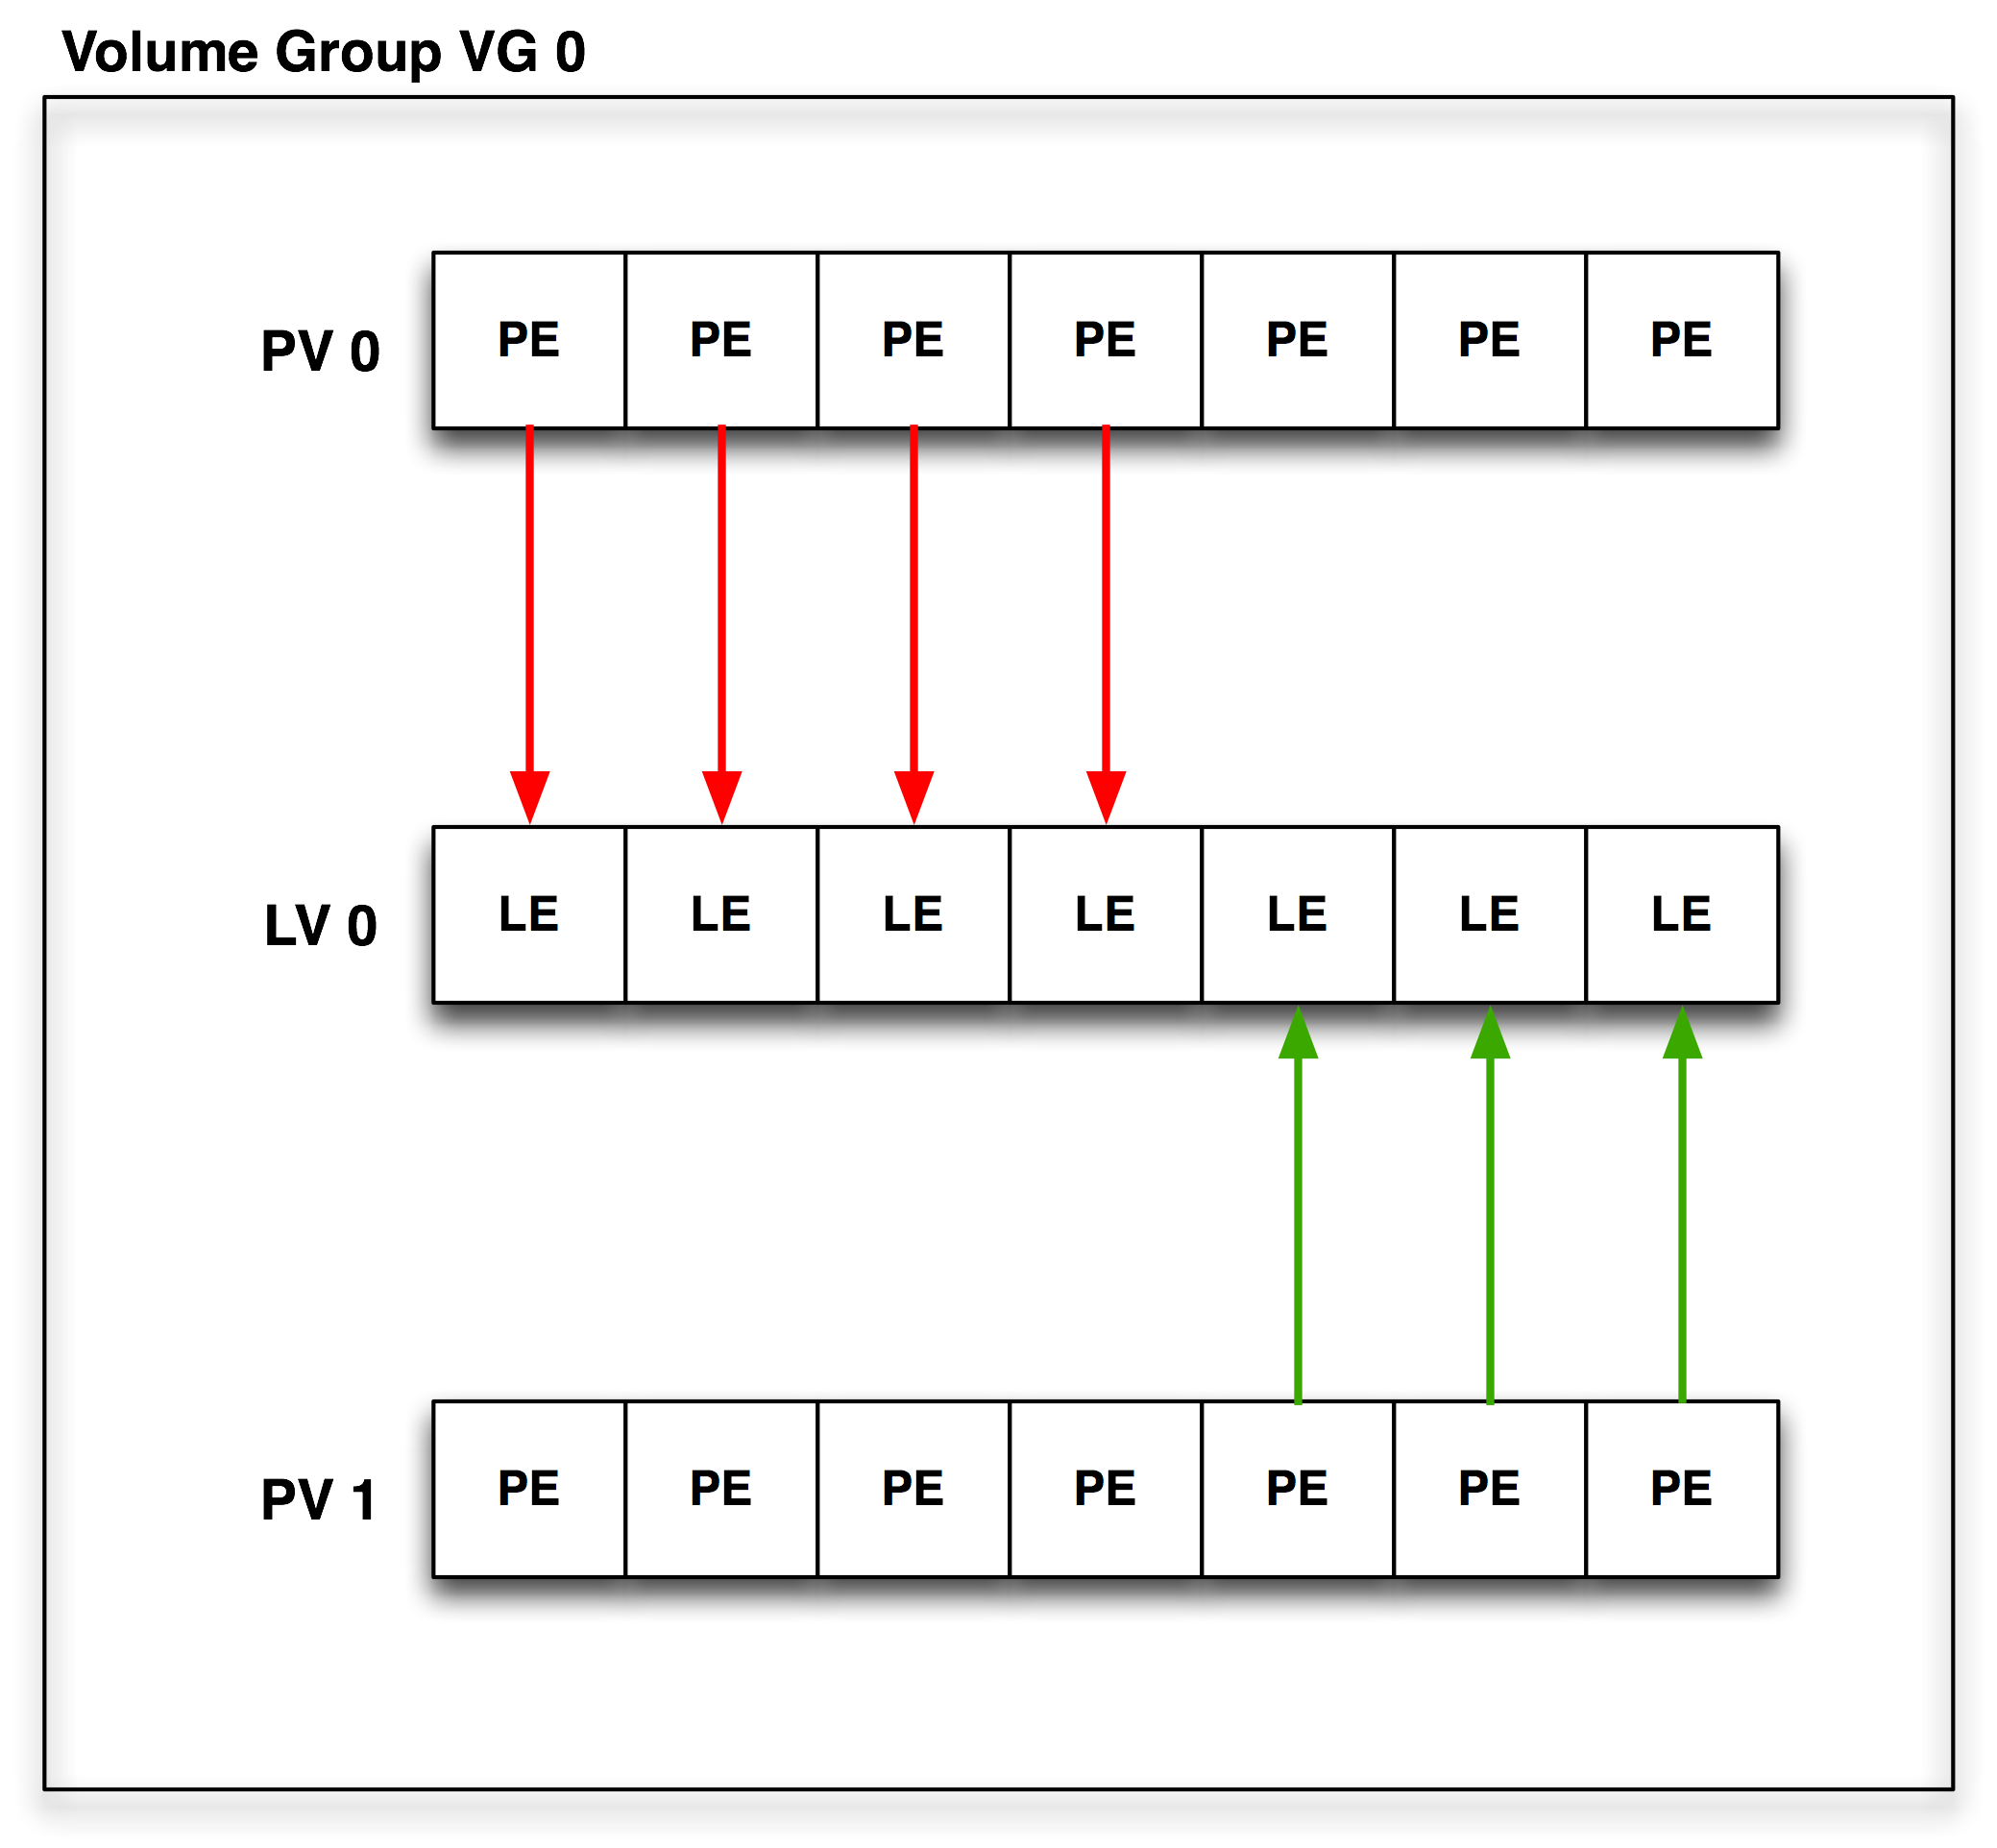
-
Volume Group
The Volume Group is a disk space pool from which the user creates Logical Volumes and to which Physical Volumes can be added. It is the basic administration unit of the NetBSD LVM implementation.
-
Physical Volume
A physical volume is the basic unit in a LVM structure. Every PV consists of small disk space chunks called Physical Extends. Every Volume Group must have at least one PV. A PV can be created on hard disks or hard disk like devices such as raid, ccd, or cgd device.
-
Logical Volume
The Logical Volume is a logical partition created from disk space assigned to the Volume Group. LV can be newfsed and mounted as any other pseudo-disk device. Lvm tools use functionality exported by the device-mapper driver in the kernel to create the LV.
-
Physical Extents
Each physical volume is divided chunks of disk space. The default size is 4MB. Every LV size is rounded by PE size. The LV is created by mapping Logical Extends in the LV to Physical extends in a Volume group.
-
Logical Extents
Each logical volume is split into chunks of disk space, known as logical extents. The extent size is the same for all logical volumes in the volume group.
-
Physical Extents mapping
Every LV consists of “LEs” mapped to “PEs” mapped by a target mapping. Currently, the following mappings are defined.
-
Linear Mapping
will linearly assign range of PEs to LEs.
For example it can map 100 PEs from PV 1 to LV 1 and another 100 PEs from PV 0. -
Stripe Mapping
will interleave the chunks of the logical extents across a number of physical volumes.
-
-
Snapshots
A facility provided by LVM is 'snapshots'. Whilst in standard NetBSD, the “fss” driver can be used to provide filesystem snapshots at a filesystem level, the snapshot facility in the LVM allows the administrator to create a logical block device which presents an exact copy of a logical volume, frozen at some point in time. This facility does require that the snapshot be made at a time when the data on the logical volume is in a consistent state.
Warning
Snapshot feature is not fully implemented in LVM in NetBSD and should not be used in production.
This step is at your own discretion, depending on your platform and the hardware at your disposal. LVM can be used with disklabel partitions or even with standard partitions created with fdisk.
From my “dmesg”:
Disk #1:
            probe(esp0:0:0): max sync rate 10.00MB/s
            sd0 at scsibus0 target 0 lun 0: <SEAGATE, ST32430N SUN2.1G, 0444> SCSI2 0/direct fixed
            sd0: 2049 MB, 3992 cyl, 9 head, 116 sec, 512 bytes/sect x 4197405 sectors

            Disk #2
            probe(esp0:1:0): max sync rate 10.00MB/s
            sd1 at scsibus0 target 1 lun 0: <SEAGATE, ST32430N SUN2.1G, 0444> SCSI2 0/direct fixed
            sd1: 2049 MB, 3992 cyl, 9 head, 116 sec, 512 bytes/sect x 4197405 sectors

            Disk #3
            probe(esp0:2:0): max sync rate 10.00MB/s
            sd2 at scsibus0 target 2 lun 0: <SEAGATE, ST11200N SUN1.05, 9500> SCSI2 0/direct fixed
            sd2: 1005 MB, 1872 cyl, 15 head, 73 sec, 512 bytes/sect x 2059140 sectors

            Disk #4
            probe(esp0:3:0): max sync rate 10.00MB/s
            sd3 at scsibus0 target 3 lun 0: <SEAGATE, ST11200N SUN1.05, 8808 > SCSI2 0
            sd3: 1005 MB, 1872 cyl, 15 head, 73 sec, 512 bytes/sect x 2059140 sectors
The following kernel configuration directive is needed to provide LVM device support. It is provided as a kernel module, so that no extra modifications need be made to a standard NetBSD kernel.
pseudo-device dm
If you do not want to rebuild your kernel only because of LVM support you can use dm kernel module. The devmapper kernel module can be loaded on your system. To get the current status of modules in the kernel, the modstat is used:
vm1# modstat
        NAME            CLASS   SOURCE  REFS    SIZE    REQUIRES
        cd9660          vfs     filesys 0       21442   -
        coredump        misc    filesys 1       2814    -
        exec_elf32      misc    filesys 0       6713    coredump
        exec_script     misc    filesys 0       1091    -
        ffs             vfs     boot    0       163040  -
        kernfs          vfs     filesys 0       10201   -
        ptyfs           vfs     filesys 0       7852    -
When the modload dm is issued, the dm kernel module will be loaded:
vm1# modstat
          NAME            CLASS   SOURCE  REFS    SIZE    REQUIRES
          cd9660          vfs     filesys 0       21442   -
          coredump        misc    filesys 1       2814    -
          dm              misc    filesys 0       14448   -
          exec_elf32      misc    filesys 0       6713    coredump
          exec_script     misc    filesys 0       1091    -
          ffs             vfs     boot    0       163040  -
          kernfs          vfs     filesys 0       10201   -
          ptyfs           vfs     filesys 0       7852    -
Each physical volume disk in LVM will need a special filesystem established. In this example, I will need to disklabel:
/dev/rsd0d
/dev/rsd1d
/dev/rsd2d
/dev/rsd3d
It should be borne in mind that it is possible to use the NetBSD vnd driver to make standard filesystem space appear in the system as a disk device.
Note
Always remember to disklabel the character device, not the block device, in
/dev/r{s,w}d*
Note
On all platforms except amd64 and i386 where the d partition is used for this,
the c slice is symbolic of the entire NetBSD partition and is
reserved.
You will probably want to remove any pre-existing disklabels on the physical volume disks in the LVM. This can be accomplished in one of two ways with the dd(1) command:
#dd if=/dev/zero of=/dev/rsd0d bs=8k count=1#dd if=/dev/zero of=/dev/rsd1d bs=8k count=1#dd if=/dev/zero of=/dev/rsd2d bs=8k count=1#dd if=/dev/zero of=/dev/rsd3d bs=8k count=1
If your port uses a MBR (Master Boot Record) to partition the disks so that the NetBSD partitions are only part of the overall disk, and other OSs like Windows or Linux use other parts, you can void the MBR and all partitions on disk by using the command:
#dd if=/dev/zero of=/dev/rsd0d bs=8k count=1#dd if=/dev/zero of=/dev/rsd1d bs=8k count=1#dd if=/dev/zero of=/dev/rsd2d bs=8k count=1#dd if=/dev/zero of=/dev/rsd3d bs=8k count=1
This will make all data on the entire disk inaccessible. Note that the entire disk is
slice d on i386 (and some other ports), and c
elsewhere (e.g. on sparc). See the “kern.rawpartition” sysctl - "3" means "d",
"2" means "c".
The default disklabel for the disk will look similar to this:
#disklabel -r sd0[...snip...] bytes/sector: 512 sectors/track: 63 tracks/cylinder: 16 sectors/cylinder: 1008 cylinders: 207 total sectors: 208896 rpm: 3600 interleave: 1 trackskew: 0 cylinderskew: 0 headswitch: 0 # microseconds track-to-track seek: 0 # microseconds drivedata: 0 4 partitions: # size offset fstype [fsize bsize cpg/sgs] a: 208896 0 4.2BSD 0 0 0 # (Cyl. 0 - 207*) d: 208896 0 unused 0 0 # (Cyl. 0 - 207*)
You will need to create one “slice” on the NetBSD partition of the disk that consumes the entire partition. The slice must begin at least two sectors after end of disklabel part of disk. On i386 it is sector “63”. Therefore, the “size” value should be “total sectors” minus 2x “sectors”. Edit your disklabel accordingly:
#disklabel -e sd0
Note
The offset of a slice of type “4.2BSD” must be a multiple of the “sectors” value.
Note
Be sure to export EDITOR=[path to your favorite editor] before editing the disklabels.
Note
The slice must be fstype 4.2BSD.
Because there will only be one slice on this partition, you can recycle the
d slice (normally reserved for symbolic uses). Change your disklabel to the
following:
3 partitions:
            #        size   offset    fstype   [fsize bsize   cpg]
            d:  4197403       65      4.2BSD                       # (Cyl. 1 - 4020*)
Optionally you can setup a slice other than d to use, simply adjust
accordingly below:
3 partitions:
            #        size   offset    fstype   [fsize bsize   cpg]
            a:  4197403       65      4.2BSD                       # (Cyl. 1 - 4020*)
            c:  4197405       0       unused     1024  8192        # (Cyl. 0 - 4020*)
Be sure to write the label when you have completed. Disklabel will object to your disklabel and prompt you to re-edit if it does not pass its sanity checks.
Once all disks are properly labeled, you will need to create physical volume on them. Every partition/disk added to LVM must have physical volume header on start of it. All informations, like Volume group where Physical volume belongs are stored in this header.
# lvm pvcreate /dev/rwd1[ad]
Status of physical volume can be viewed with pvdisplay command.
# lvm pvdisplay
Once all disks are properly labeled with physical volume header, volume group must be created from them. Volume Group is pool of PEs from which administrator can create Logical Volumes “partitions”.
# lvm vgcreate vg0 /dev/rwd1[ad]
vg0 is name of Volume Group
/dev/rwd1[ad] is Physical Volume
Volume group can be later extended/reduced with vgextend and vgreduce commands. These commands adds physical volumes to VG.
          # lvm vgextend vg0 /dev/rwd1[ad]

          # lvm vgreduce vg0 /dev/rwd1[ad]
Status of Volume group can be viewed with vgdisplay command.
# lvm vgdisplay vg0
Once Volume Group was created administrator can create “logical partitions” volumes.
# lvm lvcreate -L 20M -n lv1 vg0
vg0 is name of Volume Group
-L 20M is size of Logical Volume
-n lv1 is name of Logical Volume
Logical Volume can be later extended/reduced with lvextend and lvreduce commands.
          # lvm lvextend -L+20M /dev/vg0/lv1

          # lvm lvreduce -L-20M /dev/vg0/lv1
Note
To shrink the lv partition, you must first shrink the filesystem using resize_ffs(8) (which as of NetBSD 9.0 does not support shrinking of FFSv2 yet).
Status of Logical Volume can be viewed with lvdisplay command.
# lvm lvdisplay lv0/lv1
After reboot all functional LV's in defined Volume group can be activated with command
# lvm vgchange -a y
Motivation for using raid 1 disk as physical volume disk for Volume Group is disk reliability. With PV on raid 1 disk it is possible to use Logical Volumes even after disk failure.
Before we can start work with the LVM tools. We have to be sure that NetBSD dm driver was properly compiled into the kernel or loaded as a module. Easiest way how to find if we have dm driver available is run modstat. For more information see Configure Kernel Support chapter.
Following example raid configuration defined in Raid 1 configuration user will set up clean raid1 disk device. With 2 disks in a mirror mode.
Figure 17.2. Example raid 1 configuration
# vi /var/tmp/raid0.conf
START array
1 2 0

START disks
/dev/wd2a
/dev/wd1a

START layout
128 1 1 1

START queue
fifo 100#raidctl -v -C /var/tmp/raid0.conf raid0 raid0: Component /dev/wd1a being configured at col: 0 Column: 0 Num Columns: 0 Version: 0 Serial Number: 0 Mod Counter: 0 Clean: No Status: 0 Column out of alignment for: /dev/wd2a Number of columns do not match for: /dev/wd2a /dev/wd2a is not clean! raid0: Component /dev/wd1a being configured at col: 1 Column: 0 Num Columns: 0 Version: 0 Serial Number: 0 Mod Counter: 0 Clean: No Status: 0 Column out of alignment for: /dev/wd1a Number of columns do not match for: /dev/wd1a /dev/wd1a is not clean! raid0: There were fatal errors raid0: Fatal errors being ignored. raid0: RAID Level 1 raid0: Components: /dev/wd2a /dev/wd1a raid0: Total Sectors: 19540864 (9541 MB)#raidctl -v -I 2004082401 raid0#raidctl -v -i raid0 Initiating re-write of parity#tail -1 /var/log/messages raid0: Error re-writing parity!#raidctl -v -s raid0 Components: /dev/wd2a: optimal /dev/wd1a: optimal No spares. Component label for /dev/wd1a: Row: 0, Column: 1, Num Rows: 1, Num Columns: 2 Version: 2, Serial Number: 2004082401, Mod Counter: 7 Clean: No, Status: 0 sectPerSU: 128, SUsPerPU: 1, SUsPerRU: 1 Queue size: 100, blocksize: 512, numBlocks: 19540864 RAID Level: 1 Autoconfig: No Root partition: No Last configured as: raid0 Parity status: DIRTY Reconstruction is 100% complete. Parity Re-write is 100% complete. Copyback is 100% complete. Component label for /dev/wd2a: Row: 0, Column: 1, Num Rows: 1, Num Columns: 2 Version: 2, Serial Number: 2004082401, Mod Counter: 7 Clean: No, Status: 0 sectPerSU: 128, SUsPerPU: 1, SUsPerRU: 1 Queue size: 100, blocksize: 512, numBlocks: 19540864 RAID Level: 1 Autoconfig: No Root partition: No Last configured as: raid0 Parity status: DIRTY Reconstruction is 100% complete. Parity Re-write is 100% complete. Copyback is 100% complete.
After setting up raid we need to create disklabel on raid disk.
On i386:
 # disklabel -r -e -I raid0
type: RAID
disk: raid
label: fictitious
flags:
bytes/sector: 512
sectors/track: 128
tracks/cylinder: 8
sectors/cylinder: 1024
cylinders: 19082
total sectors: 19540864
rpm: 3600
interleave: 1
trackskew: 0
cylinderskew: 0
headswitch: 0 # microseconds
track-to-track seek: 0 # microseconds
drivedata: 0

#        size    offset     fstype [fsize bsize cpg/sgs]
a:  19540789        65     4.2BSD      0     0     0  # (Cyl.      0 - 18569)
d:  19540864         0     unused      0     0        # (Cyl.      0 - 19082*)
On sparc64:
# disklabel -r -e -I raid0
[...snip...]
total sectors: 19539968
[...snip...]
2 partitions:
#        size    offset     fstype [fsize bsize cpg/sgs]
a:  19540793        65     4.2BSD      0     0     0  # (Cyl.      0 -  18799)
c:  19539968         0     unused      0     0        # (Cyl.      0 -  19081)
Partitions should be created with offset 65, because sectors < than 65 sector are marked as readonly and therefore can't be rewritten.
Physical volumes can be created on any disk like device and on any partition on it we can use a or d on sparc64 c partitions. PV will label selected partition as LVM used and add needed information to it.
PV is created on char disk device entry. As any other disk operation in the NetBSD.
# lvm pvcreate /dev/rraid0a
For our example purpose I will create vg00 Volume Group. The first parameter of vgcreate command is Volume Group name and second is PV created on raid. If you later found that VG size is no sufficient and you need more space we will can add it with vgextend command.
#lvm vgcreate vg00 /dev/rraid0a#lvm vgextend vg00 /dev/rraid1a
Warning
If you add non-raid PV to your Volume Group your data are not safe anymore. Therefore you should add raid based PV to VG if you want to keep your data safe.
For our example purpose we will create Logical Volume named lv0. If you later found that LV size is not sufficient for you can add it with lvresize command.
Note
You must also resize the filesystem, when you resize LV, otherwise you will not see any filesystem change when you mount LV.
Warning
Be aware that to shrink LV you must first shrink the filesystem (and shrinking of FFSv2 filesystems is not supported yet as of NetBSD 9.0).
This means that for FFSv2 filesystems, the -L-* option is not available in NetBSD.
#lvm lvcreate -n lv0 -L 2G vg00#lvm lvresize -L+2G vg00/lv0
All lv device nodes are created in the /dev/vg00/
directory. File system can be create on LV with this command. After
filesystem creation LV can be mounted to system.
#newfs -O2 /dev/vg00/rlv0#mount /dev/vg00/lv0 /mnt/
For Proper LVM integration you have to enable lvm rc.d script,
which detect LVs during boot and enables them. You have to add entry
for Logical Volume to the /etc/fstab file.
# cat /etc/rc.conf
[snip]
lvm=yes
# cat /etc/fstab
/dev/wd0a               /       ffs     rw               1 1
/dev/vg00/lv0           /lv0/   ffs     rw               1 1
[snip]
Table of Contents
- 18.1. About
- 18.2. Introduction
- 18.3. Terms and conventions
- 18.4. PAM Essentials
- 18.5. PAM Configuration
- 18.6. PAM modules
- 18.7. PAM Application Programming
- 18.8. PAM Module Programming
- 18.9. Sample PAM Application
- 18.10. Sample PAM Module
- 18.11. Sample PAM Conversation Function
- 18.12. Further Reading
This article describes the underlying principles and mechanisms of the Pluggable Authentication Modules (PAM) library, and explains how to configure PAM, how to integrate PAM into applications, and how to write PAM modules.
See Section D.3.2, “Networks Associates Technology's license on the PAM article” for the license of this chapter.
The Pluggable Authentication Modules (PAM) library is a generalized API for authentication-related services which allows a system administrator to add new authentication methods simply by installing new PAM modules, and to modify authentication policies by editing configuration files.
PAM was defined and developed in 1995 by Vipin Samar and Charlie Lai of Sun Microsystems, and has not changed much since. In 1997, the Open Group published the X/Open Single Sign-on (XSSO) preliminary specification, which standardized the PAM API and added extensions for single (or rather integrated) sign-on. At the time of this writing, this specification has not yet been adopted as a standard.
Although this article focuses primarily on FreeBSD 5.x and NetBSD 3.x, which both use OpenPAM, it should be equally applicable to FreeBSD 4.x, which uses Linux-PAM, and other operating systems such as Linux and Solaris™.
The terminology surrounding PAM is rather confused. Neither Samar and Lai's original paper nor the XSSO specification made any attempt at formally defining terms for the various actors and entities involved in PAM, and the terms that they do use (but do not define) are sometimes misleading and ambiguous. The first attempt at establishing a consistent and unambiguous terminology was a whitepaper written by Andrew G. Morgan (author of Linux-PAM) in 1999. While Morgan's choice of terminology was a huge leap forward, it is in this author's opinion by no means perfect. What follows is an attempt, heavily inspired by Morgan, to define precise and unambiguous terms for all actors and entities involved in PAM.
- account
The set of credentials the applicant is requesting from the arbitrator.
- applicant
The user or entity requesting authentication.
- arbitrator
The user or entity who has the privileges necessary to verify the applicant's credentials and the authority to grant or deny the request.
- chain
A sequence of modules that will be invoked in response to a PAM request. The chain includes information about the order in which to invoke the modules, what arguments to pass to them, and how to interpret the results.
- client
The application responsible for initiating an authentication request on behalf of the applicant and for obtaining the necessary authentication information from him.
- facility
One of the four basic groups of functionality provided by PAM: authentication, account management, session management and authentication token update.
- module
A collection of one or more related functions implementing a particular authentication facility, gathered into a single (normally dynamically loadable) binary file and identified by a single name.
- policy
The complete set of configuration statements describing how to handle PAM requests for a particular service. A policy normally consists of four chains, one for each facility, though some services do not use all four facilities.
- server
The application acting on behalf of the arbitrator to converse with the client, retrieve authentication information, verify the applicant's credentials and grant or deny requests.
- service
A class of servers providing similar or related functionality and requiring similar authentication. PAM policies are defined on a per-service basis, so all servers that claim the same service name will be subject to the same policy.
- session
The context within which service is rendered to the applicant by the server. One of PAM's four facilities, session management, is concerned exclusively with setting up and tearing down this context.
- token
A chunk of information associated with the account, such as a password or passphrase, which the applicant must provide to prove his identity.
- transaction
A sequence of requests from the same applicant to the same instance of the same server, beginning with authentication and session set-up and ending with session tear-down.
This section aims to illustrate the meanings of some of the terms defined above by way of a handful of simple examples.
This simple example shows alice
su(1)'ing to root.
$whoamialice$ls -l `which su`-r-sr-xr-x 1 root wheel 10744 Dec 6 19:06 /usr/bin/su$su -Password:xi3kiune#whoami root
The example below shows eve try to
initiate an ssh(1) connection to
login.example.com, ask to log in as
bob, and succeed. Bob should have chosen
a better password!
$whoamieve$ssh bob@login.example.combob@login.example.com's password:godLast login: Thu Oct 11 09:52:57 2001 from 192.168.0.1 NetBSD 3.0 (LOGIN) #1: Thu Mar 10 18:22:36 WET 2005 Welcome to NetBSD!$
The following is FreeBSD's default policy for
sshd:
sshd	auth		required	pam_nologin.so	no_warn
sshd	auth		required	pam_unix.so	no_warn try_first_pass
sshd	account		required	pam_login_access.so
sshd	account		required	pam_unix.so
sshd	session		required	pam_lastlog.so	no_fail
sshd	password	required	pam_permit.so
This policy applies to the
sshdservice (which is not necessarily restricted to the sshd(8) server.)auth,account,sessionandpasswordare facilities.pam_nologin.so,pam_unix.so,pam_login_access.so,pam_lastlog.soandpam_permit.soare modules. It is clear from this example thatpam_unix.soprovides at least two facilities (authentication and account management.)
There are some differences between FreeBSD and NetBSD PAM policies:
By default, every configuration is done under
/etc/pam.d.If configuration is non-existent, you will not have access to the system, in contrast with FreeBSD that has a default policy of allowing authentication.
For authentication, NetBSD forces at least one
required,requisiteorbindingmodule to be present.
The PAM API offers six different authentication primitives grouped in four facilities, which are described below.
auth-
Authentication. This facility concerns itself with authenticating the applicant and establishing the account credentials. It provides two primitives:
pam_authenticate(3) authenticates the applicant, usually by requesting an authentication token and comparing it with a value stored in a database or obtained from an authentication server.
pam_setcred(3) establishes account credentials such as user ID, group membership and resource limits.
account-
Account management. This facility handles non-authentication-related issues of account availability, such as access restrictions based on the time of day or the server's work load. It provides a single primitive:
pam_acct_mgmt(3) verifies that the requested account is available.
session-
Session management. This facility handles tasks associated with session set-up and tear-down, such as login accounting. It provides two primitives:
pam_open_session(3) performs tasks associated with session set-up: add an entry in the
utmpandwtmpdatabases, start an SSH agent, etc.pam_close_session(3) performs tasks associated with session tear-down: add an entry in the
utmpandwtmpdatabases, stop the SSH agent, etc.
password-
Password management. This facility is used to change the authentication token associated with an account, either because it has expired or because the user wishes to change it. It provides a single primitive:
pam_chauthtok(3) changes the authentication token, optionally verifying that it is sufficiently hard to guess, has not been used previously, etc.
Modules are a very central concept in PAM; after all, they are the “M” in “PAM”. A PAM module is a self-contained piece of program code that implements the primitives in one or more facilities for one particular mechanism; possible mechanisms for the authentication facility, for instance, include the UNIX® password database, NIS, LDAP and Radius.
FreeBSD and NetBSD implement each mechanism in a single module,
named
pam_
(for instance, mechanism.sopam_unix.so for the UNIX®
mechanism.) Other implementations sometimes have separate
modules for separate facilities, and include the facility
name as well as the mechanism name in the module name. To
name one example, Solaris™ has a
pam_dial_auth.so.1 module which is
commonly used to authenticate dialup users.
Also, almost every module has a man page with the same name,
i.e.: pam_unix(8) explains how the
pam_unix.so module works.
FreeBSD's original PAM implementation, based on Linux-PAM, did not use version numbers for PAM modules. This would commonly cause problems with legacy applications, which might be linked against older versions of the system libraries, as there was no way to load a matching version of the required modules.
OpenPAM, on the other hand, looks for modules that have the same version number as the PAM library (currently 2 in FreeBSD and 0 in NetBSD), and only falls back to an unversioned module if no versioned module could be loaded. Thus legacy modules can be provided for legacy applications, while allowing new (or newly built) applications to take advantage of the most recent modules.
Although Solaris™ PAM modules commonly have a version number, they're not truly versioned, because the number is a part of the module name and must be included in the configuration.
When a server initiates a PAM transaction, the PAM library tries to load a policy for the service specified in the pam_start(3) call. The policy specifies how authentication requests should be processed, and is defined in a configuration file. This is the other central concept in PAM: the possibility for the admin to tune the system security policy (in the wider sense of the word) simply by editing a text file.
A policy consists of four chains, one for each of the four PAM facilities. Each chain is a sequence of configuration statements, each specifying a module to invoke, some (optional) parameters to pass to the module, and a control flag that describes how to interpret the return code from the module.
Understanding the control flags is essential to understanding PAM configuration files. There are a number of different control flags:
binding-
If the module succeeds and no earlier module in the chain has failed, the chain is immediately terminated and the request is granted. If the module fails, the rest of the chain is executed, but the request is ultimately denied.
This control flag was introduced by Sun in Solaris™ 9 (SunOS™ 5.9), and is also supported by OpenPAM.
requiredIf the module succeeds, the rest of the chain is executed, and the request is granted unless some other module fails. If the module fails, the rest of the chain is also executed, but the request is ultimately denied.
requisiteIf the module succeeds, the rest of the chain is executed, and the request is granted unless some other module fails. If the module fails, the chain is immediately terminated and the request is denied.
sufficient-
If the module succeeds and no earlier module in the chain has failed, the chain is immediately terminated and the request is granted. If the module fails, the module is ignored and the rest of the chain is executed.
As the semantics of this flag may be somewhat confusing, especially when it is used for the last module in a chain, it is recommended that the
bindingcontrol flag be used instead if the implementation supports it. optionalThe module is executed, but its result is ignored. If all modules in a chain are marked
optional, all requests will always be granted.
When a server invokes one of the six PAM primitives, PAM
retrieves the chain for the facility the primitive belongs to,
and invokes each of the modules listed in the chain, in the
order they are listed, until it reaches the end, or determines
that no further processing is necessary (either because a
binding or
sufficient module succeeded, or because a
requisite module failed.) The request is
granted if and only if at least one module was invoked, and
all non-optional modules succeeded.
Note that it is possible, though not very common, to have the same module listed several times in the same chain. For instance, a module that looks up user names and passwords in a directory server could be invoked multiple times with different parameters specifying different directory servers to contact. PAM treat different occurrences of the same module in the same chain as different, unrelated modules.
The lifecycle of a typical PAM transaction is described below. Note that if any of these steps fails, the server should report a suitable error message to the client and abort the transaction.
If necessary, the server obtains arbitrator credentials through a mechanism independent of PAM—most commonly by virtue of having been started by
root, or of being setuidroot.The server calls pam_start(3) to initialize the PAM library and specify its service name and the target account, and register a suitable conversation function.
The server obtains various information relating to the transaction (such as the applicant's user name and the name of the host the client runs on) and submits it to PAM using pam_set_item(3).
The server calls pam_authenticate(3) to authenticate the applicant.
The server calls pam_acct_mgmt(3) to verify that the requested account is available and valid. If the password is correct but has expired, pam_acct_mgmt(3) will return
PAM_NEW_AUTHTOK_REQDinstead ofPAM_SUCCESS.If the previous step returned
PAM_NEW_AUTHTOK_REQD, the server now calls pam_chauthtok(3) to force the client to change the authentication token for the requested account.Now that the applicant has been properly authenticated, the server calls pam_setcred(3) to establish the credentials of the requested account. It is able to do this because it acts on behalf of the arbitrator, and holds the arbitrator's credentials.
Once the correct credentials have been established, the server calls pam_open_session(3) to set up the session.
The server now performs whatever service the client requested—for instance, provide the applicant with a shell.
Once the server is done serving the client, it calls pam_close_session(3) to tear down the session.
Finally, the server calls pam_end(3) to notify the PAM library that it is done and that it can release whatever resources it has allocated in the course of the transaction.
The traditional PAM policy file is
/etc/pam.conf. This file contains all
the PAM policies for your system. Each line of the file
describes one step in a chain, as shown below:
login auth required pam_nologin.so no_warn
The fields are, in order: service name, facility name, control flag, module name, and module arguments. Any additional fields are interpreted as additional module arguments.
A separate chain is constructed for each service /
facility pair, so while the order in which lines for the
same service and facility appear is significant, the order
in which the individual services and facilities are listed
is not. The examples in the original PAM paper grouped
configuration lines by facility, and the Solaris™ stock
pam.conf still does that, but FreeBSD's
stock configuration groups configuration lines by service.
Either way is fine; either way makes equal sense.
OpenPAM and Linux-PAM support an alternate configuration
mechanism, which is the preferred mechanism in FreeBSD and
NetBSD.
In this scheme, each policy is contained in a separate file
bearing the name of the service it applies to. These files
are stored in /etc/pam.d/.
These per-service policy files have only four fields
instead of pam.conf's five: the service
name field is omitted. Thus, instead of the sample
pam.conf line from the previous
section, one would have the following line in
/etc/pam.d/login:
auth required pam_nologin.so no_warn
As a consequence of this simplified syntax, it is
possible to use the same policy for multiple services by
linking each service name to a same policy file. For
instance, to use the same policy for the
su and sudo services,
one could do as follows:
#cd /etc/pam.d#ln -s su sudo
This works because the service name is determined from the file name rather than specified in the policy file, so the same file can be used for multiple differently-named services.
Since each service's policy is stored in a separate
file, the pam.d mechanism also makes it
very easy to install additional policies for third-party
software packages.
As we have seen above, PAM policies can be found in a
number of places. If no configuration file is found for a
particular service, the /etc/pam.d/other
is used instead. If that file does not exist,
/etc/pam.conf is searched for entries
matching he specified service or, failing that, the "other"
service.
It is essential to understand that PAM's configuration system is centered on chains.
As explained in the PAM policy files section, each line in
/etc/pam.conf consists of four or more
fields: the service name, the facility name, the control flag,
the module name, and zero or more module arguments.
The service name is generally (though not always) the name of the application the statement applies to. If you are unsure, refer to the individual application's documentation to determine what service name it uses.
Note that if you use /etc/pam.d/
instead of /etc/pam.conf, the service
name is specified by the name of the policy file, and omitted
from the actual configuration lines, which then start with the
facility name.
The facility is one of the four facility keywords described in the Facilities and primitives section.
Likewise, the control flag is one of the four keywords described in the Chains and policies section, describing how to interpret the return code from the module. Linux-PAM supports an alternate syntax that lets you specify the action to associate with each possible return code, but this should be avoided as it is non-standard and closely tied in with the way Linux-PAM dispatches service calls (which differs greatly from the way Solaris™ and OpenPAM do it.) Unsurprisingly, OpenPAM does not support this syntax.
To configure PAM correctly, it is essential to understand how policies are interpreted.
When an application calls pam_start(3), the PAM
library loads the policy for the specified service and
constructs four module chains (one for each facility.) If one
or more of these chains are empty, the corresponding chains
from the policy for the other service are
substituted.
When the application later calls one of the six PAM primitives, the PAM library retrieves the chain for the corresponding facility and calls the appropriate service function in each module listed in the chain, in the order in which they were listed in the configuration. After each call to a service function, the module type and the error code returned by the service function are used to determine what happens next. With a few exceptions, which we discuss below, the following table applies:
Table 18.1. PAM chain execution summary
PAM_SUCCESS |
PAM_IGNORE |
other |
|
|---|---|---|---|
| binding | if (!fail) break; | - | fail = true; |
| required | - | - | fail = true; |
| requisite | - | - | fail = true; break; |
| sufficient | if (!fail) break; | - | - |
| optional | - | - | - |
If fail is true at the end of a chain,
or when a “break” is reached, the dispatcher
returns the error code returned by the first module that
failed. Otherwise, it returns
PAM_SUCCESS.
The first exception of note is that the error code
PAM_NEW_AUTHTOK_REQD is treated like a
success, except that if no module failed, and at least one
module returned PAM_NEW_AUTHTOK_REQD, the
dispatcher will return
PAM_NEW_AUTHTOK_REQD.
The second exception is that pam_setcred(3) treats
binding and
sufficient modules as if they were
required.
The third and final exception is that
pam_chauthtok(3) runs the entire chain twice (once for
preliminary checks and once to actually set the password), and
in the preliminary phase it treats
binding and
sufficient modules as if they were
required.
18.6.1.1. pam_deny(8)
The pam_deny(8) module is one of the simplest modules
available; it responds to any request with
PAM_AUTH_ERR. It is useful for quickly
disabling a service (add it to the top of every chain), or for
terminating chains of sufficient
modules.
18.6.1.2. pam_echo(8)
The pam_echo(8) module simply passes its arguments to
the conversation function as a
PAM_TEXT_INFO message. It is mostly useful
for debugging, but can also serve to display messages such as
“Unauthorized access will be prosecuted” before
starting the authentication procedure.
18.6.1.3. pam_exec(8)
The pam_exec(8) module takes its first argument to be the name of a program to execute, and the remaining arguments are passed to that program as command-line arguments. One possible application is to use it to run a program at login time which mounts the user's home directory.
18.6.1.4. pam_ftpusers(8)
The pam_ftpusers(8) module successes if and only if
the user is listed in /etc/ftpusers.
Currently, in NetBSD, this module doesn't understand the
extended syntax of ftpd(8), but this will be fixed in
the future.
18.6.1.5. pam_group(8)
The pam_group(8) module accepts or rejects applicants
on the basis of their membership in a particular file group
(normally wheel for su(1)). It is
primarily intended for maintaining the traditional behaviour
of BSD su(1), but has many other uses, such as excluding
certain groups of users from a particular service.
In NetBSD, there is an argument called
authenticate in which the user is asked to
authenticate using his own password.
18.6.1.6. pam_guest(8)
The pam_guest(8) module allows guest logins using fixed login names. Various requirements can be placed on the password, but the default behaviour is to allow any password as long as the login name is that of a guest account. The pam_guest(8) module can easily be used to implement anonymous FTP logins.
18.6.1.7. pam_krb5(8)
The pam_krb5(8) module provides functions to verify the identity of a user and to set user specific credentials using Kerberos 5. It prompts the user for a password and obtains a new Kerberos TGT for the principal. The TGT is verified by obtaining a service ticket for the local host. The newly acquired credentials are stored in a credential cache and the environment variable KRB5CCNAME is set appropriately. The credentials cache should be destroyed by the user at logout with kdestroy(1).
18.6.1.8. pam_ksu(8)
The pam_ksu(8) module provides only authentication services for Kerberos 5 to determine whether or not the applicant is authorized to obtain the privileges of the target account.
18.6.1.9. pam_lastlog(8)
The pam_lastlog(8) module provides only session management services. It records the session in utmp(5), utmpx(5), wtmp(5), wtmpx(5), lastlog(5) and lastlogx(5) databases.
18.6.1.10. pam_login_access(8)
The pam_login_access(8) module provides an implementation of the account management primitive which enforces the login restrictions specified in the login.access(5) table.
18.6.1.11. pam_nologin(8)
The pam_nologin(8) module refuses non-root logins
when /var/run/nologin exists. This file
is normally created by shutdown(8) when less than five
minutes remain until the scheduled shutdown time.
18.6.1.12. pam_permit(8)
The pam_permit(8) module is one of the simplest
modules available; it responds to any request with
PAM_SUCCESS. It is useful as a placeholder
for services where one or more chains would otherwise be
empty.
18.6.1.13. pam_radius(8)
The pam_radius(8) module provides authentication services based upon the RADIUS (Remote Authentication Dial In User Service) protocol.
18.6.1.14. pam_rhosts(8)
The pam_rhosts(8) module provides only
authentication services. It reports success if and only if the
target user's ID is not 0 and the remote host and user are
listed in /etc/hosts.equiv or in the
target user's ~/.rhosts.
18.6.1.15. pam_rootok(8)
The pam_rootok(8) module reports success if and only
if the real user id of the process calling it (which is
assumed to be run by the applicant) is 0. This is useful for
non-networked services such as su(1) or passwd(1),
to which the root should have automatic
access.
18.6.1.16. pam_securetty(8)
The pam_securetty(8) module provides only account services. It is used when the applicant is attempting to authenticate as superuser, and the process is attached to an insecure TTY.
18.6.1.17. pam_self(8)
The pam_self(8) module reports success if and only if the names of the applicant matches that of the target account. It is most useful for non-networked services such as su(1), where the identity of the applicant can be easily verified.
18.6.1.18. pam_ssh(8)
The pam_ssh(8) module provides both authentication
and session services. The authentication service allows users
who have passphrase-protected SSH secret keys in their
~/.ssh directory to authenticate
themselves by typing their passphrase. The session service
starts ssh-agent(1) and preloads it with the keys that
were decrypted in the authentication phase. This feature is
particularly useful for local logins, whether in X (using
xdm(1) or another PAM-aware X login manager) or at the
console.
This module implements what is fundamentally a password authentication scheme. Care should be taken to only use this module over a secure session (secure TTY, encrypted session, etc.), otherwise the user's SSH passphrase could be compromised.
Additional consideration should be given to the use of pam_ssh(8). Users often assume that file permissions are sufficient to protect their SSH keys, and thus use weak or no passphrases. Since the system administrator has no effective means of enforcing SSH passphrase quality, this has the potential to expose the system to security risks.
18.6.1.19. pam_unix(8)
The pam_unix(8) module implements traditional UNIX® password authentication, using getpwnam(3) under FreeBSD or getpwnam_r(3) under NetBSD to obtain the target account's password and compare it with the one provided by the applicant. It also provides account management services (enforcing account and password expiration times) and password-changing services. This is probably the single most useful module, as the great majority of admins will want to maintain historical behaviour for at least some services.
18.6.2.1. pam_skey(8)
The pam_skey(8) module implements S/Key One Time
Password (OTP) authentication methods, using the
/etc/skeykeys database.
The following is a minimal implementation of su(1)
using PAM. Note that it uses the OpenPAM-specific
openpam_ttyconv(3) conversation function, which is
prototyped in
security/openpam.h.
If you wish
build this application on a system with a different PAM library,
you will have to provide your own conversation function. A
robust conversation function is surprisingly difficult to
implement; the one presented in the
Sample PAM Conversation
Function sub-chapter is a good
starting point, but should not be used in real-world
applications.
#include <sys/param.h>
#include <sys/wait.h>

#include <err.h>
#include <pwd.h>
#include <stdio.h>
#include <stdlib.h>
#include <string.h>
#include <syslog.h>
#include <unistd.h>

#include <security/pam_appl.h>
#include <security/openpam.h>	/* for openpam_ttyconv() */

extern char **environ;

static pam_handle_t *pamh;
static struct pam_conv pamc;

static void
usage(void)
{

	fprintf(stderr, "Usage: su [login [args]]\n");
	exit(1);
}

int
main(int argc, char *argv[])
{
	char hostname[MAXHOSTNAMELEN];
	const char *user, *tty;
	char **args, **pam_envlist, **pam_env;
	struct passwd *pwd;
	int o, pam_err, status;
	pid_t pid;

	while ((o = getopt(argc, argv, "h")) != -1)
		switch (o) {
		case 'h':
		default:
			usage();
		}

	argc -= optind;
	argv += optind;

	if (argc > 0) {
		user = *argv;
		--argc;
		++argv;
	} else {
		user = "root";
	}

	/* initialize PAM */
	pamc.conv = &openpam_ttyconv;
	pam_start("su", user, &pamc, &pamh);

	/* set some items */
	gethostname(hostname, sizeof(hostname));
	if ((pam_err = pam_set_item(pamh, PAM_RHOST, hostname)) != PAM_SUCCESS)
		goto pamerr;
	user = getlogin();
	if ((pam_err = pam_set_item(pamh, PAM_RUSER, user)) != PAM_SUCCESS)
		goto pamerr;
	tty = ttyname(STDERR_FILENO);
	if ((pam_err = pam_set_item(pamh, PAM_TTY, tty)) != PAM_SUCCESS)
		goto pamerr;

	/* authenticate the applicant */
	if ((pam_err = pam_authenticate(pamh, 0)) != PAM_SUCCESS)
		goto pamerr;
	if ((pam_err = pam_acct_mgmt(pamh, 0)) == PAM_NEW_AUTHTOK_REQD)
		pam_err = pam_chauthtok(pamh, PAM_CHANGE_EXPIRED_AUTHTOK);
	if (pam_err != PAM_SUCCESS)
		goto pamerr;

	/* establish the requested credentials */
	if ((pam_err = pam_setcred(pamh, PAM_ESTABLISH_CRED)) != PAM_SUCCESS)
		goto pamerr;

	/* authentication succeeded; open a session */
	if ((pam_err = pam_open_session(pamh, 0)) != PAM_SUCCESS)
		goto pamerr;

	/* get mapped user name; PAM may have changed it */
	pam_err = pam_get_item(pamh, PAM_USER, (const void **)&user);
	if (pam_err != PAM_SUCCESS || (pwd = getpwnam(user)) == NULL)
		goto pamerr;

	/* export PAM environment */
	if ((pam_envlist = pam_getenvlist(pamh)) != NULL) {
		for (pam_env = pam_envlist; *pam_env != NULL; ++pam_env) {
			putenv(*pam_env);
			free(*pam_env);
		}
		free(pam_envlist);
	}

	/* build argument list */
	if ((args = calloc(argc + 2, sizeof *args)) == NULL) {
		warn("calloc()");
		goto err;
	}
	*args = pwd->pw_shell;
	memcpy(args + 1, argv, argc * sizeof *args);

	/* fork and exec */
	switch ((pid = fork())) {
	case -1:
		warn("fork()");
		goto err;
	case 0:
		/* child: give up privs and start a shell */

		/* set uid and groups */
		if (initgroups(pwd->pw_name, pwd->pw_gid) == -1) {
			warn("initgroups()");
			_exit(1);
		}
		if (setgid(pwd->pw_gid) == -1) {
			warn("setgid()");
			_exit(1);
		}
		if (setuid(pwd->pw_uid) == -1) {
			warn("setuid()");
			_exit(1);
		}
		execve(*args, args, environ);
		warn("execve()");
		_exit(1);
	default:
		/* parent: wait for child to exit */
		waitpid(pid, &status, 0);

		/* close the session and release PAM resources */
		pam_err = pam_close_session(pamh, 0);
		pam_end(pamh, pam_err);

		exit(WEXITSTATUS(status));
	}

pamerr:
	fprintf(stderr, "Sorry\n");
err:
	pam_end(pamh, pam_err);
	exit(1);
}
The following is a minimal implementation of pam_unix(8), offering only authentication services. It should build and run with most PAM implementations, but takes advantage of OpenPAM extensions if available: note the use of pam_get_authtok(3), which enormously simplifies prompting the user for a password.
#include <sys/param.h>

#include <pwd.h>
#include <stdlib.h>
#include <stdio.h>
#include <string.h>
#include <unistd.h>

#include <security/pam_modules.h>
#include <security/pam_appl.h>

#ifndef _OPENPAM
static char password_prompt[] = "Password:";
#endif

#ifndef PAM_EXTERN
#define PAM_EXTERN
#endif

PAM_EXTERN int
pam_sm_authenticate(pam_handle_t *pamh, int flags,
	int argc, const char *argv[])
{
#ifndef _OPENPAM
	const void *ptr;
	const struct pam_conv *conv;
	struct pam_message msg;
	const struct pam_message *msgp;
	struct pam_response *resp;
#endif
	struct passwd *pwd;
	const char *user;
	char *crypt_password, *password;
	int pam_err, retry;

	/* identify user */
	if ((pam_err = pam_get_user(pamh, &user, NULL)) != PAM_SUCCESS)
		return (pam_err);
	if ((pwd = getpwnam(user)) == NULL)
		return (PAM_USER_UNKNOWN);

	/* get password */
#ifndef _OPENPAM
	pam_err = pam_get_item(pamh, PAM_CONV, &ptr);
	if (pam_err != PAM_SUCCESS)
		return (PAM_SYSTEM_ERR);
	conv = ptr;
	msg.msg_style = PAM_PROMPT_ECHO_OFF;
	msg.msg = password_prompt;
	msgp = &msg;
#endif
	password = NULL;
	for (retry = 0; retry < 3; ++retry) {
#ifdef _OPENPAM
		pam_err = pam_get_authtok(pamh, PAM_AUTHTOK,
		    (const char **)&password, NULL);
#else
		resp = NULL;
		pam_err = (*conv->conv)(1, &msgp, &resp, conv->appdata_ptr);
		if (resp != NULL) {
			if (pam_err == PAM_SUCCESS)
				password = resp->resp;
			else
				free(resp->resp);
			free(resp);
		}
#endif
		if (pam_err == PAM_SUCCESS)
			break;
	}
	if (pam_err == PAM_CONV_ERR)
		return (pam_err);
	if (pam_err != PAM_SUCCESS)
		return (PAM_AUTH_ERR);

	/* compare passwords */
	if ((!pwd->pw_passwd[0] && (flags & PAM_DISALLOW_NULL_AUTHTOK)) ||
	    (crypt_password = crypt(password, pwd->pw_passwd)) == NULL ||
	    strcmp(crypt_password, pwd->pw_passwd) != 0)
		pam_err = PAM_AUTH_ERR;
	else
		pam_err = PAM_SUCCESS;
#ifndef _OPENPAM
	free(password);
#endif
	return (pam_err);
}

PAM_EXTERN int
pam_sm_setcred(pam_handle_t *pamh, int flags,
	int argc, const char *argv[])
{

	return (PAM_SUCCESS);
}

PAM_EXTERN int
pam_sm_acct_mgmt(pam_handle_t *pamh, int flags,
	int argc, const char *argv[])
{

	return (PAM_SUCCESS);
}

PAM_EXTERN int
pam_sm_open_session(pam_handle_t *pamh, int flags,
	int argc, const char *argv[])
{

	return (PAM_SUCCESS);
}

PAM_EXTERN int
pam_sm_close_session(pam_handle_t *pamh, int flags,
	int argc, const char *argv[])
{

	return (PAM_SUCCESS);
}

PAM_EXTERN int
pam_sm_chauthtok(pam_handle_t *pamh, int flags,
	int argc, const char *argv[])
{

	return (PAM_SERVICE_ERR);
}

#ifdef PAM_MODULE_ENTRY
PAM_MODULE_ENTRY("pam_unix");
#endif
The conversation function presented below is a greatly simplified version of OpenPAM's openpam_ttyconv(3). It is fully functional, and should give the reader a good idea of how a conversation function should behave, but it is far too simple for real-world use. Even if you're not using OpenPAM, feel free to download the source code and adapt openpam_ttyconv(3) to your uses; we believe it to be as robust as a tty-oriented conversation function can reasonably get.
#include <stdio.h>
#include <stdlib.h>
#include <string.h>
#include <unistd.h>

#include <security/pam_appl.h>

int
converse(int n, const struct pam_message **msg,
	struct pam_response **resp, void *data)
{
	struct pam_response *aresp;
	char buf[PAM_MAX_RESP_SIZE];
	int i;

	data = data;
	if (n <= 0 || n > PAM_MAX_NUM_MSG)
		return (PAM_CONV_ERR);
	if ((aresp = calloc(n, sizeof *aresp)) == NULL)
		return (PAM_BUF_ERR);
	for (i = 0; i < n; ++i) {
		aresp[i].resp_retcode = 0;
		aresp[i].resp = NULL;
		switch (msg[i]->msg_style) {
		case PAM_PROMPT_ECHO_OFF:
			aresp[i].resp = strdup(getpass(msg[i]->msg));
			if (aresp[i].resp == NULL)
				goto fail;
			break;
		case PAM_PROMPT_ECHO_ON:
			fputs(msg[i]->msg, stderr);
			if (fgets(buf, sizeof buf, stdin) == NULL)
				goto fail;
			aresp[i].resp = strdup(buf);
			if (aresp[i].resp == NULL)
				goto fail;
			break;
		case PAM_ERROR_MSG:
			fputs(msg[i]->msg, stderr);
			if (strlen(msg[i]->msg) > 0 &&
			    msg[i]->msg[strlen(msg[i]->msg) - 1] != '\n')
				fputc('\n', stderr);
			break;
		case PAM_TEXT_INFO:
			fputs(msg[i]->msg, stdout);
			if (strlen(msg[i]->msg) > 0 &&
			    msg[i]->msg[strlen(msg[i]->msg) - 1] != '\n')
				fputc('\n', stdout);
			break;
		default:
			goto fail;
		}
	}
	*resp = aresp;
	return (PAM_SUCCESS);
 fail:
        for (i = 0; i < n; ++i) {
                if (aresp[i].resp != NULL) {
                        memset(aresp[i].resp, 0, strlen(aresp[i].resp));
                        free(aresp[i].resp);
                }
        }
        memset(aresp, 0, n * sizeof *aresp);
	*resp = NULL;
	return (PAM_CONV_ERR);
}
Papers
[sun-pam] Making Login Services Independent of Authentication Technologies. Sun Microsystems.
[opengroup-singlesignon] X/Open Single Sign-on Preliminary Specification. The Open Group. 1-85912-144-6. June 1997.
[kernelorg-pamdraft] Pluggable Authentication Modules. October 6, 1999.
User Manuals
[sun-pamadmin] PAM Administration. Sun Microsystems.
Related Web pages
[openpam-website] OpenPAM homepage. ThinkSec AS.
[linuxpam-website] Linux-PAM homepage.
[solarispam-website] Solaris PAM homepage. Sun Microsystems.
Table of Contents
This section covers a variety of performance tuning topics. It attempts to span tuning from the perspective of the system administrator to systems programmer. The art of performance tuning itself is very old. To tune something means to make it operate more efficiently, whether one is referring to a NetBSD based technical server or a vacuum cleaner, the goal is to improve something, whether that be the way something is done, how it works or how it is put together.
A view from 10,000 feet pretty much dictates that everything we do is task oriented, this pertains to a NetBSD system as well. When the system boots, it automatically begins to perform a variety of tasks. When a user logs in, they usually have a wide variety of tasks they have to accomplish. In the scope of these documents, however, performance tuning strictly means to improve how efficient a NetBSD system performs.
The most common thought that crops into someone's mind when they think "tuning" is some sort of speed increase or decreasing the size of the kernel - while those are ways to improve performance, they are not the only ends an administrator may have to take for increasing efficiency. For our purposes, performance tuning means this: To make a NetBSD system operate in an optimum state.
Which could mean a variety of things, not necessarily speed enhancements. A good example of this is filesystem formatting parameters, on a system that has a lot of small files (say like a source repository) an administrator may need to increase the number of inodes by making their size smaller (say down to 1024k) and then increasing the amount of inodes. In this case the number of inodes was increased, however, it keeps the administrator from getting those nasty out of inodes messages, which ultimately makes the system more efficient.
Tuning normally revolves around finding and eliminating bottlenecks. Most of the time, such bottlenecks are spurious, for example, a release of Mozilla that does not quite handle java applets too well can cause Mozilla to start crunching the CPU, especially applets that are not done well. Occasions when processes seem to spin off into nowhere and eat CPU are almost always resolved with a kill. There are instances, however, when resolving bottlenecks takes a lot longer, for example, say an rsynced server is just getting larger and larger. Slowly, performance begins to fade and the administrator may have to take some sort of action to speed things up, however, the situation is relative to say an emergency like an instantly spiked CPU.
Many NetBSD users rarely have to tune a system. The GENERIC kernel may run just fine and the layout/configuration of the system may do the job as well. By the same token, as a pragma it is always good to know how to tune a system. Most often tuning comes as a result of a sudden bottleneck issue (which may occur randomly) or a gradual loss of performance. It does happen in a sense to everyone at some point, one process that is eating the CPU is a bottleneck as much as a gradual increase in paging. So, the question should not be when to tune so much as when to learn to tune.
One last time to tune is if you can tune in a preventive manner (and you think you might need to) then do it. One example of this was on a system that needed to be able to reboot quickly. Instead of waiting, I did everything I could to trim the kernel and make sure there was absolutely nothing running that was not needed, I even removed drivers that did have devices, but were never used (lp). The result was reducing reboot time by nearly two-thirds. In the long run, it was a smart move to tune it before it became an issue.
Before I wrap up the introduction, I think it is important to note what these documents will not cover. This guide will pertain only to the core NetBSD system. In other words, it will not cover tuning a web server's configuration to make it run better; however, it might mention how to tune NetBSD to run better as a web server. The logic behind this is simple: web servers, database software, etc. are third party and almost limitless. I could easily get mired down in details that do not apply to the NetBSD system. Almost all third party software have their own documentation about tuning anyhow.
Since there is ample man page documentation, only used options and arguments with examples are discussed. In some cases, material is truncated for brevity and not thoroughly discussed because, quite simply, there is too much. For example, every single device driver entry in the kernel will not be discussed, however, an example of determining whether or not a given system needs one will be. Nothing in this Guide is concrete, tuning and performance are very subjective, instead, it is a guide for the reader to learn what some of the tools available to them can do.
Tuning a system is not really too difficult when pro-active tuning is the approach. This document approaches tuning from a “before it comes up” approach. While tuning in spare time is considerably easier versus say, a server that is almost completely bogged down to 0.1% idle time, there are still a few things that should be mulled over about tuning before actually doing it, hopefully, before a system is even installed.
Of course, how the system is setup makes a big difference. Sometimes small items can be overlooked which may in fact cause some sort of long term performance problem.
How the filesystem is laid out relative to disk drives is
very important. On hardware RAID systems, it is not such
a big deal, but, many NetBSD users specifically use NetBSD
on older hardware where hardware RAID simply is not an
option. The idea of / being
close to the first drive is a good one, but for example
if there are several drives to choose from that will be
the first one, is the best performing the one that
/ will be on? On a related note,
is it wise to split off /usr? Will
the system see heavy usage say in
/usr/pkgsrc? It might make sense to
slap a fast drive in and mount it under
/usr/pkgsrc, or it might not. Like
all things in performance tuning, this is subjective.
There are three schools of thought on swap size and about fifty on using split swap files with prioritizing and how that should be done. In the swap size arena, the vendor schools (at least most commercial ones) usually have their own formulas per OS. As an example, on a particular version of HP-UX with a particular version of Oracle the formula was:
2.5 GB * Number_of_processor
Well, that all really depends on what type of usage the database is having and how large it is, for instance if it is so large that it must be distributed, that formula does not fit well.
The next school of thought about swap sizing is sort of strange but makes some sense, it says, if possible, get a reference amount of memory used by the system. It goes something like this:
Startup a machine and estimate total memory needs by running everything that may ever be needed at once. Databases, web servers .... whatever. Total up the amount.
Add a few MB for padding.
Subtract the amount of physical RAM from this total.
If the amount leftover is 3 times the size of physical RAM, consider getting more RAM. The problem, of course, is figuring out what is needed and how much space it will take. There is also another flaw in this method, some programs do not behave well. A glaring example of misbehaved software is web browsers. On certain versions of Netscape, when something went wrong it had a tendency to runaway and eat swap space. So, the more spare space available, the more time to kill it.
Last and not least is the tried and true PHYSICAL_RAM * 2 method. On modern machines and even older ones (with limited purpose of course) this seems to work best.
All in all, it is hard to tell when swapping will start. Even on small 16MB RAM machines (and less) NetBSD has always worked well for most people until misbehaving software is running.
On servers, system services have a large impact. Getting them to run at their best almost always requires some sort of network level change or a fundamental speed increase in the underlying system (which of course is what this is all about). There are instances when some simple solutions can improve services. One example, an ftp server is becoming slower and a new release of the ftp server that is shipped with the system comes out that, just happens to run faster. By upgrading the ftp software, a performance boost is accomplished.
Another good example where services are concerned is the age old question: “To use inetd or not to use inetd?” A great service example is pop3. Pop3 connections can conceivably clog up inetd. While the pop3 service itself starts to degrade slowly, other services that are multiplexed through inetd will also degrade (in some case more than pop3). Setting up pop3 to run outside of inetd and on its own may help.
The NetBSD kernel obviously plays a key role in how well a system performs, while rebuilding and tuning the kernel is covered later in the text, it is worth discussing in the local context from a high level.
Tuning the NetBSD kernel really involves three main areas:
removing unrequired drivers
configuring options
system settings
Taking drivers out of the kernel that are not needed achieves several results; first, the system boots faster since the kernel is smaller, second again since the kernel is smaller, more memory is free to users and processes and third, the kernel tends to respond quicker.
Configuring options such as enabling/disabling certain subsystems, specific hardware and filesystems can also improve performance pretty much the same way removing unrequired drivers does. A very simple example of this is a FTP server that only hosts ftp files - nothing else. On this particular server there is no need to have anything but native filesystem support and perhaps a few options to help speed things along. Why would it ever need NTFS support for example? Besides, if it did, support for NTFS could be added at some later time. In an opposite case, a workstation may need to support a lot of different filesystem types to share and access files.
System wide settings are controlled by the kernel, a few examples are filesystem settings, network settings and core kernel settings such as the maximum number of processes. Almost all system settings can be at least looked at or modified via the sysctl facility. Examples using the sysctl facility are given later on.
NetBSD ships a variety of performance monitoring tools with the system. Most of these tools are common on all UNIX systems. In this section some example usage of the tools is given with interpretation of the output.
The top monitor does exactly what it says: it displays the CPU hogs on the system. To run the monitor, simply type top at the prompt. Without any arguments, it should look like:
load averages:  0.09,  0.12,  0.08                                     20:23:41
21 processes:  20 sleeping, 1 on processor
CPU states:  0.0% user,  0.0% nice,  0.0% system,  0.0% interrupt,  100% idle
Memory: 15M Act, 1104K Inact, 208K Wired, 22M Free, 129M Swap free

  PID USERNAME PRI NICE   SIZE   RES STATE     TIME   WCPU    CPU COMMAND
13663 root       2    0  1552K 1836K sleep     0:08  0.00%  0.00% httpd
  127 root      10    0   129M 4464K sleep     0:01  0.00%  0.00% mount_mfs
22591 root       2    0   388K 1156K sleep     0:01  0.00%  0.00% sshd
  108 root       2    0   132K  472K sleep     0:01  0.00%  0.00% syslogd
22597 jrf       28    0   156K  616K onproc    0:00  0.00%  0.00% top
22592 jrf       18    0   828K 1128K sleep     0:00  0.00%  0.00% tcsh
  203 root      10    0   220K  424K sleep     0:00  0.00%  0.00% cron
    1 root      10    0   312K  192K sleep     0:00  0.00%  0.00% init
  205 root       3    0    48K  432K sleep     0:00  0.00%  0.00% getty
  206 root       3    0    48K  424K sleep     0:00  0.00%  0.00% getty
  208 root       3    0    48K  424K sleep     0:00  0.00%  0.00% getty
  207 root       3    0    48K  424K sleep     0:00  0.00%  0.00% getty
13667 nobody     2    0  1660K 1508K sleep     0:00  0.00%  0.00% httpd
 9926 root       2    0   336K  588K sleep     0:00  0.00%  0.00% sshd
  200 root       2    0    76K  456K sleep     0:00  0.00%  0.00% inetd
  182 root       2    0    92K  436K sleep     0:00  0.00%  0.00% portsentry
  180 root       2    0    92K  436K sleep     0:00  0.00%  0.00% portsentry
13666 nobody    -4    0  1600K 1260K sleep     0:00  0.00%  0.00% httpd
The top utility is great for finding CPU hogs, runaway processes or groups of processes that may be causing problems. The output shown above indicates that this particular system is in good health. Now, the next display should show some very different results:
load averages:  0.34,  0.16,  0.13                                     21:13:47
25 processes:  24 sleeping, 1 on processor
CPU states:  0.5% user,  0.0% nice,  9.0% system,  1.0% interrupt, 89.6% idle
Memory: 20M Act, 1712K Inact, 240K Wired, 30M Free, 129M Swap free

  PID USERNAME PRI NICE   SIZE   RES STATE     TIME   WCPU    CPU COMMAND
 5304 jrf       -5    0    56K  336K sleep     0:04 66.07% 19.53% bonnie
 5294 root       2    0   412K 1176K sleep     0:02  1.01%  0.93% sshd
  108 root       2    0   132K  472K sleep     1:23  0.00%  0.00% syslogd
  187 root       2    0  1552K 1824K sleep     0:07  0.00%  0.00% httpd
 5288 root       2    0   412K 1176K sleep     0:02  0.00%  0.00% sshd
 5302 jrf       28    0   160K  620K onproc    0:00  0.00%  0.00% top
 5295 jrf       18    0   828K 1116K sleep     0:00  0.00%  0.00% tcsh
 5289 jrf       18    0   828K 1112K sleep     0:00  0.00%  0.00% tcsh
  127 root      10    0   129M 8388K sleep     0:00  0.00%  0.00% mount_mfs
  204 root      10    0   220K  424K sleep     0:00  0.00%  0.00% cron
    1 root      10    0   312K  192K sleep     0:00  0.00%  0.00% init
  208 root       3    0    48K  432K sleep     0:00  0.00%  0.00% getty
  210 root       3    0    48K  424K sleep     0:00  0.00%  0.00% getty
  209 root       3    0    48K  424K sleep     0:00  0.00%  0.00% getty
  211 root       3    0    48K  424K sleep     0:00  0.00%  0.00% getty
  217 nobody     2    0  1616K 1272K sleep     0:00  0.00%  0.00% httpd
  184 root       2    0   336K  580K sleep     0:00  0.00%  0.00% sshd
  201 root       2    0    76K  456K sleep     0:00  0.00%  0.00% inetd
At first, it should seem rather obvious which process is hogging the system, however, what is interesting in this case is why. The bonnie program is a disk benchmark tool which can write large files in a variety of sizes and ways. What the previous output indicates is only that the bonnie program is a CPU hog, but not why.
A careful examination of the manual page top(1) shows that there is a lot more that can be done with top, for example, processes can have their priority changed and killed. Additionally, filters can be set for looking at processes.
As the man page sysstat(1) indicates, the sysstat utility shows a variety of system statistics using the curses library. While it is running the screen is shown in two parts, the upper window shows the current load average while the lower screen depends on user commands. The exception to the split window view is when vmstat display is on which takes up the whole screen. Following is what sysstat looks like on a fairly idle system with no arguments given when it was invoked:
                   /0   /1   /2   /3   /4   /5   /6   /7   /8   /9   /10
     Load Average   |

                         /0   /10  /20  /30  /40  /50  /60  /70  /80  /90  /100
                  <idle> XXXXXXXXXXXXXXXXXXXXXXXXXXXXXXXXXXXXXXXXXXXXXXXXXX
Basically a lot of dead time there, so now have a look with some arguments provided, in this case, sysstat inet.tcp which looks like this:
                    /0   /1   /2   /3   /4   /5   /6   /7   /8   /9   /10
     Load Average   |

        0 connections initiated           19 total TCP packets sent
        0 connections accepted            11   data
        0 connections established          0   data (retransmit)
                                           8   ack-only
        0 connections dropped              0   window probes
        0   in embryonic state             0   window updates
        0   on retransmit timeout          0   urgent data only
        0   by keepalive                   0   control
        0   by persist
                                          29 total TCP packets received
       11 potential rtt updates           17   in sequence
       11 successful rtt updates           0   completely duplicate
        9 delayed acks sent                0   with some duplicate data
        0 retransmit timeouts              4   out of order
        0 persist timeouts                 0   duplicate acks
        0 keepalive probes                11   acks
        0 keepalive timeouts               0   window probes
                                           0   window updates
Now that is informative. The first poll is accumulative, so it is possible to see quite a lot of information in the output when sysstat is invoked. Now, while that may be interesting, how about a look at the buffer cache with sysstat bufcache:
                    /0   /1   /2   /3   /4   /5   /6   /7   /8   /9   /10
     Load Average

There are 1642 buffers using 6568 kBytes of memory.

File System          Bufs used   %   kB in use   %  Bufsize kB   %  Util %
/                          877  53        6171  93        6516  99      94
/var/tmp                     5   0          17   0          28   0      60

Total:                     882  53        6188  94        6544  99
Again, a pretty boring system, but great information to have available. While this is all nice to look at, it is time to put a false load on the system to see how sysstat can be used as a performance monitoring tool. As with top, bonnie++ will be used to put a high load on the I/O subsystems and a little on the CPU. The bufcache will be looked at again to see of there are any noticeable differences:
                    /0   /1   /2   /3   /4   /5   /6   /7   /8   /9   /10
     Load Average   |||

There are 1642 buffers using 6568 kBytes of memory.

File System          Bufs used   %   kB in use   %  Bufsize kB   %  Util %
/                          811  49        6422  97        6444  98      99

Total:                     811  49        6422  97        6444  98
First, notice that the load average shot up, this is to be expected of course, then, while most of the numbers are close, notice that utilization is at 99%. Throughout the time that bonnie++ was running the utilization percentage remained at 99, this of course makes sense, however, in a real troubleshooting situation, it could be indicative of a process doing heavy I/O on one particular file or filesystem.
In addition to screen oriented monitors and tools, the NetBSD system also ships with a set of command line oriented tools. Many of the tools that ship with a NetBSD system can be found on other UNIX and UNIX-like systems.
The fstat(1) utility reports the status of open files on the system, while it is not what many administrators consider a performance monitor, it can help find out if a particular user or process is using an inordinate amount of files, generating large files and similar information.
Following is a sample of some fstat output:
USER     CMD          PID   FD MOUNT      INUM MODE         SZ|DV R/W
jrf      tcsh       21607   wd /         29772 drwxr-xr-x     512 r
jrf      tcsh       21607    3* unix stream c057acc0<-> c0553280
jrf      tcsh       21607    4* unix stream c0553280 <-> c057acc0
root     sshd       21597   wd /             2 drwxr-xr-x     512 r
root     sshd       21597    0 /         11921 crw-rw-rw-    null rw
nobody   httpd       5032   wd /             2 drwxr-xr-x     512 r
nobody   httpd       5032    0 /         11921 crw-rw-rw-    null r
nobody   httpd       5032    1 /         11921 crw-rw-rw-    null w
nobody   httpd       5032    2 /         15890 -rw-r--r--  353533 rw
...
The fields are pretty self explanatory, again, this tool while not as performance oriented as others, can come in handy when trying to find out information about file usage.
The iostat(8) command does exactly what it sounds like, it reports the status of the I/O subsystems on the system. When iostat is employed, the user typically runs it with a certain number of counts and an interval between them like so:
$iostat -c 5 -w 5tty wd0 cd0 fd0 md0 cpu tin tout KB/t t/s MB/s KB/t t/s MB/s KB/t t/s MB/s KB/t t/s MB/s us ni sy in id 0 1 5.13 1 0.00 0.00 0 0.00 0.00 0 0.00 0.00 0 0.00 0 0 0 0 100 0 54 0.00 0 0.00 0.00 0 0.00 0.00 0 0.00 0.00 0 0.00 0 0 0 0 100 0 18 0.00 0 0.00 0.00 0 0.00 0.00 0 0.00 0.00 0 0.00 0 0 0 0 100 0 18 8.00 0 0.00 0.00 0 0.00 0.00 0 0.00 0.00 0 0.00 0 0 0 0 100 0 28 0.00 0 0.00 0.00 0 0.00 0.00 0 0.00 0.00 0 0.00 0 0 0 0 100
The above output is from a very quiet ftp server. The fields represent the various I/O devices, the tty (which, ironically, is the most active because iostat is running), wd0 which is the primary IDE disk, cd0, the cdrom drive, fd0, the floppy and the memory filesystem.
Now, let's see if we can pummel the system with some heavy usage. First, a large ftp transaction consisting of a tarball of netbsd-current source along with the bonnie++ disk benchmark program running at the same time.
$iostat -c 5 -w 5tty wd0 cd0 fd0 md0 cpu tin tout KB/t t/s MB/s KB/t t/s MB/s KB/t t/s MB/s KB/t t/s MB/s us ni sy in id 0 1 5.68 1 0.00 0.00 0 0.00 0.00 0 0.00 0.00 0 0.00 0 0 0 0 100 0 54 61.03 150 8.92 0.00 0 0.00 0.00 0 0.00 0.00 0 0.00 1 0 18 4 78 0 26 63.14 157 9.71 0.00 0 0.00 0.00 0 0.00 0.00 0 0.00 1 0 20 4 75 0 20 43.58 26 1.12 0.00 0 0.00 0.00 0 0.00 0.00 0 0.00 0 0 9 2 88 0 28 19.49 82 1.55 0.00 0 0.00 0.00 0 0.00 0.00 0 0.00 1 0 7 3 89
As can be expected, notice that wd0 is very active, what is interesting about this output is how the processor's I/O seems to rise in proportion to wd0. This makes perfect sense, however, it is worth noting that only because this ftp server is hardly being used can that be observed. If, for example, the cpu I/O subsystem was already under a moderate load and the disk subsystem was under the same load as it is now, it could appear that the cpu is bottlenecked when in fact it would have been the disk. In such a case, we can observe that "one tool" is rarely enough to completely analyze a problem. A quick glance at processes probably would tell us (after watching iostat) which processes were causing problems.
Using the ps(1) command or process status, a great deal of information about the system can be discovered. Most of the time, the ps command is used to isolate a particular process by name, group, owner etc. Invoked with no options or arguments, ps simply prints out information about the user executing it.
$psPID TT STAT TIME COMMAND 21560 p0 Is 0:00.04 -tcsh 21564 p0 I+ 0:00.37 ssh jrf.odpn.net 21598 p1 Ss 0:00.12 -tcsh 21673 p1 R+ 0:00.00 ps 21638 p2 Is+ 0:00.06 -tcsh
Not very exciting. The fields are self explanatory with the exception of STAT which is actually the state a process is in. The flags are all documented in the man page, however, in the above example, I is idle, S is sleeping, R is runnable, the + means the process is in a foreground state, and the s means the process is a session leader. This all makes perfect sense when looking at the flags, for example, PID 21560 is a shell, it is idle and (as would be expected) the shell is the process leader.
In most cases, someone is looking for something very specific in the process listing. As an example, looking at all processes is specified with -a, to see all processes plus those without controlling terminals is -ax and to get a much more verbose listing (basically everything plus information about the impact processes are having) aux:
#ps auxUSER PID %CPU %MEM VSZ RSS TT STAT STARTED TIME COMMAND root 0 0.0 9.6 0 6260 ?? DLs 16Jul02 0:01.00 (swapper) root 23362 0.0 0.8 144 488 ?? S 12:38PM 0:00.01 ftpd -l root 23328 0.0 0.4 428 280 p1 S 12:34PM 0:00.04 -csh jrf 23312 0.0 1.8 828 1132 p1 Is 12:32PM 0:00.06 -tcsh root 23311 0.0 1.8 388 1156 ?? S 12:32PM 0:01.60 sshd: jrf@ttyp1 jrf 21951 0.0 1.7 244 1124 p0 S+ 4:22PM 0:02.90 ssh jrf.odpn.net jrf 21947 0.0 1.7 828 1128 p0 Is 4:21PM 0:00.04 -tcsh root 21946 0.0 1.8 388 1156 ?? S 4:21PM 0:04.94 sshd: jrf@ttyp0 nobody 5032 0.0 2.0 1616 1300 ?? I 19Jul02 0:00.02 /usr/pkg/sbin/httpd ...
Again, most of the fields are self explanatory with the exception of VSZ and RSS which can be a little confusing. RSS is the real size of a process in 1024 byte units while VSZ is the virtual size. This is all great, but again, how can ps help? Well, for one, take a look at this modified version of the same output:
#ps auxUSER PID %CPU %MEM VSZ RSS TT STAT STARTED TIME COMMAND root 0 0.0 9.6 0 6260 ?? DLs 16Jul02 0:01.00 (swapper) root 23362 0.0 0.8 144 488 ?? S 12:38PM 0:00.01 ftpd -l root 23328 0.0 0.4 428 280 p1 S 12:34PM 0:00.04 -csh jrf 23312 0.0 1.8 828 1132 p1 Is 12:32PM 0:00.06 -tcsh root 23311 0.0 1.8 388 1156 ?? S 12:32PM 0:01.60 sshd: jrf@ttyp1 jrf 21951 0.0 1.7 244 1124 p0 S+ 4:22PM 0:02.90 ssh jrf.odpn.net jrf 21947 0.0 1.7 828 1128 p0 Is 4:21PM 0:00.04 -tcsh root 21946 0.0 1.8 388 1156 ?? S 4:21PM 0:04.94 sshd: jrf@ttyp0 nobody 5032 9.0 2.0 1616 1300 ?? I 19Jul02 0:00.02 /usr/pkg/sbin/httpd ...
Given that on this server, our baseline indicates a relatively quiet system, the PID 5032 has an unusually large amount of %CPU. Sometimes this can also cause high TIME numbers. The ps command can be grepped on for PIDs, username and process name and hence help track down processes that may be experiencing problems.
Using vmstat(1), information pertaining to virtual memory can be monitored and measured. Not unlike iostat, vmstat can be invoked with a count and interval. Following is some sample output using -c 5 -w 5 like the iostat example:
#vmstat -c 5 -w 5procs memory page disks faults cpu r b w avm fre flt re pi po fr sr w0 c0 f0 m0 in sy cs us sy id 0 7 0 17716 33160 2 0 0 0 0 0 1 0 0 0 105 15 4 0 0 100 0 7 0 17724 33156 2 0 0 0 0 0 1 0 0 0 109 6 3 0 0 100 0 7 0 17724 33156 1 0 0 0 0 0 1 0 0 0 105 6 3 0 0 100 0 7 0 17724 33156 1 0 0 0 0 0 0 0 0 0 107 6 3 0 0 100 0 7 0 17724 33156 1 0 0 0 0 0 0 0 0 0 105 6 3 0 0 100
Yet again, relatively quiet, for posterity, the exact same load that was put on this server in the iostat example will be used. The load is a large file transfer and the bonnie benchmark program.
#vmstat -c 5 -w 5procs memory page disks faults cpu r b w avm fre flt re pi po fr sr w0 c0 f0 m0 in sy cs us sy id 1 8 0 18880 31968 2 0 0 0 0 0 1 0 0 0 105 15 4 0 0 100 0 8 0 18888 31964 2 0 0 0 0 0 130 0 0 0 1804 5539 1094 31 22 47 1 7 0 18888 31964 1 0 0 0 0 0 130 0 0 0 1802 5500 1060 36 16 49 1 8 0 18888 31964 1 0 0 0 0 0 160 0 0 0 1849 5905 1107 21 22 57 1 7 0 18888 31964 1 0 0 0 0 0 175 0 0 0 1893 6167 1082 1 25 75
Just a little different. Notice, since most of the work
was I/O based, the actual memory used was not very much.
Since this system uses mfs for /tmp,
however, it can certainly get beat up. Have a look at this:
#vmstat -c 5 -w 5procs memory page disks faults cpu r b w avm fre flt re pi po fr sr w0 c0 f0 m0 in sy cs us sy id 0 2 0 99188 500 2 0 0 0 0 0 1 0 0 0 105 16 4 0 0 100 0 2 0111596 436 592 0 587 624 586 1210 624 0 0 0 741 883 1088 0 11 89 0 3 0123976 784 666 0 662 643 683 1326 702 0 0 0 828 993 1237 0 12 88 0 2 0134692 1236 581 0 571 563 595 1158 599 0 0 0 722 863 1066 0 9 90 2 0 0142860 912 433 0 406 403 405 808 429 0 0 0 552 602 768 0 7 93
Pretty scary stuff. That was created by running bonnie in
/tmp
on a memory based filesystem. If it continued for too long,
it is possible the system could have started thrashing.
Notice that even though the VM subsystem was taking a beating,
the processors still were not getting too battered.
Sometimes a performance problem is not a particular machine, it is the network or some sort of device on the network such as another host, a router etc. What other machines that provide a service or some sort of connectivity to a particular NetBSD system do and how they act can have a very large impact on performance of the NetBSD system itself, or the perception of performance by users. A really great example of this is when a DNS server that a NetBSD machine is using suddenly disappears. Lookups take long and they eventually fail. Someone logged into the NetBSD machine who is not experienced would undoubtedly (provided they had no other evidence) blame the NetBSD system. One of my personal favorites, “the Internet is broke” usually means either DNS service or a router/gateway has dropped offline. Whatever the case may be, a NetBSD system comes adequately armed to deal with finding out what network issues may be cropping up whether the fault of the local system or some other issue.
The classic ping(8) utility can tell us if there is just
plain connectivity, it can also tell if host resolution
(depending on how nsswitch.conf
dictates) is working. Following is some typical ping
output on a local network with a count of 3 specified:
#ping -c 3 mariePING marie (172.16.14.12): 56 data bytes 64 bytes from 172.16.14.12: icmp_seq=0 ttl=255 time=0.571 ms 64 bytes from 172.16.14.12: icmp_seq=1 ttl=255 time=0.361 ms 64 bytes from 172.16.14.12: icmp_seq=2 ttl=255 time=0.371 ms ----marie PING Statistics---- 3 packets transmitted, 3 packets received, 0.0% packet loss round-trip min/avg/max/stddev = 0.361/0.434/0.571/0.118 ms
Not only does ping tell us if a host is alive, it tells us how long it took and gives some nice details at the very end. If a host cannot be resolved, just the IP address can be specified as well:
#ping -c 1 172.16.20.5PING ash (172.16.20.5): 56 data bytes 64 bytes from 172.16.20.5: icmp_seq=0 ttl=64 time=0.452 ms ----ash PING Statistics---- 1 packets transmitted, 1 packets received, 0.0% packet loss round-trip min/avg/max/stddev = 0.452/0.452/0.452/0.000 ms
Now, not unlike any other tool, the times are very subjective, especially in regards to networking. For example, while the times in the examples are good, take a look at the localhost ping:
#ping -c 4 localhostPING localhost (127.0.0.1): 56 data bytes 64 bytes from 127.0.0.1: icmp_seq=0 ttl=255 time=0.091 ms 64 bytes from 127.0.0.1: icmp_seq=1 ttl=255 time=0.129 ms 64 bytes from 127.0.0.1: icmp_seq=2 ttl=255 time=0.120 ms 64 bytes from 127.0.0.1: icmp_seq=3 ttl=255 time=0.122 ms ----localhost PING Statistics---- 4 packets transmitted, 4 packets received, 0.0% packet loss round-trip min/avg/max/stddev = 0.091/0.115/0.129/0.017 ms
Much smaller because the request never left the machine. Pings can be used to gather information about how well a network is performing. It is also good for problem isolation, for instance, if there are three relatively close in size NetBSD systems on a network and one of them simply has horrible ping times, chances are something is wrong on that one particular machine.
The traceroute(8) command is great for making sure a path is available or detecting problems on a particular path. As an example, here is a trace between the example ftp server and ftp.NetBSD.org:
#traceroute ftp.NetBSD.orgtraceroute to ftp.NetBSD.org (204.152.184.75), 30 hops max, 40 byte packets 1 208.44.95.1 (208.44.95.1) 1.646 ms 1.492 ms 1.456 ms 2 63.144.65.170 (63.144.65.170) 7.318 ms 3.249 ms 3.854 ms 3 chcg01-edge18.il.inet.qwest.net (65.113.85.229) 35.982 ms 28.667 ms 21.971 ms 4 chcg01-core01.il.inet.qwest.net (205.171.20.1) 22.607 ms 26.242 ms 19.631 ms 5 snva01-core01.ca.inet.qwest.net (205.171.8.50) 78.586 ms 70.585 ms 84.779 ms 6 snva01-core03.ca.inet.qwest.net (205.171.14.122) 69.222 ms 85.739 ms 75.979 ms 7 paix01-brdr02.ca.inet.qwest.net (205.171.205.30) 83.882 ms 67.739 ms 69.937 ms 8 198.32.175.3 (198.32.175.3) 72.782 ms 67.687 ms 73.320 ms 9 so-1-0-0.orpa8.pf.isc.org (192.5.4.231) 78.007 ms 81.860 ms 77.069 ms 10 tun0.orrc5.pf.isc.org (192.5.4.165) 70.808 ms 75.151 ms 81.485 ms 11 ftp.NetBSD.org (204.152.184.75) 69.700 ms 69.528 ms 77.788 ms
All in all, not bad. The trace went from the host to the local router, then out onto the provider network and finally out onto the Internet looking for the final destination. How to interpret traceroutes, again, are subjective, but abnormally high times in portions of a path can indicate a bottleneck on a piece of network equipment. Not unlike ping, if the host itself is suspect, run traceroute from another host to the same destination. Now, for the worst case scenario:
#traceroute www.microsoft.comtraceroute: Warning: www.microsoft.com has multiple addresses; using 207.46.230.220 traceroute to www.microsoft.akadns.net (207.46.230.220), 30 hops max, 40 byte packets 1 208.44.95.1 (208.44.95.1) 2.517 ms 4.922 ms 5.987 ms 2 63.144.65.170 (63.144.65.170) 10.981 ms 3.374 ms 3.249 ms 3 chcg01-edge18.il.inet.qwest.net (65.113.85.229) 37.810 ms 37.505 ms 20.795 ms 4 chcg01-core03.il.inet.qwest.net (205.171.20.21) 36.987 ms 32.320 ms 22.430 ms 5 chcg01-brdr03.il.inet.qwest.net (205.171.20.142) 33.155 ms 32.859 ms 33.462 ms 6 205.171.1.162 (205.171.1.162) 39.265 ms 20.482 ms 26.084 ms 7 sl-bb24-chi-13-0.sprintlink.net (144.232.26.85) 26.681 ms 24.000 ms 28.975 ms 8 sl-bb21-sea-10-0.sprintlink.net (144.232.20.30) 65.329 ms 69.694 ms 76.704 ms 9 sl-bb21-tac-9-1.sprintlink.net (144.232.9.221) 65.659 ms 66.797 ms 74.408 ms 10 144.232.187.194 (144.232.187.194) 104.657 ms 89.958 ms 91.754 ms 11 207.46.154.1 (207.46.154.1) 89.197 ms 84.527 ms 81.629 ms 12 207.46.155.10 (207.46.155.10) 78.090 ms 91.550 ms 89.480 ms 13 * * * .......
In this case, the Microsoft server cannot be found either because of multiple addresses or somewhere along the line a system or server cannot reply to the information request. At that point, one might think to try ping, in the Microsoft case, a ping does not reply, that is because somewhere on their network ICMP is most likely disabled.
Another problem that can crop up on a NetBSD system is routing table issues. These issues are not always the systems fault. The route(8) and netstat(1) commands can show information about routes and network connections (respectively).
The route command can be used to look at and modify routing tables while netstat can display information about network connections and routes. First, here is some output from route show:
#route showRouting tables Internet: Destination Gateway Flags default 208.44.95.1 UG loopback 127.0.0.1 UG localhost 127.0.0.1 UH 172.15.13.0 172.16.14.37 UG 172.16.0.0 link#2 U 172.16.14.8 0:80:d3:cc:2c:0 UH 172.16.14.10 link#2 UH marie 0:10:83:f9:6f:2c UH 172.16.14.37 0:5:32:8f:d2:35 UH 172.16.16.15 link#2 UH loghost 8:0:20:a7:f0:75 UH artemus 8:0:20:a8:d:7e UH ash 0:b0:d0:de:49:df UH 208.44.95.0 link#1 U 208.44.95.1 0:4:27:3:94:20 UH 208.44.95.2 0:5:32:8f:d2:34 UH 208.44.95.25 0:c0:4f:10:79:92 UH Internet6: Destination Gateway Flags default localhost UG default localhost UG localhost localhost UH ::127.0.0.0 localhost UG ::224.0.0.0 localhost UG ::255.0.0.0 localhost UG ::ffff:0.0.0.0 localhost UG 2002:: localhost UG 2002:7f00:: localhost UG 2002:e000:: localhost UG 2002:ff00:: localhost UG fe80:: localhost UG fe80::%ex0 link#1 U fe80::%ex1 link#2 U fe80::%lo0 fe80::1%lo0 U fec0:: localhost UG ff01:: localhost U ff02::%ex0 link#1 U ff02::%ex1 link#2 U ff02::%lo0 fe80::1%lo0 U
The flags section shows the status and whether or not it is a gateway. In this case we see U, H and G (U is up, H is host and G is gateway, see the man page for additional flags).
Now for some netstat output using the -r (routing) and -n (show network numbers) options:
Routing tables Internet: Destination Gateway Flags Refs Use Mtu Interface default 208.44.95.1 UGS 0 330309 1500 ex0 127 127.0.0.1 UGRS 0 0 33228 lo0 127.0.0.1 127.0.0.1 UH 1 1624 33228 lo0 172.15.13/24 172.16.14.37 UGS 0 0 1500 ex1 172.16 link#2 UC 13 0 1500 ex1 ... Internet6: Destination Gateway Flags Refs Use Mtu Interface ::/104 ::1 UGRS 0 0 33228 lo0 => ::/96 ::1 UGRS 0 0
The above output is a little more verbose. So, how can this help? Well, a good example is when routes between networks get changed while users are connected. I saw this happen several times when someone was rebooting routers all day long after each change. Several users called up saying they were getting kicked out and it was taking very long to log back in. As it turned out, the clients connecting to the system were redirected to another router (which took a very long route) to reconnect. I observed the M flag or Modified dynamically (by redirect) on their connections. I deleted the routes, had them reconnect and summarily followed up with the offending technician.
Last, and definitely not least is tcpdump(8), the network sniffer that can retrieve a lot of information. In this discussion, there will be some sample output and an explanation of some of the more useful options of tcpdump.
Following is a small snippet of tcpdump in action just as it starts:
#tcpdumptcpdump: listening on ex0 14:07:29.920651 mail.ssh > 208.44.95.231.3551: P 2951836801:2951836845(44) ack 2 476972923 win 17520 <nop,nop,timestamp 1219259 128519450> [tos 0x10] 14:07:29.950594 12.125.61.34 > 208.44.95.16: ESP(spi=2548773187,seq=0x3e8c) (DF) 14:07:29.983117 smtp.somecorp.com.smtp > 208.44.95.30.42828: . ack 420285166 win 16500 (DF) 14:07:29.984406 208.44.95.30.42828 > smtp.somecorp.com.smtp: . 1:1376(1375) ack 0 win 7431 (DF) ...
Given that the particular server is a mail server, what is shown makes perfect sense, however, the utility is very verbose, I prefer to initially run tcpdump with no options and send the text output into a file for later digestion like so:
#tcpdump > tcpdump.outtcpdump: listening on ex0
So, what precisely in the mish mosh are we looking for? In short, anything that does not seem to fit, for example, messed up packet lengths (as in a lot of them) will show up as improper lens or malformed packets (basically garbage). If, however, we are looking for something specific, tcpdump may be able to help depending on the problem.
These are just examples of a few things one can do with tcpdump.
Look for duplicate IP addresses:
tcpdump -e host ip-addressFor example:
tcpdump -e host 192.168.0.2Routing Problems:
tcpdump icmpThere are plenty of third party tools available, however, NetBSD comes shipped with a good tool set for tracking down network level performance problems.
The NetBSD system comes equipped with a great deal of performance monitors for active monitoring, but what about long term monitoring? Well, of course the output of a variety of commands can be sent to files and re-parsed later with a meaningful shell script or program. NetBSD does, by default, offer some extraordinarily powerful low level monitoring tools for the programmer, administrator or really astute hobbyist.
While accounting gives system usage at an almost userland level, kernel profiling with gprof provides explicit system call usage.
Using the accounting tools can help figure out what possible performance problems may be lying in wait, such as increased usage of compilers or network services for example.
Starting accounting is actually fairly simple, as root, use the accton(8) command. The syntax to start accounting is: accton filename
Where accounting information is appended to filename, now,
strangely enough, the lastcomm command which reads from an
accounting output file, by default, looks in
/var/account/acct
so I tend to just use the default location, however, lastcomm
can be told to look elsewhere.
To stop accounting, simply type accton with no arguments.
To read accounting information, there are two tools that can be used:
The lastcomm command shows the last commands executed in order, like all of them. It can, however, select by user, here is some sample output:
$lastcomm jrflast - jrf ttyp3 0.00 secs Tue Sep 3 14:39 (0:00:00.02) man - jrf ttyp3 0.00 secs Tue Sep 3 14:38 (0:01:49.03) sh - jrf ttyp3 0.00 secs Tue Sep 3 14:38 (0:01:49.03) less - jrf ttyp3 0.00 secs Tue Sep 3 14:38 (0:01:49.03) lastcomm - jrf ttyp3 0.02 secs Tue Sep 3 14:38 (0:00:00.02) stty - jrf ttyp3 0.00 secs Tue Sep 3 14:38 (0:00:00.02) tset - jrf ttyp3 0.00 secs Tue Sep 3 14:38 (0:00:01.05) hostname - jrf ttyp3 0.00 secs Tue Sep 3 14:38 (0:00:00.02) ls - jrf ttyp0 0.00 secs Tue Sep 3 14:36 (0:00:00.00) ...
Pretty nice, the lastcomm command gets its information from the default location of /var/account/acct, however, using the -f option, another file may be specified.
As may seem obvious, the output of lastcomm could get a little heavy on large multi user systems. That is where sa comes into play.
The sa command (meaning "print system accounting statistics") can be used to maintain information. It can also be used interactively to create reports. Following is the default output of sa:
$sa77 18.62re 0.02cp 8avio 0k 3 4.27re 0.01cp 45avio 0k ispell 2 0.68re 0.00cp 33avio 0k mutt 2 1.09re 0.00cp 23avio 0k vi 10 0.61re 0.00cp 7avio 0k ***other 2 0.01re 0.00cp 29avio 0k exim 4 0.00re 0.00cp 8avio 0k lastcomm 2 0.00re 0.00cp 3avio 0k atrun 3 0.03re 0.00cp 1avio 0k cron* 5 0.02re 0.00cp 10avio 0k exim* 10 3.98re 0.00cp 2avio 0k less 11 0.00re 0.00cp 0avio 0k ls 9 3.95re 0.00cp 12avio 0k man 2 0.00re 0.00cp 4avio 0k sa 12 3.97re 0.00cp 1avio 0k sh ...
From left to right, total times called, real time in minutes, sum of user and system time, in minutes, Average number of I/O operations per execution, size, command name.
The sa command can also be used to create summary files or reports based on some options, for example, here is the output when specifying a sort by CPU-time average memory usage:
$sa -k86 30.81re 0.02cp 8avio 0k 10 0.61re 0.00cp 7avio 0k ***other 2 0.00re 0.00cp 3avio 0k atrun 3 0.03re 0.00cp 1avio 0k cron* 2 0.01re 0.00cp 29avio 0k exim 5 0.02re 0.00cp 10avio 0k exim* 3 4.27re 0.01cp 45avio 0k ispell 4 0.00re 0.00cp 8avio 0k lastcomm 12 8.04re 0.00cp 2avio 0k less 13 0.00re 0.00cp 0avio 0k ls 11 8.01re 0.00cp 12avio 0k man 2 0.68re 0.00cp 33avio 0k mutt 3 0.00re 0.00cp 4avio 0k sa 14 8.03re 0.00cp 1avio 0k sh 2 1.09re 0.00cp 23avio 0k vi
The sa command is very helpful on larger systems.
Accounting reports, as was mentioned earlier, offer a way to help predict trends, for example, on a system that has cc and make being used more and more may indicate that in a few months some changes will need to be made to keep the system running at an optimum level. Another good example is web server usage. If it begins to gradually increase, again, some sort of action may need to be taken before it becomes a problem. Luckily, with accounting tools, said actions can be reasonably predicted and planned for ahead of time.
Profiling a kernel is normally employed when the goal is to compare the difference of new changes in the kernel to a previous one or to track down some sort of low level performance problem. Two sets of data about profiled code behavior are recorded independently: function call frequency and time spent in each function.
First, take a look at both Section 19.9, “Kernel Tuning” and
Chapter 34, Compiling the kernel.
The only difference in procedure for setting up a kernel
with profiling enabled is when you run config add the -p
option. The build area is
../compile/<KERNEL_NAME>.PROF ,
for example, a GENERIC kernel would be
../compile/GENERIC.PROF.
Following is a quick summary of how to compile a kernel
with profiling enabled on the amd64 port, the assumptions
are that the appropriate sources are available under
/usr/src and the GENERIC
configuration is being used, of course, that may not
always be the situation:
cd /usr/src/sys/arch/amd64/confconfig -p GENERICcd ../compile/GENERIC.PROFmake depend && makecp /netbsd /netbsd.oldcp netbsd /reboot
Once the new kernel is in place and the system has rebooted, it is time to turn on the monitoring and start looking at results.
To start kgmon:
$kgmon -bkgmon: kernel profiling is running.
Next, send the data into the file
gmon.out:
$kgmon -p
Now, it is time to make the output readable:
$gprof /netbsd > gprof.out
Since gmon is looking for gmon.out,
it should find it in the current working directory.
By just running kgmon alone, you may not get the information you need, however, if you are comparing the differences between two different kernels, then a known good baseline should be used. Note that it is generally a good idea to stress the subsystem if you know what it is both in the baseline and with the newer (or different) kernel.
Now that kgmon can run, collect and parse information, it is time to actually look at some of that information. In this particular instance, a GENERIC kernel is running with profiling enabled for about an hour with only system processes and no adverse load, in the fault insertion section, the example will be large enough that even under a minimal load detection of the problem should be easy.
The flat profile is a list of functions, the number of times they were called and how long it took (in seconds). Following is sample output from the quiet system:
Flat profile: Each sample counts as 0.01 seconds. % cumulative self self total time seconds seconds calls ns/call ns/call name 99.77 163.87 163.87 idle 0.03 163.92 0.05 219 228310.50 228354.34 _wdc_ata_bio_start 0.02 163.96 0.04 219 182648.40 391184.96 wdc_ata_bio_intr 0.01 163.98 0.02 3412 5861.66 6463.02 pmap_enter 0.01 164.00 0.02 548 36496.35 36496.35 pmap_zero_page 0.01 164.02 0.02 Xspllower 0.01 164.03 0.01 481968 20.75 20.75 gettick 0.01 164.04 0.01 6695 1493.65 1493.65 VOP_LOCK 0.01 164.05 0.01 3251 3075.98 21013.45 syscall_plain ...
As expected, idle was the highest in percentage, however, there were still some things going on, for example, a little further down there is the vn_lock function:
... 0.00 164.14 0.00 6711 0.00 0.00 VOP_UNLOCK 0.00 164.14 0.00 6677 0.00 1493.65 vn_lock 0.00 164.14 0.00 6441 0.00 0.00 genfs_unlock
This is to be expected, since locking still has to take place, regardless.
The call graph is an augmented version of the flat profile showing subsequent calls from the listed functions. First, here is some sample output:
Call graph (explanation follows)
granularity: each sample hit covers 4 byte(s) for 0.01% of 164.14 seconds
index % time self children called name
<spontaneous>
[1] 99.8 163.87 0.00 idle [1]
-----------------------------------------------
<spontaneous>
[2] 0.1 0.01 0.08 syscall1 [2]
0.01 0.06 3251/3251 syscall_plain [7]
0.00 0.01 414/1660 trap [9]
-----------------------------------------------
0.00 0.09 219/219 Xintr14 [6]
[3] 0.1 0.00 0.09 219 pciide_compat_intr [3]
0.00 0.09 219/219 wdcintr [5]
-----------------------------------------------
...
Now this can be a little confusing. The index number is mapped to from the trailing number on the end of the line, for example,
...
0.00 0.01 85/85 dofilewrite [68]
[72] 0.0 0.00 0.01 85 soo_write [72]
0.00 0.01 85/89 sosend [71]
...
Here we see that dofilewrite was called first, now we can look at the index number for 64 and see what was happening there:
...
0.00 0.01 101/103 ffs_full_fsync <cycle 6> [58]
[64] 0.0 0.00 0.01 103 bawrite [64]
0.00 0.01 103/105 VOP_BWRITE [60]
...
And so on, in this way, a "visual trace" can be established.
At the end of the call graph right after the terms section is an index by function name which can help map indexes as well.
In this example, I have modified an area of the kernel I know will create a problem that will be blatantly obvious.
Here is the top portion of the flat profile after running the system for about an hour with little interaction from users:
Flat profile: Each sample counts as 0.01 seconds. % cumulative self self total time seconds seconds calls us/call us/call name 93.97 139.13 139.13 idle 5.87 147.82 8.69 23 377826.09 377842.52 check_exec 0.01 147.84 0.02 243 82.30 82.30 pmap_copy_page 0.01 147.86 0.02 131 152.67 152.67 _wdc_ata_bio_start 0.01 147.88 0.02 131 152.67 271.85 wdc_ata_bio_intr 0.01 147.89 0.01 4428 2.26 2.66 uvn_findpage 0.01 147.90 0.01 4145 2.41 2.41 uvm_pageactivate 0.01 147.91 0.01 2473 4.04 3532.40 syscall_plain 0.01 147.92 0.01 1717 5.82 5.82 i486_copyout 0.01 147.93 0.01 1430 6.99 56.52 uvm_fault 0.01 147.94 0.01 1309 7.64 7.64 pool_get 0.01 147.95 0.01 673 14.86 38.43 genfs_getpages 0.01 147.96 0.01 498 20.08 20.08 pmap_zero_page 0.01 147.97 0.01 219 45.66 46.28 uvm_unmap_remove 0.01 147.98 0.01 111 90.09 90.09 selscan ...
As is obvious, there is a large difference in performance. Right off the bat the idle time is noticeably less. The main difference here is that one particular function has a large time across the board with very few calls. That function is check_exec. While at first, this may not seem strange if a lot of commands had been executed, when compared to the flat profile of the first measurement, proportionally it does not seem right:
... 0.00 164.14 0.00 37 0.00 62747.49 check_exec ...
The call in the first measurement is made 37 times and has a better performance. Obviously something in or around that function is wrong. To eliminate other functions, a look at the call graph can help, here is the first instance of check_exec
...
-----------------------------------------------
0.00 8.69 23/23 syscall_plain [3]
[4] 5.9 0.00 8.69 23 sys_execve [4]
8.69 0.00 23/23 check_exec [5]
0.00 0.00 20/20 elf32_copyargs [67]
...
Notice how the time of 8.69 seems to affect the two previous functions. It is possible that there is something wrong with them, however, the next instance of check_exec seems to prove otherwise:
...
-----------------------------------------------
8.69 0.00 23/23 sys_execve [4]
[5] 5.9 8.69 0.00 23 check_exec [5]
...
Now we can see that the problem, most likely, resides in
check_exec. Of course, problems
are not always this simple and in fact, here
is the simpleton code that was inserted right after
check_exec
(the function is in sys/kern/kern_exec.c):
...
/* A Cheap fault insertion */
for (x = 0; x < 100000000; x++) {
y = x;
}
..
Not exactly glamorous, but enough to register a large change with profiling.
Kernel profiling can be enlightening for anyone and provides a much more refined method of hunting down performance problems that are not as easy to find using conventional means, it is also not nearly as hard as most people think, if you can compile a kernel, you can get profiling to work.
Now that monitoring and analysis tools have been addressed, it is time to look into some actual methods. In this section, tools and methods that can affect how the system performs that are applied without recompiling the kernel are addressed, the next section examines kernel tuning by recompiling.
The sysctl utility can be used to look at and in some cases alter system parameters. There are so many parameters that can be viewed and changed they cannot all be shown here, however, for the first example here is a simple usage of sysctl to look at the system PATH environment variable:
$sysctl user.cs_pathuser.cs_path = /usr/bin:/bin:/usr/sbin:/sbin:/usr/pkg/bin:/usr/pkg/sbin:/usr/local/bin:/usr/local/sbin
Fairly simple. Now something that is actually related to performance. As an example, let's say a system with many users is having file open issues, by examining and perhaps raising the kern.maxfiles parameter the problem may be fixed, but first, a look:
$sysctl kern.maxfileskern.maxfiles = 1772
Now, to change it, as root with the -w option specified:
#sysctl -w kern.maxfiles=1972kern.maxfiles: 1772 -> 1972
Note, when the system is rebooted, the old value will return,
there are two cures for this, first, modify that parameter in
the kernel and recompile, second (and simpler) add this line
to /etc/sysctl.conf:
kern.maxfiles=1972
NetBSD's "ramdisk" implementations cache all data in the RAM, and if that is full, the swap space is used as backing store. NetBSD comes with two implementations, the traditional BSD memory-based file system "mfs" and the more modern "tmpfs". While the former can only grow in size, the latter can also shrink if space is no longer needed.
When to use and not to use a memory based filesystem can
be hard on large multi user systems. In some cases,
however, it makes pretty good sense, for example, on a
development machine used by only one developer at a time,
the obj directory might be a good place, or some of the
tmp directories for builds. In a case like that, it
makes sense on machines that have a fair amount of RAM
on them. On the other side of the coin, if a system
only has 16MB of RAM and /var/tmp
is mfs-based, there could be severe applications
issues that occur.
The GENERIC kernel has both tmpfs and mfs enabled by default. To use
it on a particular directory first determine where the
swap space is that you wish to use, in the example case,
a quick look in /etc/fstab
indicates that /dev/wd0b is the
swap partition:
mail% cat /etc/fstab /dev/wd0a / ffs rw 1 1 /dev/wd0b none swap sw 0 0 /kern /kern kernfs rw
This system is a mail server so I only want to use
/tmp with tmpfs, also on this
particular system I have linked /tmp
to /var/tmp to save space
(they are on the same drive). All I need to do is add the
following entry:
/dev/wd0b /var/tmp tmpfs rw 0 0
If you want to use "mfs" instead of "tmpfs", put just that into the above place.
Now, a word of warning: make sure said directories are
empty and nothing is using them when you mount the memory
file system! After changing /etc/fstab, you
can either run mount -a or reboot the
system.
Journaling is a mechanism which puts written data in a so-called "journal" first, and in a second step the data from the journal is written to disk. In the event of a system crash, data that was not written to disk but that is in the journal can be replayed, and will thus get the disk into a proper state. The main effect of this is that no file system check (fsck) is needed after a rough reboot.
Journaling can be enabled by adding "log" to the filesystem
options in /etc/fstab.
Here is an example which enables journaling for the root
(/), /var, and
/usr file systems:
/dev/wd0a / ffs rw,log 1 1 /dev/wd0e /var ffs rw,log 1 2 /dev/wd0g /usr ffs rw,log 1 2
LFS, the log structured filesystem, writes data to disk in a way that is sometimes too aggressive and leads to congestion. To throttle writing, the following sysctls can be used:
vfs.sync.delay vfs.sync.filedelay vfs.sync.dirdelay vfs.sync.metadelay vfs.lfs.flushindir vfs.lfs.clean_vnhead vfs.lfs.dostats vfs.lfs.pagetrip vfs.lfs.stats.segsused vfs.lfs.stats.psegwrites vfs.lfs.stats.psyncwrites vfs.lfs.stats.pcleanwrites vfs.lfs.stats.blocktot vfs.lfs.stats.cleanblocks vfs.lfs.stats.ncheckpoints vfs.lfs.stats.nwrites vfs.lfs.stats.nsync_writes vfs.lfs.stats.wait_exceeded vfs.lfs.stats.write_exceeded vfs.lfs.stats.flush_invoked vfs.lfs.stats.vflush_invoked vfs.lfs.stats.clean_inlocked vfs.lfs.stats.clean_vnlocked vfs.lfs.stats.segs_reclaimed vfs.lfs.ignore_lazy_sync
Besides tuning those parameters, disabling write-back caching on wd(4) devices may be beneficial. See the dkctl(8) man page for details.
More is available in the NetBSD mailing list archives. See this and this mail.
While many system parameters can be changed with sysctl, many improvements by using enhanced system software, layout of the system and managing services (moving them in and out of inetd for example) can be achieved as well. Tuning the kernel however will provide better performance, even if it appears to be marginal.
First, get the kernel sources for the release as described in Chapter 32, Obtaining the sources, reading Chapter 34, Compiling the kernel for more information on building the kernel is recommended. Note, this document can be used for -current tuning, however, a read of the Tracking -current documentation should be done first, much of the information there is repeated here.
Configuring a kernel in NetBSD can be daunting. This is because of
multiple line dependencies within the configuration file itself,
however, there is a benefit to this method and that is, all it really
takes is an ASCII editor to get a new kernel configured and some
dmesg output. The kernel configuration file is under
src/sys/arch/ARCH/conf where ARCH is your
architecture (for example,
on a SPARC it would be under
src/sys/arch/sparc/conf).
After you have located your kernel config file, copy it and remove (comment out) all the entries you don't need. This is where dmesg(8) becomes your friend. A clean dmesg(8)-output will show all of the devices detected by the kernel at boot time. Using dmesg(8) output, the device options really needed can be determined.
In this example, an ftp server's kernel is being
reconfigured to run
with the bare minimum drivers and options and any other items that
might make it run faster (again, not necessarily smaller, although
it will be). The first thing to do is take a look at some of the
main configuration items. So, in
/usr/src/sys/arch/amd64/conf the
GENERIC file is copied to FTP, then the file FTP edited.
At the start of the file there are a bunch of options beginning with maxusers, which will be left alone, however, on larger multi-user systems it might be help to crank that value up a bit. Next is CPU support, looking at the dmesg output this is seen:
cpu0: Intel Pentium II/Celeron (Deschutes) (686-class), 400.93 MHz
Indicating that only the options I686_CPU options needs to be used. In the next section, all options are left alone except the PIC_DELAY which is recommended unless it is an older machine. In this case it is enabled since the 686 is “relatively new.”
Between the last section all the way down to compat options there really was no need to change anything on this particular system. In the compat section, however, there are several options that do not need to be enabled, again this is because this machine is strictly a FTP server, all compat options were turned off.
The next section is File systems, and again, for this server very few need to be on, the following were left on:
# File systems file-system FFS # UFS file-system LFS # log-structured file system file-system MFS # memory file system file-system CD9660 # ISO 9660 + Rock Ridge file system file-system FDESC # /dev/fd file-system KERNFS # /kern file-system NULLFS # loopback file system file-system PROCFS # /proc file-system UMAPFS # NULLFS + uid and gid remapping ... options SOFTDEP # FFS soft updates support. ...
Next comes the network options section. The only options left on were:
options INET # IP + ICMP + TCP + UDP options INET6 # IPV6 options IPFILTER_LOG # ipmon(8) log support
IPFILTER_LOG is a nice one to have around since the server will be running ipf.
The next section is verbose messages for various subsystems, since this machine is already running and had no major problems, all of them are commented out.
The configurable items in the config file are relatively few and easy to cover, however, device drivers are a different story. In the following examples, two drivers are examined and their associated “areas” in the file trimmed down. First, a small example: the cdrom, in dmesg, is the following lines:
... cd0 at atapibus0 drive 0: <CD-540E, , 1.0A> type 5 cdrom removable cd0: 32-bit data port cd0: drive supports PIO mode 4, DMA mode 2, Ultra-DMA mode 2 pciide0: secondary channel interrupting at irq 15 cd0(pciide0:1:0): using PIO mode 4, Ultra-DMA mode 2 (using DMA data transfer ...
Now, it is time to track that section down in the configuration file. Notice that the "cd"-drive is on an atapibus and requires pciide support. The section that is of interest in this case is the kernel config's "IDE and related devices" section. It is worth noting at this point, in and around the IDE section are also ISA, PCMCIA etc., on this machine in the dmesg(8) output there are no PCMCIA devices, so it stands to reason that all PCMCIA references can be removed. But first, the "cd" drive.
At the start of the IDE section is the following:
... wd* at atabus? drive ? flags 0x0000 ... atapibus* at atapi? ...
Well, it is pretty obvious that those lines need to be kept. Next is this:
... # ATAPI devices # flags have the same meaning as for IDE drives. cd* at atapibus? drive ? flags 0x0000 # ATAPI CD-ROM drives sd* at atapibus? drive ? flags 0x0000 # ATAPI disk drives st* at atapibus? drive ? flags 0x0000 # ATAPI tape drives uk* at atapibus? drive ? flags 0x0000 # ATAPI unknown ...
The only device type that was in the dmesg(8) output was the cd, the rest can be commented out.
The next example is slightly more difficult, network interfaces. This machine has two of them:
... ex0 at pci0 dev 17 function 0: 3Com 3c905B-TX 10/100 Ethernet (rev. 0x64) ex0: interrupting at irq 10 ex0: MAC address 00:50:04:83:ff:b7 UI 0x001018 model 0x0012 rev 0 at ex0 phy 24 not configured ex1 at pci0 dev 19 function 0: 3Com 3c905B-TX 10/100 Ethernet (rev. 0x30) ex1: interrupting at irq 11 ex1: MAC address 00:50:da:63:91:2e exphy0 at ex1 phy 24: 3Com internal media interface exphy0: 10baseT, 10baseT-FDX, 100baseTX, 100baseTX-FDX, auto ...
At first glance it may appear that there are in fact three devices, however, a closer look at this line:
exphy0 at ex1 phy 24: 3Com internal media interface
Reveals that it is only two physical cards, not unlike the cdrom, simply removing names that are not in dmesg will do the job. In the beginning of the network interfaces section is:
... # Network Interfaces # PCI network interfaces an* at pci? dev ? function ? # Aironet PC4500/PC4800 (802.11) bge* at pci? dev ? function ? # Broadcom 570x gigabit Ethernet en* at pci? dev ? function ? # ENI/Adaptec ATM ep* at pci? dev ? function ? # 3Com 3c59x epic* at pci? dev ? function ? # SMC EPIC/100 Ethernet esh* at pci? dev ? function ? # Essential HIPPI card ex* at pci? dev ? function ? # 3Com 90x[BC] ...
There is the ex device. So all of the rest under the PCI section can be removed. Additionally, every single line all the way down to this one:
exphy* at mii? phy ? # 3Com internal PHYs
can be commented out as well as the remaining.
Now it is time to build the kernel and put it in place. In the conf directory on the ftp server, the following command prepares the build:
$config FTP
When it is done a message reminding me to make depend will display, next:
$cd ../compile/FTP$make depend && make
When it is done, I backup the old kernel and drop the new one in place:
#cp /netbsd /netbsd.orig#cp netbsd /
Now reboot. If the kernel cannot boot, stop the boot process
when prompted and type boot netbsd.orig to
boot from the previous kernel.
When building a kernel for embedded systems, it's often necessary to modify the Kernel binary to reduce space or memory footprint.
We already know how to remove Kernel support for drivers
and options that you don't need, thus saving memory and
space, but you can save some KiloBytes of space by
removing debugging symbols and two ELF sections
if you don't need them: .comment and
.ident. They are used for storing RCS
strings viewable with ident(1) and a gcc(1)
version string. The following examples assume you have
your TOOLDIR under
/usr/src/tooldir.NetBSD-2.0-i386
and the target architecture is i386.
$/usr/src/tooldir.NetBSD-2.0-i386/bin/i386--netbsdelf-objdump -h /netbsd/netbsd: file format elf32-i386 Sections: Idx Name Size VMA LMA File off Algn 0 .text 0057a374 c0100000 c0100000 00001000 2**4 CONTENTS, ALLOC, LOAD, READONLY, CODE 1 .rodata 00131433 c067a380 c067a380 0057b380 2**5 CONTENTS, ALLOC, LOAD, READONLY, DATA 2 .rodata.str1.1 00035ea0 c07ab7b3 c07ab7b3 006ac7b3 2**0 CONTENTS, ALLOC, LOAD, READONLY, DATA 3 .rodata.str1.32 00059d13 c07e1660 c07e1660 006e2660 2**5 CONTENTS, ALLOC, LOAD, READONLY, DATA 4 link_set_malloc_types 00000198 c083b374 c083b374 0073c374 2**2 CONTENTS, ALLOC, LOAD, READONLY, DATA 5 link_set_domains 00000024 c083b50c c083b50c 0073c50c 2**2 CONTENTS, ALLOC, LOAD, READONLY, DATA 6 link_set_pools 00000158 c083b530 c083b530 0073c530 2**2 CONTENTS, ALLOC, LOAD, READONLY, DATA 7 link_set_sysctl_funcs 000000f0 c083b688 c083b688 0073c688 2**2 CONTENTS, ALLOC, LOAD, READONLY, DATA 8 link_set_vfsops 00000044 c083b778 c083b778 0073c778 2**2 CONTENTS, ALLOC, LOAD, READONLY, DATA 9 link_set_dkwedge_methods 00000004 c083b7bc c083b7bc 0073c7bc 2**2 CONTENTS, ALLOC, LOAD, READONLY, DATA 10 link_set_bufq_strats 0000000c c083b7c0 c083b7c0 0073c7c0 2**2 CONTENTS, ALLOC, LOAD, READONLY, DATA 11 link_set_evcnts 00000030 c083b7cc c083b7cc 0073c7cc 2**2 CONTENTS, ALLOC, LOAD, READONLY, DATA 12 .data 00048ae4 c083c800 c083c800 0073c800 2**5 CONTENTS, ALLOC, LOAD, DATA 13 .bss 00058974 c0885300 c0885300 00785300 2**5 ALLOC 14 .comment 0000cda0 00000000 00000000 00785300 2**0 CONTENTS, READONLY 15 .ident 000119e4 00000000 00000000 007920a0 2**0 CONTENTS, READONLY
On the third column we can see the size of the sections
in hexadecimal form. By summing
.comment and .ident
sizes we know how much we're going to save with their
removal: around 120KB (= 52640 + 72164 = 0xcda0 + 0x119e4).
To remove the sections and debugging symbols that may be
present, we're going to use strip(1):
#cp /netbsd /netbsd.orig#/usr/src/tooldir.NetBSD-2.0-i386/bin/i386--netbsdelf-strip -S -R .ident -R .comment /netbsd#ls -l /netbsd /netbsd.orig-rwxr-xr-x 1 root wheel 8590668 Apr 30 15:56 netbsd -rwxr-xr-x 1 root wheel 8757547 Apr 30 15:56 netbsd.orig
Since we also removed debugging symbols, the total amount of disk space saved is around 160KB.
On some architectures, the bootloader can boot a compressed kernel. You can save several MegaBytes of disk space by using this method, but the bootloader will take longer to load the Kernel.
#cp /netbsd /netbsd.plain#gzip -9 /netbsd
To see how much space we've saved:
$ls -l /netbsd.plain /netbsd.gz-rwxr-xr-x 1 root wheel 8757547 Apr 29 18:05 /netbsd.plain -rwxr-xr-x 1 root wheel 3987769 Apr 29 18:05 /netbsd.gz
Note that you can only use gzip coding, by using gzip(1), bzip2 is not supported by the NetBSD bootloaders!
Table of Contents
Veriexec is NetBSD's file integrity subsystem. It's kernel based, hence can provide some protection even in the case of a root compromise.
Veriexec works by loading a specification file, also called the signatures file, to the kernel. This file contains information about files Veriexec should monitor, as well as their digital fingerprint (along with the hashing algorithm used to produce this fingerprint), and various flags that will be discussed later.
At the moment, the following hashing algorithms are supported by Veriexec: MD5, SHA1, SHA256, SHA384, SHA512, and RMD160.
An entry in the Veriexec signatures file looks like this:
/path/to/file algorithm fingerprint flags
Where the first element, the path, must always be an absolute path. The algorithm is one of the algorithms listed above, and fingerprint is the ASCII fingerprint.
You can generate ASCII fingerprints for each algorithm using the following tools:
Table 20.1. Veriexec fingerprints tools
Algorithm Tool MD5 /usr/bin/cksum -a md5SHA1 /usr/bin/cksum -a sha1SHA256 /usr/bin/cksum -a sha256SHA384 /usr/bin/cksum -a sha384SHA512 /usr/bin/cksum -a sha512RMD160 /usr/bin/cksum -a rmd160
For example, to generate a MD5 fingerprint for
/bin/ls:
%cksum -a md5 < /bin/lsa8b525da46e758778564308ed9b1e493
And to generate a SHA512 fingerprint for
/bin/ps:
%cksum -a sha512 < /bin/ps381d4ad64fd47800897446a2026eca42151e03adeae158db5a34d12c529559113d928a9fef9a7c4615d257688d1da4645db004081030d7f080bb7198067eb890
Each entry may be associated with zero or more flags. Currently, these flags indicate how the file the entry is describing should be accessed. Note that this access type is enforced only in strict level 2 (IPS mode) and above.
The access types you can use are “DIRECT”, “INDIRECT”, and “FILE”.
-
DIRECT access means that the file is executed directly, and not invoked as an interpreter for some script, or opened with an editor. Usually, most programs you use will be accessed using this mode:
%ls /tmp%cp ~/foo /tmp/bar%rm ~/foo -
INDIRECT access means that the file is executed indirectly, and is invoked to interpret a script. This happens usually when scripts have a #! magic as their first line. For example, if you have a script with the following as its first line:
#!/bin/sh
And you run it as:
%./script.shThen
/bin/shwill be executed indirectly -- it will be invoked to interpret the script. -
FILE entries refer to everything which is not (or should not) be an executable. This includes shared libraries, configuration files, etc.
Some examples for Veriexec signature file entries:
/bin/ls MD5 dc2e14dc84bdefff4bf9777958c1b20b DIRECT /usr/bin/perl MD5 914aa8aa47ebd79ccd7909a09ed61f81 INDIRECT /etc/pf.conf MD5 950e1dd6fcb3f27df1bf6accf7029f7d FILE
Veriexec allows you to specify more than one way to access a
file in an entry. For example, even though
/usr/bin/perl is mostly used as an
interpreter, it may be desired to be able to execute it
directly, too:
/usr/bin/perl MD5 914aa8aa47ebd79ccd7909a09ed61f81 DIRECT, INDIRECT
Shell scripts using #! magic to be “executable” also require two access types: We need them to be “DIRECT” so we can execute them, and we need them to be “FILE” so that the kernel can feed their contents to the interpreter they define:
/usr/src/build.sh MD5 e80dbb4c047ecc1d84053174c1e9264a DIRECT, FILE
To make it easier to create signature files, and to make the signature files themselves more readable, Veriexec allows you to use the following aliases:
Table 20.2. Veriexec access type aliases
Alias Expansion PROGRAM DIRECT INTERPRETER INDIRECT SCRIPT DIRECT, FILE LIBRARY FILE
After you have generated a signatures file, you should save it as
/etc/signatures, and enable Veriexec in
rc.conf:
veriexec=YES
Since different people might want to use Veriexec for different purposes, we also define four strict levels, ranging 0-3, and named “learning”, “IDS”, “IPS”, and “lockdown” modes.
In strict level 0, learning mode, Veriexec will act passively and simply warn about any anomalies. Combined with verbose level 1, running the system in this mode can help you fine-tune the signatures file. This is also the only strict level in which you can load new entries to the kernel.
Strict level 1, or IDS mode, will deny access to files with a fingerprint mismatch. This mode suits mostly to users who simply want to prevent access to files which might've been maliciously modified by an attacker.
Strict level 2, IPS mode, takes a step towards trying to protect the integrity of monitored files. In addition to preventing access to files with a fingerprint mismatch, it will also deny write access and prevent the removal of monitored files, and enforce the way monitored files are accessed. (as the signatures file specifies).
Lockdown mode (strict level 3) can be used in highly critical situations such as custom made special-purpose machines, or as a last line of defense after an attacker compromised the system and we want to prevent traces from being removed, so we can perform post-mortem analysis. It will prevent the creation of new files, and deny access to files not monitored by Veriexec.
It's recommended to first run Veriexec in strict level 0 and
verbose level 1 to fine-tune your signatures file, ensuring that
desired applications run correctly, and only then raise the
strict level (and lower the verbosity level). You can use
/etc/sysctl.conf to auto raise the
strict level to the desired level after a reboot:
kern.veriexec.strict=1
Veriexec can be used on NFS file systems on the client side
and on layered file systems such as the union file system. The
files residing on these file systems need only be specified in the
/etc/signatures file and that the file
systems be mounted prior to the fingerprints being loaded.
If you are going to use layered file systems then you must ensure that you include the fingerprint for files you want protected at every layer. If you fail to do this someone could overwrite a file protected by Veriexec by using a different layer in a layered file system stack. This limitation may be removed in later versions of NetBSD.
It's recommended that if you are not going to use layered file systems nor NFS then these features should be disabled in they kernel configuration. If you need to use layered file systems then you must follow the instructions in the previous paragraph and ensure that the files you want protected have fingerprints at all layers. Also you should raise securelevel to 2 after all mounts are done:
kern.securelevel=2
To prevent new layers being mounted which could compromise Veriexec's protection.
To use Veriexec, aside from creating a signatures file, you
should enable (uncomment) it in your kernel's config file: (e.g.
/usr/src/sys/arch/i386/conf/GENERIC):
pseudo-device veriexec
Then, you need to enable the hashing algorithms you wish to support:
options VERIFIED_EXEC_FP_MD5 options VERIFIED_EXEC_FP_SHA1 options VERIFIED_EXEC_FP_RMD160 options VERIFIED_EXEC_FP_SHA512 options VERIFIED_EXEC_FP_SHA384 options VERIFIED_EXEC_FP_SHA256
Depending on your operating system version and platform, these may already be enable. Once done, rebuild and reinstall your kernel, see Chapter 34, Compiling the kernel for further instructions.
If you do not have the Veriexec device
/dev/veriexec, you can create it manually by
running the following command:
# cd /dev # sh MAKEDEV veriexec
Table of Contents
Bluetooth is a digital radio protocol used for short range and low power communications. NetBSD includes support for the Bluetooth protocol stack, and some integration of service profiles into the NetBSD device framework.
The lower layers of the Bluetooth protocol stack pertaining to actual radio links between devices are handled inside the Bluetooth Controller, which communicates with the Host computer using the “Host Controller Interface” (HCI) protocol which can be accessed via a raw packet BTPROTO_HCI socket interface.
Most of the Bluetooth protocols or services layer atop the “Link Layer Control and Adaptation Protocol” (L2CAP), which can be accessed via a BTPROTO_L2CAP socket interface. This provides sequential packet connections to remote devices, with up to 64k channels. When an L2CAP channel is opened, the protocol or service that is required is identified by a “Protocol/Service Multiplexer” (PSM) value.
Service Discovery in the Bluetooth environment is provided for by the sdp(3) library functions and the sdpd(8) daemon, which keeps a database of locally registered services and makes the information available to remote devices performing queries. The sdpquery(1) tool can be used to query local and remote service databases.
Security on Bluetooth links can be enabled by encryption and authentication options to btconfig(8) which apply to all baseband links that a controller makes, or encryption and authentication can be enabled for individual RFCOMM and L2CAP links as required. When authentication is requested, a PIN is presented by each side (generally entered by the operator, some limited input devices have a fixed PIN). The controller uses this PIN to generate a Link Key and reports this to the Host which may be asked to produce it to authenticate subsequent connections. On NetBSD, the bthcid(8) daemon is responsible for storing link keys and responding to Link Key Requests, and also provides an interface to allow unprivileged users to specify a PIN with a PIN client, such as btpin(1).
Because Bluetooth controllers normally use the standard HCI protocol as specified in the “Bluetooth 2.0 Core” documentation to communicate with the host, the NetBSD Bluetooth stack is compatible with most controllers, only requiring an interface driver:
bcsp(4) provides a tty(4) line discipline to send and receive BlueCore Serial Protocol packets over a serial line as described in the “BlueCore Serial Protocol (BCSP)” specification.
bt3c(4) provides an interface to the 3Com Bluetooth PC Card, model 3CRWB6096-A.
btbc(4) provides support for the AnyCom BlueCard (LSE041, LSE039, LSE139) PCMCIA devices.
btuart(4) provides a tty(4) line discipline to send and receive Bluetooth packets over a serial line as described in the “Bluetooth Host Controller Interface [Transport Layer] specification, Vol 4 part A”.
sbt(4) provides support for Secure Digital IO Bluetooth adapters.
ubt(4) interfaces to all USB Bluetooth controllers conforming to the “HCI USB Transport Layer” specification.
If the hardware is supported by the NetBSD Bluetooth stack, autoconfiguration messages will show up in the dmesg output, for example:
bt3c0 at pcmcia0 function 0: <3COM, 3CRWB60-A, Bluetooth PC Card>
ubt0 at uhub1 port 4 configuration 1 interface 0
ubt0: Cambridge Silicon Radio Bluetooth USB Adapter, rev 2.00/19.58, addr 4
ubt1 at uhub1 port 2 configuration 1 interface 0
ubt1: Broadcom Belkin Bluetooth Device, rev 1.10/0.01, addr 5
When support is not already compiled in, it can be added to the kernel configuration file for any platform that supports USB and/or PCMCIA (see Section 19.9, “Kernel Tuning”), using the following declarations, as required:
# Bluetooth Controller and Device support
pseudo-device bcsp # BlueCore Serial Protocol
pseudo-device btuart # Bluetooth HCI UART
# Bluetooth PCMCIA Controllers
bt3c* at pcmcia? function ? # 3Com 3CRWB6096-A
btbc* at pcmcia? function ? # AnyCom BlueCard LSE041/039/139
# Bluetooth SDIO Controllers
sbt* at sdmmc?
# Bluetooth USB Controllers
ubt* at uhub? port ?
# Bluetooth Device Hub
bthub* at bcsp?
bthub* at bt3c?
bthub* at btbc?
bthub* at btuart?
bthub* at sbt?
bthub* at ubt?
# Bluetooth HID support
bthidev* at bthub?
# Bluetooth Mouse
btms* at bthidev? reportid ?
wsmouse* at btms? mux 0
# Bluetooth Keyboard
btkbd* at bthidev? reportid ?
wskbd* at btkbd? console ? mux 1
# Bluetooth Audio support
btsco* at bthub?
Some older USB Bluetooth dongles based on the Broadcom BCM2033 chip require firmware to be loaded before they can function, and these devices will be attached to ugen(4). Use the “sysutils/bcmfw” package from the NetBSD Package Collection, to load firmware and enable these.
To fully enable Bluetooth services on NetBSD, the following
line should be added to the /etc/rc.conf
file.
bluetooth=YES
and either reboot, or execute the following command:
#service bluetooth start
Configuration of Bluetooth controllers is done with the
btconfig(8) program, and the above argument enables
only basic functionality, see the manual page for other
useful options. The extra options for btconfig on a given device,
say utb0, can be set by adding a line for it to the
/etc/rc.conf file.
btconfig_ubt0="name MyComputerName"
Important
bthcid(8) must be running in order to make authenticated connections with remote devices, and authentication may be requested by either device.
Support for “Human Interface Devices” (HIDs), which operate using the USB HID protocol over a pair of L2CAP channels is provided by the bthidev(4) driver. Currently, keyboards and mice are catered for, and attach to wscons(4) as normal.
Bluetooth Mice can be attached to the system with the btms(4) driver, using btdevctl(8).
First, you must discover the BDADDR of the device. This may be printed on the box, but the easiest way is to place the device into discoverable mode and perform a device inquiry with the appropriate controller:
%btconfig ubt0 inquiryDevice Discovery on ubt0 .... 1 response 1: bdaddr 00:14:51:c1:b9:2d (unknown) : name "Mighty Mouse" : class: [0x002580] Peripheral Mouse <Limited Discoverable> : page scan rep mode 0x01 : page scan period mode 0x02 : page scan mode 0x00 : clock offset 6944
For ease of use, you may want to add the address to the
/etc/bluetooth/hosts file, so that
you can refer to the mouse by alias:
#echo "00:14:51:c1:b9:2d mouse" >>/etc/bluetooth/hosts
Now, you can query the mouse, which will likely request authentication before it accepts connections. The fixed PIN should be listed in the documentation, though “0000” is often used. Set the PIN first using the btpin(1) program:
%btpin -d ubt0 -a mouse -p 0000#btdevctl -d ubt0 -a mouse -s HIDlocal bdaddr: 00:08:1b:8d:ba:6d remote bdaddr: 00:14:51:c1:b9:2d link mode: auth device type: bthidev control psm: 0x0011 interrupt psm: 0x0013 Collection page=Generic_Desktop usage=Mouse Input id=2 size=1 count=1 page=Button usage=Button_1 Variable, logical range 0..1 Input id=2 size=1 count=1 page=Button usage=Button_2 Variable, logical range 0..1 Input id=2 size=1 count=1 page=Button usage=Button_3 Variable, logical range 0..1 Input id=2 size=1 count=1 page=Button usage=Button_4 Variable, logical range 0..1 Input id=2 size=4 count=1 page=0x0000 usage=0x0000 Const Variable, logical range 0..1 Collection page=Generic_Desktop usage=Pointer Input id=2 size=8 count=1 page=Generic_Desktop usage=X Variable Relative, logical range -127..127 Input id=2 size=8 count=1 page=Generic_Desktop usage=Y Variable Relative, logical range -127..127 Input id=2 size=8 count=1 page=Consumer usage=AC_Pan Variable Relative, logical range -127..127 Input id=2 size=8 count=1 page=Generic_Desktop usage=Wheel Variable Relative, logical range -127..127 End collection Input id=2 size=8 count=1 page=0x00ff usage=0x00c0 Variable, logical range -127..127 Feature id=71 size=8 count=1 page=0x0006 usage=0x0020 Variable NoPref Volatile, logical range 0..100 End collection
This tells you that the mouse has responded to an SDP query, and the device capabilities are shown. Note that authentication is enabled by default for Bluetooth mice. You may now attach to the system:
#btdevctl -d ubt0 -a mouse -s HID -A
which should generate some messages on the system console:
bthidev0 at bthub0 remote-bdaddr 00:14:51:c1:b9:2d link-mode auth
btms0 at bthidev1 reportid 2: 4 buttons, W and Z dirs.
wsmouse1 at btms0 mux 0
bthidev1: reportid 71 not configured
bthidev1: connected
and the mouse should work.
The device capabilities are cached by btdevctl(8), and
to reattach the mouse at system startup, place an entry in
/etc/bluetooth/btdevctl.conf. The
bthidev(4) driver will attempt to connect once, though
mice will usually be sleeping and may require a tap on the
shoulder to awaken, in which case they should initiate the
connection to the host computer.
Bluetooth Keyboards can be attached to the system with the btkbd(4) driver, using btdevctl(8).
First, you must discover the BDADDR of the device. This may be printed on the box, but the easiest way is to place the device into discoverable mode and perform a device inquiry with the appropriate controller:
%btconfig ubt0 inquiryDevice Discovery on ubt0 .... 1 response 1: bdaddr 00:0a:95:45:a4:a0 (unknown) : name "Apple Wireless Keyboard" : class: [0x002540] Peripheral Keyboard <Limited Discoverable> : page scan rep mode 0x01 : page scan period mode 0x00 : page scan mode 0x00 : clock offset 18604
For ease of use, you may want to add the address to the
/etc/bluetooth/hosts file, so that
you can refer to the keyboard by alias:
#echo "00:0a:95:45:a4:a0 keyboard" >>/etc/bluetooth/hosts
Now, you can query the keyboard, which will likely request authentication before it accepts connections. The PIN will need to be entered on the keyboard, and we can generate a random PIN, using the btpin(1) program.
%btpin -d ubt0 -a keyboard -r -l 8PIN: 18799632#btdevctl -d ubt0 -a keyboard -s HID< ENTER PIN ON BLUETOOTH KEYBOARD NOW > local bdaddr: 00:08:1b:8d:ba:6d remote bdaddr: 00:0a:95:45:a4:a0 link mode: encrypt device type: bthidev control psm: 0x0011 interrupt psm: 0x0013 Collection page=Generic_Desktop usage=Keyboard Input id=1 size=1 count=1 page=Keyboard usage=Keyboard_LeftControl Variable, logical range 0..1 Input id=1 size=1 count=1 page=Keyboard usage=Keyboard_LeftShift Variable, logical range 0..1 Input id=1 size=1 count=1 page=Keyboard usage=Keyboard_LeftAlt Variable, logical range 0..1 Input id=1 size=1 count=1 page=Keyboard usage=Keyboard_Left_GUI Variable, logical range 0..1 Input id=1 size=1 count=1 page=Keyboard usage=Keyboard_RightControl Variable, logical range 0..1 Input id=1 size=1 count=1 page=Keyboard usage=Keyboard_RightShift Variable, logical range 0..1 Input id=1 size=1 count=1 page=Keyboard usage=Keyboard_RightAlt Variable, logical range 0..1 Input id=1 size=1 count=1 page=Keyboard usage=Keyboard_Right_GUI Variable, logical range 0..1 Input id=1 size=8 count=1 page=0x0000 usage=0x0000 Const, logical range 0..1 Output id=1 size=1 count=1 page=LEDs usage=Num_Lock Variable, logical range 0..1 Output id=1 size=1 count=1 page=LEDs usage=Caps_Lock Variable, logical range 0..1 Output id=1 size=1 count=1 page=LEDs usage=Scroll_Lock Variable, logical range 0..1 Output id=1 size=1 count=1 page=LEDs usage=Compose Variable, logical range 0..1 Output id=1 size=1 count=1 page=LEDs usage=Kana Variable, logical range 0..1 Output id=1 size=3 count=1 page=0x0000 usage=0x0000 Const, logical range 0..1 Input id=1 size=8 count=6 page=Keyboard usage=No_Event, logical range 0..255 Input id=1 size=1 count=1 page=Consumer usage=Eject Variable Relative, logical range 0..1 Input id=1 size=1 count=1 page=Consumer usage=Mute Variable Relative, logical range 0..1 Input id=1 size=1 count=1 page=Consumer usage=Volume_Up Variable, logical range 0..1 Input id=1 size=1 count=1 page=Consumer usage=Volume_Down Variable, logical range 0..1 Input id=1 size=1 count=4 page=0x0000 usage=0x0000 Const, logical range 0..1 End collection
This tells you that the keyboard has responded to an SDP query, and the device capabilities are shown. Note that encryption is enabled by default, since encrypted connection support is mandatory for Bluetooth keyboards. You may now attach to the system:
#btdevctl -d ubt0 -a keyboard -s HID -A
which should generate some messages on the system console:
bthidev1 at bthub0 remote-bdaddr 00:0a:95:45:a4:a0 link-mode encrypt
btkbd0 at bthidev0 reportid 1
wskbd1 at btkbd0 mux 1
wskbd1: connecting to wsdisplay0
bthidev1: connected
and the keyboard should work.
The device capabilities are cached by btdevctl(8), and
to reattach the keyboard at system startup, place an entry in
/etc/bluetooth/btdevctl.conf. The
bthidev(4) driver will attempt to connect once when
attached, but if the keyboard is not available at that time,
you may find that pressing a key will cause it to wake up and
initiate a connection to the last paired host.
Personal Area Networking services over Bluetooth are provided by the btpand(8) daemon which can assume all roles from the PAN profile and connects remote devices to the system through a tap(4) virtual Ethernet interface.
The "Personal Area Networking User" role is the client that accesses Network services on another device. For instance, in order to connect to the Internet via a smart phone with the NAP profile, make sure that the phone is discoverable, then:
%btconfig ubt0 inquiryDevice Discovery from device: ubt0 .... 1 response 1: bdaddr 00:17:83:30:bd:5e (unknown) : name "HTC Touch" : class: [0x5a020c] Smart Phone <Networking> <Capturing> <Object Transfer> <Telephony> : page scan rep mode 0x01 : clock offset 9769 : rssi -42#echo "00:17:83:30:bd:5e phone" >>/etc/bluetooth/hosts
You will see that the phone should have the <Networking> flag set in the Class of Device. Checking for the NAP service:
%sdpquery -a phone search NAPServiceRecordHandle: 0x00010000 ServiceClassIDList: Network Access Point ProtocolDescriptorList: L2CAP (PSM 0x000f) BNEP (v1.0; IPv4, ARP, IPv6) LanguageBaseAttributeIDList: en.UTF-8 base 0x0100 BluetoothProfileDescriptorList: Network Access Point, v1.0 ServiceName: "Network Access Point" ServiceDescription: "Bluetooth NAP Service" SecurityDescription: None NetAccessType: 100Mb Ethernet MaxNetAccessRate: 100000
reveals that the NAP service is available and that it provides IPv4, ARP and IPv6 protocols.
Most likely, the phone will request authentication before it allows connections to the NAP service, so before you make the first connection you may need to provide a PIN, which can be randomly generated. Then start btpand(8):
%btpin -d ubt0 -a phone -r -l 6PIN: 862048#btpand -d ubt0 -a phone -s NAP< ENTER PIN ON PHONE NOW > Searching for NAP service at 00:17:83:30:bd:5e Found PSM 15 for service NAP Opening connection to service 0x1116 at 00:17:83:30:bd:5e Using interface tap0 with addr 00:10:60:e1:50:3d
Finally, you will need to configure the tap(4) interface, but the phone should have a DHCP server so dhcpcd(8) will do that for you.
#dhcpcd tap0
Now you can surf the World Wide Web, but watch your data usage unless you have a comprehensive data plan.
Serial connections over Bluetooth are provided for by the RFCOMM protocol, which provides up to 30 channels multiplexed over a single L2CAP channel. This streamed data protocol can be accessed using the BTPROTO_RFCOMM socket interface, or via the rfcomm_sppd(1) program.
For instance, you can make a serial connection to the
“Dial Up Networking” (DUN) service of a mobile
phone in order to connect to the Internet with PPP. First you
should discover the BDADDR of the phone, and add this to your
/etc/bluetooth/hosts for ease of use.
Place the phone into Discoverable mode, and perform an inquiry
from the appropriate controller:
%btconfig ubt0 inquiryDevice Discovery from device: ubt0 ..... 1 response 1: bdaddr 00:16:bc:00:e8:48 (unknown) : name "Nokia 6103" : class: [0x520204] Cellular Phone <Networking> <Object Transfer> <Telephony> : page scan rep mode 0x01 : page scan period mode 0x02 : page scan mode 0x00 : clock offset 30269#echo "00:16:bc:00:e8:48 phone" >>/etc/bluetooth/hosts
Now, you can query the phone to confirm that it supports the DUN profile:
%sdpquery -d ubt0 -a phone search DUNServiceRecordHandle: 0x00010003 ServiceClassIDList: Dialup Networking Generic Networking ProtocolDescriptorList: L2CAP RFCOMM (channel 1) BrowseGroupList: Public Browse Root LanguageBaseAttributeIDList: en.UTF-8 base 0x0100 BluetoothProfileDescriptorList: Dialup Networking, v1.0 ServiceName: "Dial-up networking"
Most likely, the phone will request authentication before
it allows connections to the DUN service, so before you
make the first connection you may need to provide a PIN,
which can be randomly generated. You can use
rfcomm_sppd in stdio mode to check that
the connection is working ok, press ^C
to disconnect and return to the shell, for example:
%btpin -d ubt0 -a phone -r -l 6PIN: 904046%rfcomm_sppd -d ubt0 -a phone -s DUN< ENTER PIN ON PHONE NOW > rfcomm_sppd[24635]: Starting on stdio...atOKatiNokia OKati3Nokia 6103 OKat&vACTIVE PROFILE: E1 Q0 V1 X5 &C1 &D2 &S0 &Y0 +CMEE=0 +CSTA=129 +CBST=0,0,1 +CRLP=61,61,48,6 +CR=0 +CRC=0 +CLIP=0,2 +CLIR=0,2 +CSNS=0 +CVHU=1 +DS=0,0,2048,32 +DR=0 +ILRR=0 +CHSN=0,0,0,0 +CHSR=0 +CPBS="SM" S00:000 S01:000 S02:043 S03:013 S04:010 S05:008 S07:060 S08:002 S10:100 S12:050 S25:000 OK^Crfcomm_sppd[24635]: Completed on stdio
To have pppd(8) connect to the DUN service of your
phone automatically when making outbound connections, add the
following line to the /etc/ppp/options
file in place of the normal tty declaration:
pty "rfcomm_sppd -d ubt0 -a phone -s DUN -m encrypt"
Isochronous (SCO) Audio connections may be created on a baseband radio link using either the BTPROTO_SCO socket interface, or the btsco(4) audio device driver. While the specification says that up to three such links can be made between devices, the current Bluetooth stack can only handle one with any dignity.
Important
When using SCO Audio with USB Bluetooth controllers, you will need to enable isochronous data, and calculate the MTU that the device will use, see ubt(4) and btconfig(8).
Note
SCO Audio does not work properly with the bt3c(4) driver, use a USB controller for best results.
Audio connections to Bluetooth Headsets are possible
using the btsco(4) audio driver, and the bthset(1)
program. First, you need to discover the BDADDR of the
headset, and will probably wish to make an alias in your
/etc/bluetooth/hosts file for ease
of use. Place the headset into discoverable mode and
perform an inquiry with the appropriate controller:
%btconfig ubt0 inquiryDevice Discovery from device: ubt0 ..... 1 response 1: bdaddr 00:07:a4:23:10:83 (unknown) : name "JABRA 250" : class: [0x200404] Wearable Headset <Audio> : page scan rep mode 0x01 : page scan period mode 0x00 : page scan mode 0x00 : clock offset 147#echo "00:07:a4:23:10:83 headset" >>/etc/bluetooth/hosts
You will need to pair with the headset the first time you connect, the fixed PIN should be listed in the manual (often, “0000” is used). btdevctl(8) will query the device and attach the btsco(4) audio driver.
%btpin -d ubt0 -a headset -p 0000#btdevctl -d ubt0 -a headset -s HSET -Alocal bdaddr: 00:08:1b:8d:ba:6d remote bdaddr: 00:07:a4:23:10:83 link mode: none device type: btsco mode: connect channel: 1
which should generate some messages on the system console:
btsco0 at bthub0 remote-bdaddr 00:07:a4:23:10:83 channel 1
audio1 at btsco0: full duplex
In order to use the audio device, you will need to open a control connection with bthset(1) which conveys volume information to the mixer device.
%bthset -m /dev/mixer1 -vHeadset Info: mixer: /dev/mixer1 laddr: 00:08:1b:8d:ba:6d raddr: 00:07:a4:23:10:83 channel: 1 vgs.dev: 0, vgm.dev: 1
and you should now be able to transfer 8khz samples to
and from /dev/audio1 using any program
that supports audio, such as audioplay(1) or
audiorecord(1). Adjusting the mixer values should work
when playing though you may find that when opening a
connection, the headset will reset the volume to the last
known settings.
%audiorecord -d /dev/audio1 voice.au< TALK NONSENSE NOW >^C%audioplay -d /dev/audio voice.au< THATS REALLY WHAT YOU SOUND LIKE >%audioplay -d /dev/audio1 voice.au< IN THE HEADSET >
The device capabilities are cached by btdevctl(8), and
to reattach the btsco(4) driver at system startup, add
an entry to /etc/bluetooth/btdevctl.conf.
Audio connections to Bluetooth mobile phones using the Handsfree profile are possible with the “comms/bthfp” program from the NetBSD Package Collection.
First, you need to discover the BDADDR of the phone,
and will probably wish to make an alias in your
/etc/bluetooth/hosts file for ease of
use. Place the phone into discoverable mode and perform
an inquiry with the appropriate controller:
%btconfig ubt0 inquiryDevice Discovery from device: ubt0 ..... 1 response 1: bdaddr 00:16:bc:00:e8:48 (unknown) : name "Nokia 6103" : class: [0x520204] Cellular Phone <Networking;gt; <Object Transfer;gt; <Telephony;gt; : page scan rep mode 0x01 : page scan period mode 0x02 : page scan mode 0x00 : clock offset 10131#echo "00:16:bc:00:e8:48 phone" >>/etc/bluetooth/hosts
Now, you should be able to query the phone to confirm that it supports the Handsfree profile:
%sdpquery -d ubt0 -a phone search HFServiceRecordHandle: 0x00010006 ServiceClassIDList: Handsfree Audio Gateway Generic Audio ProtocolDescriptorList: L2CAP RFCOMM (channel 13) BrowseGroupList: Public Browse Root LanguageBaseAttributeIDList: en.UTF-8 base 0x0100 BluetoothProfileDescriptorList: Handsfree, v1.5 ServiceName: "Voice Gateway" Network: Ability to reject a call SupportedFeatures: 3 Way Calling Echo Cancellation/Noise Reduction Voice Recognition In-band Ring Tone
and you will be able to use the bthfp program to access the Handsfree profile. The first time you connect, you may need to use a PIN to pair with the phone, which can be generated randomly by btpin(1):
%btpin -d ubt0 -a phone -r -l 6PIN: 349163%bthfp -d ubt0 -a phone -v< ENTER PIN ON PHONE NOW > Handsfree channel: 13 Press ? for commands Connecting.. ok < AT+BRSF=20 > +BRSF: 47 Features: [0x002f] <3 way calling> <EC/NR> <Voice Recognition> <In-band ringtone> <reject ability> > OK < AT+CIND=? > +CIND: ("call",(0,1)),("service",(0,1)),("call_setup",(0-3)),("callsetup",(0-3)) > OK < AT+CIND? > +CIND: 0,1,0,0 > OK < AT+CMER=3,0,0,1 > OK < AT+CLIP=1 > OK Service Level established
When the phone rings, just press a
to answer, and audio should be routed through the
/dev/audio device. Note that you will
need a microphone connected in order to speak to the remote
party.
NetBSD does not currently have any native OBEX capability, see the “comms/obexapp” or “comms/obexftp” packages from the NetBSD Package Collection.
When nothing seems to be happening, it may be useful to try the hcidump program from the “sysutils/netbt-hcidump” package in the NetBSD Package Collection. This has the capability to dump packets entering and leaving Bluetooth controllers on NetBSD, which is greatly helpful in pinpointing problems.
Table of Contents
This chapter collects various topics, in sparse order
Sysinst, the NetBSD installation program usually installs the NetBSD boot manager on the hard disk. The boot manager can also be installed or reconfigured at a later time, if needed, with the fdisk command. For example:
#fdisk -B wd0
If NetBSD doesn't boot from the hard disk, you can boot it from the installation floppy and start the kernel on the hard disk. Insert the installation disk and, at the boot prompt, give the following command:
>boot wd0a:netbsd
This boots the kernel on the hard disk (use the correct device, for example sd0a for a SCSI disk).
Note
Sometimes fdisk -B doesn't give the expected result (at least it happened to me), probably if you install/remove other operating systems. In this case, try running fdisk -i and then run again fdisk from NetBSD.
Though this is not an operation that you need to perform frequently, it can be useful to know how to do it in case of need. Please be sure to know exactly what you are doing before performing this kind of operation. For example:
#dd if=/dev/zero of=/dev/rwd0c bs=8k count=1
The previous command deletes the disklabel (not the MBR partition
table).
To completely delete the disk, the whole device rwd0d
must be used.
For example:
#dd if=/dev/zero of=/dev/rwd0d bs=8k
The commands above will only work as expected on the i386 and amd64 ports
of NetBSD. On other ports, the whole device will end in c, not d (e.g.
rwd0c).
To output a sound from the speaker (for example at the end of a
long script) the spkr driver can be used in
the kernel config, which is mapped on
/dev/speaker. For example:
echo 'BPBPBPBPBP' > /dev/speaker
Note
The spkr device is not enabled in the generic kernel; a customized kernel is needed.
If you forget root's password, not all is lost and you can still recover the system with the following steps: boot single user, mount / and change root's password. In detail:
-
Boot single user: when the boot prompt appears and the five seconds countdown starts, give the following command:
>boot -s -
At the following prompt
Enter pathname of shell or RETURN for sh:
press Enter.
-
Write the following commands:
#fsck -y /#mount -u /#fsck -y /usr#mount /usr -
Change root's password:
#passwd rootChanging local password for root. New password:(not echoed)Retype new password:(not echoed)# -
Exit the shell to go to multiuser mode.
#exit
If you get the error “Password file is busy”, please see the section below.
If you try to modify a password and you get the mysterious
message “Password file is busy”, it probably
means that the file /etc/ptmp has not
been deleted from the system. This file is a temporary copy
of the /etc/master.passwd file; check
that you are not losing important information and then
delete it:
#rm /etc/ptmp
Note
If the file /etc/ptmp exists you can
also receive a warning message at system startup. For
example:
root: password file may be incorrect - /etc/ptmp exists
This section describes how to add a new hard disk to an
already working NetBSD system. In the following example a
new SCSI controller and a new hard disk, connected to the
controller, will be added. If you don't need to add a new
controller, skip the relevant part and go to the hard disk
configuration. The installation of an IDE hard disk is
identical; only the device name will be different
(wd# instead of
sd#).
As always, before buying new hardware, consult the hardware compatibility list of NetBSD and make sure that the new device is supported by the system.
When the SCSI controller has been physically installed in the system and the new hard disk has been connected, it's time to restart the computer and check that the device is correctly detected, using the dmesg command. This is the sample output for an NCR-875 controller:
ncr0 at pci0 dev 15 function 0: ncr 53c875 fast20 wide scsi ncr0: interrupting at irq 10 ncr0: minsync=12, maxsync=137, maxoffs=16, 128 dwords burst, large dma fifo ncr0: single-ended, open drain IRQ driver, using on-chip SRAM ncr0: restart (scsi reset). scsibus0 at ncr0: 16 targets, 8 luns per target sd0(ncr0:2:0): 20.0 MB/s (50 ns, offset 15) sd0: 2063MB, 8188 cyl, 3 head, 172 sec, 512 bytes/sect x 4226725 sectors
If the device doesn't appear in the output, check that it is supported by the kernel that you are using; if necessary, compile a customized kernel (see Chapter 34, Compiling the kernel).
Now the partitions can be created using the fdisk command. First, check the current status of the disk:
#fdisk sd0NetBSD disklabel disk geometry: cylinders: 8188 heads: 3 sectors/track: 172 (516 sectors/cylinder) BIOS disk geometry: cylinders: 524 heads: 128 sectors/track: 63 (8064 sectors/cylinder) Partition table: 0: sysid 6 (Primary 'big' DOS, 16-bit FAT (> 32MB)) start 63, size 4225473 (2063 MB), flag 0x0 beg: cylinder 0, head 1, sector 1 end: cylinder 523, head 127, sector 63 1: <UNUSED> 2: <UNUSED> 3: <UNUSED>
In this example the hard disk already contains a DOS partition, which will be deleted and replaced with a native NetBSD partition. The command fdisk -u sd0 allows to modify interactively the partitions. The modified data will be written on the disk only before exiting and fdisk will request a confirmation before writing, so you can work relaxedly.
To create the BIOS partitions the command fdisk -u must be used; the result is the following:
Partition table:
0: sysid 169 (NetBSD)
start 63, size 4225473 (2063 MB), flag 0x0
beg: cylinder 0, head 1, sector 1
end: cylinder 523, head 127, sector 63
1: <UNUSED>
2: <UNUSED>
3: <UNUSED>
Now it's time to create the disklabel for the NetBSD partition. The correct steps to do this are:
#disklabel sd0 > tempfile#vi tempfile#disklabel -R -r sd0 tempfile
Now we create some disklabel partitions, editing the
tempfile as already explained. The
result is:
# size offset fstype [fsize bsize cpg] a: 2048004 63 4.2BSD 1024 8192 16 # (Cyl. 0*- 3969*) c: 4226662 63 unused 0 0 # (Cyl. 0*- 8191*) d: 4226725 0 unused 0 0 # (Cyl. 0 - 8191*) e: 2178658 2048067 4.2BSD 1024 8192 16 # (Cyl. 3969*- 8191*)
Note
When the disklabel has been created it is possible to optimize it studying the output of the command newfs -N /dev/rsd0a, which warns about the existence of unallocated sectors at the end of a disklabel partition. The values reported by newfs can be used to adjust the sizes of the partitions with an iterative process.
The final operation is the creation of the file systems for the newly defined partitions (a and e).
#newfs /dev/rsd0a#newfs /dev/rsd0e
The disk is now ready for usage, and the two partitions can be mounted. For example:
#mount /dev/sd0a /mnt
If this succeeds, you may want to put an entry for the partition
into /etc/fstab.
First shutdown to single user, partitions still mounted
“rw”
(read-write); You can do that by just typing shutdown
now while you are in multi user mode, or reboot with
the -s option and make /
and /dev read-writable by doing.
#mount -u /#mount -u /dev
Then:
#mkdir /newdev#cd /newdev#cp /dev/MAKEDEV* .#sh ./MAKEDEV all#cd /#mv dev olddev#mv newdev dev#rm -r olddev
Or if you fetched all the sources in
/usr/src:
#mkdir /newdev#cd /newdev#cp /usr/src/etc/MAKEDEV.local .#( cd /usr/src/etc ; make MAKEDEV )#cp /usr/src/etc/obj*/MAKEDEV .#sh ./MAKEDEV all#cd /#mv dev olddev; mv newdev dev#rm -r olddev
You can determine $arch by
#uname -m
or
#sysctl hw.machine_arch
Table of Contents
- 23. Introduction to TCP/IP Networking
- 24. Setting up TCP/IP on NetBSD in practice
- 24.1. Overview of the network configuration files
- 24.2. Connecting to common LAN setups
- 24.3. Manually creating a small LAN
- 24.4. Connecting to a home/office ISP with PPPoE
- 24.5. Setting up an Internet gateway with NPF
- 24.6. Setting up a network bridge device
- 24.7. Ensuring interfaces are initialized in the correct order
- 24.8. Some useful commands
- 25. The Internet Super Server inetd
- 25.1. Overview
- 25.2. What is inetd?
- 25.3. Configuring inetd -
/etc/inetd.conf - 25.4. Services -
/etc/services - 25.5. Protocols -
/etc/protocols - 25.6. Remote Procedure Calls (RPC) -
/etc/rpc - 25.7. Allowing and denying hosts
-
/etc/hosts.{allow,deny} - 25.8. Adding a Service
- 25.9. When to use or not to use inetd
- 25.10. Other Resources
- 26. The Domain Name System
- 27. Mail and news
- 28. Introduction to the Common Address Redundancy Protocol (CARP)
- 29. Network services
Table of Contents
This section explains various aspects of networking. It is intended to help people with little knowledge about networks to get started. It is divided into three big parts. We start by giving a general overview of how networking works and introduce the basic concepts. Then we go into details for setting up various types of networking in the second parts, and the third part of the networking section covers a number of “advanced” topics that go beyond the basic operation as introduced in the first two sections.
The reader is assumed to know about basic system administration tasks: how to become root, edit files, change permissions, stop processes, etc. See the other chapters of this NetBSD guide and, e.g., [AeleenFrisch] for further information on this topic. Besides that, you should know how to handle the utilities we're going to set up here, i.e., you should know how to use telnet, FTP, ... I will not explain the basic features of those utilities, please refer to the appropriate manual pages, the references listed or, of course, the other parts of this document instead.
This introduction to TCP/IP networking was written with the intention in mind to give starters a basic knowledge. If you really want to know what it's all about, read [CraigHunt]. This book does not only cover the basics, but goes on and explains all the concepts, services and how to set them up in detail. It's great, I love it! :-)
There are several protocol suites supported by NetBSD, most of which were inherited from NetBSD's predecessor, 4.4BSD, and subsequently enhanced and improved. The first and most important one today is DARPA's Transmission Control Protocol/Internet Protocol (TCP/IP). Other protocol suites available in NetBSD include the Stream Control Transmission Protocol (SCTP), and Apple's AppleTalk protocol suite. They are only used in some special applications.
Today, TCP/IP is the most widespread protocol of the ones mentioned above. It is implemented on almost every hardware and operating system, and it is also the most-used protocol in heterogenous environments. So, if you just want to connect your computer running NetBSD to some other machine at home or you want to integrate it into your company's or university's network, TCP/IP is the right choice.
The TCP/IP protocol stack behaves the same regardless of the underlying media used, and NetBSD supports a wide range of these, among them are Ethernet (10/100Mb/1/10/40/100Gb), USB, serial line and FireWire (IEEE 1394).
Ethernet is the medium commonly used to build local area networks (LANs) of interconnected machines within a limited area such as an office, company or university campus. Ethernet is based on a bus structure to which many machines can connect to, and communication always happens between two nodes at a time. When two or more nodes want to talk at the same time, both will restart communication after some timeout. The technical term for this is CSMA/CD (Carrier Sense w/ Multiple Access and Collision Detection).
Initially, Ethernet hardware consisted of a thick (yellow) cable that machines tapped into using special connectors that poked through the cable's outer shielding. The successor of this was called 10base5, which used BNC-type connectors for tapping in special T-connectors and terminators on both ends of the bus. Today, ethernet is mostly used with twisted pair lines which are used in a collapsed bus system that are contained in switches or hubs. The twisted pair lines give this type of media its name - 10baseT for 10 Mbit/s networks, and 100baseT for 100 MBit/s ones. In switched environments there's also the distinction if communication between the node and the switch can happen in half- or in full duplex mode.
IEEE 802.11 (commonly known as Wi-Fi) is the primary means by which mobile devices are connected over a Local Area Network.
IEEE 802.11 primarily operates over two radio bands, 2.4 GHz (modes b, g, and n), and 5 GHz (modes a, and ac). The 2.4 GHz band is typically more congested, but loses less performance through walls and other barriers.
The main protocol used for securing Wi-Fi connections is WPA (Wi-Fi Protected Access). In a typical configuration, this encrypts the connection between the access point and its clients with a password.
The disadvantage of a serial connection is that it's slower than other methods. NetBSD can use at most 115200 bit/s, making it a lot slower than e.g. Ethernet's minimum 10 Mbit/s.
There are two possible protocols to connect a host running NetBSD to another host using a serial line (possibly over a phone-line):
Serial Line IP (SLIP)
Point to Point Protocol (PPP)
The choice here depends on whether you use a dial-up connection through a modem or if you use a static connection (null-modem or leased line). If you dial up for your IP connection, it's wise to use PPP as it offers some possibilities to auto-negotiate IP-addresses and routes, which can be quite painful to do by hand. If you want to connect to another machine which is directly connected, use SLIP, as this is supported by about every operating system and more easy to set up with fixed addresses and routes.
PPP on a direct connection is a bit difficult to setup, as it's easy to timeout the initial handshake; with SLIP, there's no such initial handshake, i.e. you start up one side, and when the other site has its first packet, it will send it over the line.
[RFC1331] and [RFC1332] describe PPP and TCP/IP over PPP. SLIP is defined in [RFC1055].
TCP/IP uses 4-byte (32-bit) addresses in the current implementations (IPv4), also called IP-numbers (Internet-Protocol numbers), to address hosts.
TCP/IP allows any two machines to communicate directly. To permit this all hosts on a given network must have a unique IP address. To assure this, IP addresses are administrated by one central organisation, the InterNIC. They give certain ranges of addresses (network-addresses) directly to sites which want to participate in the internet or to internet-providers, which give the addresses to their customers.
If your university or company is connected to the Internet, it has (at least) one such network-address for its own use, usually not assigned by the InterNIC directly, but rather through an Internet Service Provider (ISP).
If you just want to run your private network at home, see below on how to “build” your own IP addresses. However, if you want to connect your machine to the (real :-) Internet, you should get an IP addresses from your local network-administrator or -provider.
IP addresses are usually written in “dotted quad”-notation - the four bytes are written down in decimal (most significant byte first), separated by dots. For example, 132.199.15.99 would be a valid address. Another way to write down IP-addresses would be as one 32-bit hex-word, e.g. 0x84c70f63. This is not as convenient as the dotted-quad, but quite useful at times, too. (See below!)
Being assigned a network means nothing else but setting some of the above-mentioned 32 address-bits to certain values. These bits that are used for identifying the network are called network-bits. The remaining bits can be used to address hosts on that network, therefore they are called host-bits. Figure 23.1, “IPv4-addresses are divided into more significant network- and less significant hostbits” illustrates the separation.
Figure 23.1. IPv4-addresses are divided into more significant network- and less significant hostbits

In the above example, the network-address is 132.199.0.0 (host-bits are set to 0 in network-addresses) and the host's address is 15.99 on that network.
How do you know that the host's address is 16 bit wide? Well, this is assigned by the provider from which you get your network-addresses. In the classless inter-domain routing (CIDR) used today, host fields are usually between as little as 2 to 16 bits wide, and the number of network-bits is written after the network address, separated by a “/”, e.g. 132.199.0.0/16 tells that the network in question has 16 network-bits. When talking about the “size” of a network, it's usual to only talk about it as “/16”, “/24”, etc.
Before CIDR was used, there used to be four classes of networks. Each one starts with a certain bit-pattern identifying it. Here are the four classes:
-
Class A starts with “0” as most significant bit. The next seven bits of a class A address identify the network, the remaining 24 bit can be used to address hosts. So, within one class A network there can be 224 hosts. It's not very likely that you (or your university, or company, or whatever) will get a whole class A address.
The CIDR notation for a class A network with its eight network bits is an “/8”.
-
Class B starts with “10” as most significant bits. The next 14 bits are used for the networks address and the remaining 16 bits can be used to address more than 65000 hosts. Class B addresses are very rarely given out today, they used to be common for companies and universities before IPv4 address space went scarce.
The CIDR notation for a class B network with its 16 network bits is an “/16”.
Returning to our above example, you can see that 132.199.15.99 (or 0x84c70f63, which is more appropriate here!) is on a class B network, as 0x84... = 1000... (base 2).
Therefore, the address 132.199.15.99 can be split into an network-address of 132.199.0.0 and a host-address of 15.99.
-
Class C is identified by the MSBs being “110”, allowing only 256 (actually: only 254, see below) hosts on each of the 221 possible class C networks. Class C addresses are usually found at (small) companies.
The CIDR notation for a class C network with its 24 network bits is an “/24”.
There are also other addresses, starting with “111”. Those are used for special purposes (e. g. multicast-addresses) and are not of interest here.
Please note that the bits which are used for identifying the network-class are part of the network-address.
When separating host-addresses from network-addresses, the “netmask” comes in handy. In this mask, all the network-bits are set to “1”, the host-bits are “0”. Thus, putting together IP-address and netmask with a logical AND-function, the network-address remains.
To continue our example, 255.255.0.0 is a possible netmask for 132.199.15.99. When applying this mask, the network-address 132.199.0.0 remains.
For addresses in CIDR notation, the number of network-bits given also says how many of the most significant bits of the address must be set to “1” to get the netmask for the corresponding network. For classful addressing, every network-class has a fixed default netmask assigned:
Class A (/8): default-netmask: 255.0.0.0, first byte of address: 1-127
Class B (/16): default-netmask: 255.255.0.0, first byte of address: 128-191
Class C (/24): default-netmask: 255.255.255.0, first byte of address: 192-223
Another thing to mention here is the “broadcast-address”. When sending to this address, all hosts on the corresponding network will receive the message sent. The broadcast address is characterized by having all host-bits set to “1”.
Taking 132.199.15.99 with its netmask 255.255.0.0 again, the broadcast-address would result in 132.199.255.255.
You'll ask now: But what if I want a host's address to be all bits “0” or “1”? Well, this doesn't work, as network- and broadcast-address must be present! Because of this, a class B (/16) network can contain at most 216-2 hosts, a class C (/24) network can hold no more than 28-2 = 254 hosts.
Besides all those categories of addresses, there's the special IP-address 127.0.0.1 which always refers to the “local” host, i.e. if you talk to 127.0.0.1 you'll talk to yourself without starting any network-activity. This is sometimes useful to use services installed on your own machine or to play around if you don't have other hosts to put on your network.
Let's put together the things we've introduced in this section:
- IP-address
32 bit-address, with network- and host-bits.
- Network-address
IP-address with all host bits set to “0”.
- Netmask
32-bit mask with “1” for network- and “0” for host-bits.
- Broadcast
IP-address with all host bits set “1”.
- localhost's address
The local host's IP address is always 127.0.0.1.
After talking so much about netmasks, network-, host- and other addresses, I have to admit that this is not the whole truth.
Imagine the situation at your university, which usually has a class B (/16) address, allowing it to have up to 216 ~= 65534 hosts on that net. Maybe it would be a nice thing to have all those hosts on one single network, but it's simply not possible due to limitations in the transport media commonly used today.
For example, when using thinwire ethernet, the maximum length of the cable is 185 meters. Even with repeaters in between, which refresh the signals, this is not enough to cover all the locations where machines are located. Besides that, there is a maximum number of 1024 hosts on one ethernet wire, and you'll lose quite a bit of performance if you go to this limit.
So, are you hosed now? Having an address which allows more than 60000 hosts, but being bound to media which allows far less than that limit?
Well, of course not! :-)
The idea is to divide the “big” class B net into several smaller networks, commonly called sub-networks or simply subnets. Those subnets are only allowed to have, say, 254 hosts on them (i.e. you divide one big class B network into several class C networks!).
To do this, you adjust your netmask to have more network- and less host-bits on it. This is usually done on a byte-boundary, but you're not forced to do it there. So, commonly your netmask will not be 255.255.0.0 as supposed by a class B network, but it will be set to 255.255.255.0.
In CIDR notation, you now write a “/24” instead of the “/16” to show that 24 bits of the address are used for identifying the network and subnet, instead of the 16 that were used before.
This gives you one additional network-byte to assign to each (physical!) network. All the 254 hosts on that subnet can now talk directly to each other, and you can build 256 such class C nets. This should fit your needs.
To explain this better, let's continue our above example. Say
our host 132.199.15.99 (I'll call him dusk from now; we'll talk
about assigning hostnames later) has a netmask of
255.255.255.0 and thus is on the subnet 132.199.15.0/24. Let's
furthermore introduce some more hosts so we have something to
play around with, see Figure 23.2, “Our demo-network”.
In the above network, dusk can talk directly to
dawn, as they are
both on the same subnet. (There are other hosts attached to
the 132.199.15.0/24-subnet but they are not of importance for
us now)
But what if dusk
wants to talk to a host on another subnet?
Well, the traffic will then go through one or more gateways (routers), which are attached to two subnets. Because of this, a router always has two different addresses, one for each of the subnets it is on. The router is functionally transparent, i.e. you don't have to address it to reach hosts on the “other” side. Instead, you address that host directly and the packets will be routed to it correctly.
Example. Let's say dusk wants to get some files
from the local ftp-server. As dusk can't reach ftp directly (because it's on
a different subnet), all its packets will be forwarded to its
"defaultrouter" rzi (132.199.15.1), which
knows where to forward the packets.
Dusk knows the
address of its defaultrouter in its network (rzi, 132.199.15.1), and it
will forward any packets to it which are not on the same
subnet, i.e. it will forward all IP-packets in which the third
address-byte isn't 15.
The (default)router then gives the packets to the appropriate host, as it's also on the FTP-server's network.
In this example, all packets are forwarded to the 132.199.1.0/24-network, simply because it's the network's backbone, the most important part of the network, which carries all the traffic that passes between several subnets. Almost all other networks besides 132.199.15.0/24 are attached to the backbone in a similar manner.
But what if we had hooked up another subnet to 132.199.15.0/24 instead of 132.199.1.0/24? Maybe something the situation displayed in Figure 23.3, “Attaching one subnet to another one”.
When we now want to reach a host which is located in the
132.199.16.0/24-subnet from dusk, it won't work routing it
to rzi, but you'll
have to send it directly to route2
(132.199.15.2). Dusk will have to know to
forward those packets to route2 and send all the others
to rzi.
When configuring dusk, you tell it to forward
all packets for the 132.199.16.0/24-subnet to route2, and all others to
rzi. Instead of
specifying this default as 132.199.1.0/24, 132.199.2.0/24,
etc., 0.0.0.0 can be used to set the default-route.
Returning to Figure 23.2, “Our demo-network”, there's a similar problem when
dawn wants to send
to noon, which is
connected to dusk
via a serial line running. When looking at the IP-addresses,
noon seems to be
attached to the 132.199.15.0-network, but it isn't
really. Instead, dusk is used as gateway, and
dawn will have to
send its packets to dusk, which will forward them
to noon then. The
way dusk is forced
into accepting packets that aren't destined at it but for a
different host (noon) instead is called “proxy
arp”.
The same goes when hosts from other subnets want to send to
noon. They have to
send their packets to dusk
(possibly routed via rzi),
In the previous sections, when we talked about hosts, we referred to them by their IP-addresses. This was necessary to introduce the different kinds of addresses. When talking about hosts in general, it's more convenient to give them “names”, as we did when talking about routing.
Most applications don't care whether you give them an IP address or a hostname. However, they'll use IP addresses internally, and there are several methods for them to map hostnames to IP addresses, each one with its own way of configuration. In this section we'll introduce the idea behind each method, in the next chapter, we'll talk about the configuration-part.
The mapping from hostnames (and domainnames) to IP-addresses is done by a piece of software called the “resolver”. This is not an extra service, but some library routines which are linked to every application using networking-calls. The resolver will then try to resolve (hence the name ;-) the hostnames you give into IP addresses. See [RFC1034] and [RFC1035] for details on the resolver.
Hostnames are usually up to 256 characters long, and contain letters, numbers and dashes (“-”); case is ignored.
Just as with networks and subnets, it's possible (and desirable) to group hosts into domains and subdomains. When getting your network-address, you usually also obtain a domainname by your provider. As with subnets, it's up to you to introduce subdomains. Other as with IP-addresses, (sub)domains are not directly related to (sub)nets; for example, one domain can contain hosts from several subnets.
Figure 23.2, “Our demo-network” shows this: Both subnets 132.199.1.0/24 and
132.199.15.0/24 (and others) are part of the subdomain
“rz.uni-regensburg.de”. The
domain the University of Regensburg got from its IP-provider
is “uni-regensburg.de”
(“.de” is for
Deutschland, Germany), the subdomain “rz” is for Rechenzentrum,
computing center.
Hostnames, subdomain- and domainnames are separated by dots
(“.”). It's also possible to use more than one stage of
subdomains, although this is not very common. An example would
be fox_in.socs.uts.edu.au.
A hostname which includes the (sub)domain is also called a
fully qualified domain name (FQDN). For
example, the IP-address 132.199.15.99 belongs to the host with
the FQDN dusk.rz.uni-regensburg.de.
Further above I told you that the IP-address 127.0.0.1 always
belongs to the local host, regardless what's the “real”
IP-address of the host. Therefore, 127.0.0.1 is always mapped
to the name “localhost”.
The three different ways to translate hostnames into
IP addresses are: /etc/hosts, the Domain
Name Service (DNS) and the Network
Information Service (NIS).
The first and simplest way to translate hostnames into
IP-addresses is by using a table telling which IP address
belongs to which hostname(s). This table is stored in the
file /etc/hosts and has the following format:
IP-address hostname [nickname [...]]
Lines starting with a hash mark (“#”) are
treated as
comments. The other lines contain one IP-address and the
corresponding hostname(s).
It's not possible for a hostname to belong to several
IP addresses, even if I made you think so when talking about
routing. rzi for
example has really two distinct names for each of its two
addresses: rzi
and rzia (but
please don't ask me which name belongs to which address!).
Giving a host several nicknames can be convenient if you want to specify your favorite host providing a special service with that name, as is commonly done with FTP-servers. The first (leftmost) name is usually the real (canonical) name of the host.
Besides giving nicknames, it's also convenient to give a host's full name (including domain) as its canonical name, and using only its hostname (without domain) as a nickname.
Important: There
must be an entry mapping
localhost to 127.0.0.1 in /etc/hosts!
/etc/hosts bears an inherent problem,
especially in big networks: when one host is added or one
host's address changes, all the
/etc/hosts files on all machines have to be
changed! This is not only time-consuming, it's also very
likely that there will be some errors and inconsistencies,
leading to problems.
Another approach is to hold only one hostnames-table (-database) for a network, and make all the clients query that “nameserver”. Updates will be made only on the nameserver.
This is the basic idea behind the Domain Name Service (DNS).
Usually, there's one nameserver for each domain (hence DNS), and every host (client) in that domain knows which domain it is in and which nameserver to query for its domain.
When the DNS gets a query about a host which is not in its domain, it will forward the query to a DNS which is either the DNS of the domain in question or knows which DNS to ask for the specified domain. If the DNS forwarded the query doesn't know how to handle it, it will forward that query again to a DNS one step higher. This is not ad infinitum, there are several “root”-servers, which know about any domain.
See Chapter 26, The Domain Name System for details on DNS.
Yellow Pages (YP) was invented by Sun Microsystems. The name has been changed into Network Information Service (NIS) because YP was already a trademark of the British telecom. So, when I'm talking about NIS you'll know what I mean. ;-)
There are quite some configuration files on a Unix-system, and often it's desired to maintain only one set of those files for a couple of hosts. Those hosts are grouped together in a NIS-domain (which has nothing to do with the domains built by using DNS!) and are usually contained in one workstation cluster.
Examples for the config-files shared among those hosts are
/etc/passwd,
/etc/group and - last but not least -
/etc/hosts.
So, you can “abuse” NIS for getting a unique name-to-address-translation on all hosts throughout one (NIS-)domain.
There's only one drawback, which prevents NIS from actually being used for that translation: In contrast to the DNS, NIS provides no way to resolve hostnames which are not in the hosts-table. There's no hosts “one level up” which the NIS-server can query, and so the translation will fail! Suns NIS+ takes measures against that problem, but as NIS+ is only available on Solaris-systems, this is of little use for us now.
Don't get me wrong: NIS is a fine thing for managing
e.g. user-information (/etc/passwd, ...) in
workstation-clusters, it's simply not too useful for
resolving hostnames.
The name resolving methods described above are what's used commonly today to resolve hostnames into IP addresses, but they aren't the only ones. Basically, every database mechanism would do, but none is implemented in NetBSD. Let's have a quick look what you may encounter.
With NIS lacking hierarchy in data structures, NIS+ is intended to help out in that field. Tables can be setup in a way so that if a query cannot be answered by a domain's server, there can be another domain “above” that might be able to do so. E.g. you could choose to have a domain that lists all the hosts (users, groups, ...) that are valid in the whole company, one that defines the same for each division, etc. NIS+ is not used a lot today, even Sun went back to ship back NIS by default.
Last century, the X.500 standard was designed to accommodate
both simple databases like /etc/hosts
as well as complex, hierarchical systems as can be found
e.g. in DNS today. X.500 wasn't really a success, mostly due
to the fact that it tried to do too much at the same time.
A cut-down version is available today as the Lightweight
Directory Access Protocol (LDAP), which is
becoming popular in the last years to manage data like users
but also hosts and others in small to medium sized
organisations.
When telling people to migrate from IPv4 to IPv6, the question you usually hear is “why?”. There are actually a few good reasons to move to the new version:
Bigger address space
Support for mobile devices
Built-in security
The bigger address space that IPv6 offers is the most obvious enhancement it has over IPv4. While today's internet architecture is based on 32-bit wide addresses, the new version has 128 bit available for addressing. Thanks to the enlarged address space, work-arounds like NAT don't have to be used any more. This allows full, unconstrained IP connectivity for today's mobile phones and IoT devices.
When mentioning mobile devices and IP, another important point to note is that some special protocol is needed to support mobility, and implementing this protocol - called “Mobile IP” - is one of the requirements for every IPv6 stack. Thus, if you have IPv6 going, you have support for roaming between different networks, with everyone being updated when you leave one network and enter the other one. Support for roaming is possible with IPv4 too, but there are a number of hoops that need to be jumped in order to get things working. With IPv6, there's no need for this, as support for mobility was one of the design requirements for IPv6. See [RFC3024] for some more information on the issues that need to be addressed with Mobile IP on IPv4.
Besides support for mobility, security was another requirement for the successor to today's Internet Protocol version. As a result, IPv6 protocol stacks are required to include IPsec. IPsec allows authentication, encryption and compression of any IP traffic. Unlike application level protocols like SSL or SSH, all IP traffic between two nodes can be handled, without adjusting any applications. The benefit of this is that all applications on a machine can benefit from encryption and authentication, and that policies can be set on a per-host (or even per-network) base, not per application/service. An introduction to IPsec with a roadmap to the documentation can be found in [RFC2411], the core protocol is described in [RFC2401].
After giving a brief overview of all the important features of IPv6, we'll go into the details of the basics of IPv6 here. A brief understanding of how IPv4 works is assumed, and the changes in IPv6 will be highlighted. Starting with IPv6 addresses and how they're split up we'll go into the various types of addresses there are, what became of broadcasts, then after discussing the IP layer go into changes for name resolving and what's new in DNS for IPv6.
An IPv4 address is a 32 bit value, that's usually written in “dotted quad” representation, where each “quad” represents a byte value between 0 and 255, for example:
127.0.0.1
This allows a theoretical number of 232 or ~4 billion hosts to be connected on the internet today. Due to grouping, not all addresses are available today.
IPv6 addresses use 128 bit, which results in 2128 theoretically addressable hosts. This allows for a Really Big number of machines to addressed, and it sure fits all of today's requirements plus all those nifty PDAs and cell phones with IP phones in the near future without any sweat. When writing IPv6 addresses, they are usually divided into groups of 16 bits written as four hex digits, and the groups are separated by colons. An example is:
fe80::2a0:d2ff:fea5:e9f5
This shows a special thing - a number of consecutive zeros can be abbreviated by a single “::” once in the IPv6 address. The above address is thus equivalent to fe80:0:00:000:2a0:d2ff:fea5:e9f5 - leading zeros within groups can be omitted, and only one “::” can be used in an IPv6 address.
To make addresses manageable, they are split in two parts, which are the bits identifying the network a machine is on, and the bits that identify a machine on a (sub)network. The bits are known as netbits and hostbits, and in both IPv4 and IPv6, the netbits are the “left”, most significant bits of an IP address, and the host bits are the “right”, least significant bits, as shown in Figure 23.4, “IPv6-addresses are divided into more significant network- and less significant hostbits, too”.
Figure 23.4. IPv6-addresses are divided into more significant network- and less significant hostbits, too

In IPv4, the border is drawn with the aid of the netmask, which can be used to mask all net/host bits. Typical examples are 255.255.0.0 that uses 16 bit for addressing the network, and 16 bit for the machine, or 255.255.255.0 which takes another 8 bit to allow addressing 256 subnets on e.g. a class B net.
When addressing switched from classful addressing to CIDR routing, the borders between net and host bits stopped being on 8 bit boundaries, and as a result the netmasks started looking ugly and not really manageable. As a replacement, the number of network bits is used for a given address, to denote the border, e.g.
10.0.0.0/24
is the same as a netmask of 255.255.255.0 (24 1-bits). The same scheme is used in IPv6:
2001:638:a01:2::/64
tells us that the address used here has the first (leftmost) 64 bits used as the network address, and the last (rightmost) 64 bits are used to identify the machine on the network. The network bits are commonly referred to as (network) “prefix”, and the “prefixlen” here would be 64 bits.
Common addressing schemes found in IPv4 are the (old) class B and class C nets. With a class C network (/24), you get 24 bits assigned by your provider, and it leaves 8 bits to be assigned by you. If you want to add any subnetting to that, you end up with “uneven” netmasks that are a bit nifty to deal with. Easier for such cases are class B networks (/16), which only have 16 bits assigned by the provider, and that allow subnetting, i.e. splitting of the rightmost bits into two parts. One to address the on-site subnet, and one to address the hosts on that subnet. Usually, this is done on byte (8 bit) boundaries. Using a netmask of 255.255.255.0 (or a /24 prefix) allows flexible management even of bigger networks here. Of course there is the upper limit of 254 machines per subnet, and 256 subnets.
With 128 bits available for addressing in IPv6, the scheme commonly used is the same, only the fields are wider. Providers usually assign /48 networks, which leaves 16 bits for a subnetting and 64 hostbits.
Now while the space for network and subnets here is pretty much ok, using 64 bits for addressing hosts seems like a waste. It's unlikely that you will want to have several billion hosts on a single subnet, so what is the idea behind this?
The idea behind fixed width 64 bit wide host identifiers is that they aren't assigned manually as it's usually done for IPv4 nowadays. Instead, IPv6 host addresses are recommended (not mandatory!) to be built from so-called EUI64 addresses. EUI64 addresses are - as the name says - 64 bit wide, and derived from MAC addresses of the underlying network interface. E.g. for ethernet, the 6 byte (48 bit) MAC address is usually filled with the hex bits “fffe” in the middle and a bit is set to mark the address as unique (which is true for Ethernet), e.g. the MAC address
01:23:45:67:89:ab
results in the EUI64 address
03:23:45:ff:fe:67:89:ab
which again gives the host bits for the IPv6 address as
::0323:45ff:fe67:89ab
These host bits can now be used to automatically assign IPv6 addresses to hosts, which supports autoconfiguration of IPv6 hosts - all that's needed to get a complete IPv6 address is the first (net/subnet) bits, and IPv6 also offers a solution to assign them automatically.
When on a network of machines speaking IP, there's usually one router which acts as the gateway to outside networks. In IPv6 land, this router will send “router advertisement” information, which clients are expected to either receive during operation or to solicit upon system startup. The router advertisement information includes data on the router's address, and which address prefix it routes. With this information and the host-generated EUI64 address, an IPv6-host can calculate its IP address, and there is no need for manual address assignment. Of course routers still need some configuration.
The router advertisement information they create are part of the Neighbor Discovery Protocol (NDP, see [RFC2461]), which is the successor to IPv4's ARP protocol. In contrast to ARP, NDP does not only do lookup of IPv6 addresses for MAC addresses (the neighbor solicitation/advertisement part), but also does a similar service for routers and the prefixes they serve, which is used for autoconfiguration of IPv6 hosts as described in the previous paragraph.
In IPv4, a host usually has one IP address per network interface or even per machine if the IP stack supports it. Only very rare applications like web servers result in machines having more than one IP address. In IPv6, this is different. For each interface, there is not only a globally unique IP address, but there are two other addresses that are of interest: The link local address, and the site local address. The link local address has a prefix of fe80::/64, and the host bits are built from the interface's EUI64 address. The link local address is used for contacting hosts and routers on the same network only, the addresses are not visible or reachable from different subnets. If wanted, there's the choice of either using global addresses (as assigned by a provider), or using site local addresses. Site local addresses are assigned the network address fec0::/10, and subnets and hosts can be addressed just as for provider-assigned networks. The only difference is, that the addresses will not be visible to outside machines, as these are on a different network, and their “site local” addresses are in a different physical net (if assigned at all). As with the 10/8 network in IPv4, site local addresses can be used, but don't have to. For IPv6 it's most common to have hosts assigned a link-local and a global IP address. Site local addresses are rather uncommon today, and are no substitute for globally unique addresses if global connectivity is required.
In IP land, there are three ways to talk to a host: unicast, broadcast and multicast. The most common one is by talking to it directly, using its unicast address. In IPv4, the unicast address is the “normal” IP address assigned to a single host, with all address bits assigned. The broadcast address used to address all hosts in the same IP subnet has the network bits set to the network address, and all host bits set to “1” (which can be easily done using the netmask and some bit operations). Multicast addresses are used to reach a number of hosts in the same multicast group, which can be machines spread over the whole internet. Machines must join multicast groups explicitly to participate, and there are special IPv4 addresses used for multicast addresses, allocated from the 224/8 subnet. Multicast isn't used very much in IPv4, and only few applications like the MBone audio and video broadcast utilities use it.
In IPv6, unicast addresses are used the same as in IPv4, no surprise there - all the network and host bits are assigned to identify the target network and machine. Broadcasts are no longer available in IPv6 in the way they were in IPv4, this is where multicasting comes into play. Addresses in the ff::/8 network are reserved for multicast applications, and there are two special multicast addresses that supersede the broadcast addresses from IPv4. One is the “all routers” multicast address, the others is for “all hosts”. The addresses are specific to the subnet, i.e. a router connected to two different subnets can address all hosts/routers on any of the subnets it's connected to. Addresses here are:
ff0
X::1 for all hosts andff0
X::2 for all routers,
where “X”
is the scope ID of
the link here, identifying the network. Usually this starts
from “1” for the “node local” scope,
“2” for the first
link, etc. Note that it's perfectly ok for two network
interfaces to be attached to one link, thus resulting in
double bandwidth:
One use of the “all hosts” multicast is in the neighbor solicitation code of NDP, where any machine that wants to communicate with another machine sends out a request to the “all hosts” group, and the machine in question is expected to respond.
After talking a lot about addressing in IPv6, anyone still here will hope that there's a proper way to abstract all these long & ugly IPv6 addresses with some nice hostnames as one can do in IPv4, and of course there is.
Hostname to IP address resolving in IPv4 is usually done in
one of three ways: using a simple table in
/etc/hosts, by
using the Network Information Service (NIS, formerly YP)
or via the Domain Name System (DNS).
As of this writing, NIS/NIS+ over IPv6 is currently only available on Solaris 8, for both database contents and transport, using a RPC extension.
Having a simple address<->name map like
/etc/hosts is
supported in all IPv6 stacks. With the KAME implementation
used in NetBSD, /etc/hosts contains
IPv6 addresses
as well as IPv4 addresses. A simple example is the
“localhost” entry in the default NetBSD installation:
127.0.0.1 localhost ::1 localhost
For DNS, there are no fundamentally new concepts. IPv6 name resolving is done with AAAA records that - as the name implies - point to an entity that's four times the size of an A record. The AAAA record takes a hostname on the left side, just as A does, and on the right side there's an IPv6 address, e.g.
noon IN AAAA 3ffe:400:430:2:240:95ff:fe40:4385
For reverse resolving, IPv4 uses the in-addr.arpa zone, and below that it writes the bytes (in decimal) in reversed order, i.e. more significant bytes are more right. For IPv6 this is similar, only that hex digits representing 4 bits are used instead of decimal numbers, and the resource records are also under a different domain, ip6.int.
So to have the reverse resolving for the above host, you
would put into your /etc/named.conf
something like:
zone "0.3.4.0.0.0.4.0.e.f.f.3.IP6.INT" {
type master;
file "db.reverse";
};
and in the zone file db.reverse you put (besides the usual records like SOA and NS):
5.8.3.4.0.4.e.f.f.f.5.9.0.4.2.0.2.0.0.0 IN PTR noon.ipv6.example.com.
The address is reversed here, and written down one hex digit after the other, starting with the least significant (rightmost) one, separating the hex digits with dots, as usual in zone files.
One thing to note when setting up DNS for IPv6 is to take care of the DNS software version in use. BIND 8.x does understand AAAA records, but it does not offer name resolving via IPv6. You need BIND 9.x for that. Beyond that, BIND 9.x supports a number of resource records that are currently being discussed but not officially introduced yet. The most noticeable one here is the A6 record which allows easier provider/prefix changing.
To sum up, this section talked about the technical differences between IPv4 and IPv6 for addressing and name resolving. Some details like IP header options, QoS and flows were deliberately left out to not make this document more complex than necessary.
Table of Contents
- 24.1. Overview of the network configuration files
- 24.2. Connecting to common LAN setups
- 24.3. Manually creating a small LAN
- 24.4. Connecting to a home/office ISP with PPPoE
- 24.5. Setting up an Internet gateway with NPF
- 24.6. Setting up a network bridge device
- 24.7. Ensuring interfaces are initialized in the correct order
- 24.8. Some useful commands
The following is a list of the files used to configure the network. The usage of these files, some of which have already been met the first chapters, will be described in the following sections.
/etc/hostsLocal hosts database file. Each line contains information regarding a known host and contains the internet address, the host's name and the aliases. Small networks can be configured using only the hosts file, without a name server. See hosts(5)
/etc/resolv.confThis file specifies how the routines which provide access to the Internet Domain Name System should operate. Generally it contains the addresses of the DNS servers. See resolv.conf(5)
/etc/sysctl.confThis file is used for configuring kernel settings, e.g. enabling packet forwarding on a gateway. See sysctl.conf(5).
/etc/ifconfig.xxxThis file is used for the automatic configuration of the network interfaces at boot, see ifconfig.if(5)
/etc/npf.confContains firewall configuration for the NetBSD Packet Filter, see npf.conf(5) and
/usr/share/examples/npf./etc/dhcpcd.confContains configuration for a DHCP client. DHCP is used to automatically get IPv4 address assignments over Ethernet, but dhcpcd(8) is also used to for IPv6 Prefix Delegation and DHCPv6. See dhcpcd.conf(5) and
/usr/share/examples/dhcpcd./etc/dhcpd.confContains configuration for a DHCP server. DHCP is used to automatically assign IPv4 addresses to clients. See dhcpd.conf(5) and
/usr/share/examples/dhcpd./etc/mygateContains the IP address of the IPv4 gateway. Used to configure a default route when not using DHCP. You can also set
defaultroute=""in/etc/rc.conf./etc/mygate6Contains the IP address of the IPv6 gateway. Used to configure a default route when not using autoconfiguration. You can also set
defaultroute6=""in/etc/rc.conf./etc/nsswitch.conf-
Name service switch configuration file. It controls how a process looks up various databases containing information regarding hosts, users, groups, etc. Specifically, this file defines the order to look up the databases. For example, the line:
hosts: files dns mdnsd
specifies that the hosts database comes from two sources, files (the local
/etc/hostsfile) and DNS, (the Internet Domain Name System) and that the local files are searched before the DNS.It is usually not necessary to modify this file except to enable Multicast DNS.
See nsswitch.conf(5).
/etc/hostapd.confUsed to configure an IEEE 802.11 (Wi-Fi) wireless access point. See hostapd.conf(5) and
/usr/share/examples/hostapd./etc/wpa_supplicant.confUsed to configure an IEEE 802.11 (Wi-Fi) client. See wpa_supplicant.conf(5) and
/usr/share/examples/wpa_supplicant.
In Local Area Networks that are centrally managed, one can expect Internet connectivity being available via some router, a DNS server being available, and most important, a DHCP server which hands out IP addresses to clients on request. To make a NetBSD client run in such an environment, it's usually enough to set
dhcpcd=YES
in /etc/rc.conf, and the IP address will
be set automatically, /etc/resolv.conf
will be created and routing setup to the default router.
WPA Supplicant allows connecting to Wi-Fi networks using a password, but also provides a consistent interface through which to connect to access points.
As well as having dhcpcd(8) running, on a system using Wi-Fi to connect to an access point, wpa_supplicant(8) must typically be enabled:
ifconfig_iwm0="up" dhcpcd=YES wpa_supplicant=YES
At runtime:
#ifconfig iwm0 up#service dhcpcd start#service wpa_supplicant start
In this case, our Wi-Fi interface is called iwm0.
It is set to up with ifconfig(8).
You can find a list of detected Wi-Fi interfaces with wlanctl(8):
#wlanctl -aiwm0: mac 10:02:xx:xx:xx:xx bss 00:00:00:00:00:00
The following /etc/wpa_supplicant.conf
configures NetBSD to automatically connect to two access points.
More can also be added.
Example 24.1. /etc/wpa_supplicant.conf
# Allow wpa_cli(8) to configure wpa_supplicant
ctrl_interface=/var/run/wpa_supplicant
ctrl_interface_group=wheel
update_config=1
# Automatically connect to the unprotected network "metalab".
network={
ssid="metalab"
key_mgmt=NONE
priority=100
}
# Automatically connect to the protected network "discord" using the password "XXX".
network={
ssid="discord"
psk="XXX"
}
After adding access points, reload wpa_supplicant(8)'s configuration:
#service wpa_supplicant reload#service dhcpcd restart
You can use wpa_cli(8) to scan for networks once WPA supplicant is running:
#wpa_cli scan#wpa_cli scan_resultsSelected interface 'iwm0' 16:01:33.578: bssid / frequency / signal level / flags / ssid xx:xx:xx:xx:xx:xx 5180 91 [WPA2-PSK-CCMP][ESS] FRITZ!Box 1000 EZ
This section describes how to configure a LAN manually in order to describe the basics of the networking stack. Usually, this configuration is automatic through dhcpcd(8), see Section 24.2, “Connecting to common LAN setups”
First, the network cards must be installed and connected to a switch or directly.
Next, check that the network cards are recognized by the kernel, studying the output of the dmesg command. In the following example the kernel recognized correctly an NE2000 clone:
... ne0 at isa0 port 0x280-0x29f irq 9 ne0: NE2000 Ethernet ne0: Ethernet address 00:c2:dd:c1:d1:21 ...
The following command shows the network card's current configuration:
#ifconfig ne0ne0: flags=8822<BROADCAST,NOTRAILERS,SIMPLEX,MULTICAST> mtu 1500 address: 00:50:ba:aa:a7:7f media: Ethernet autoselect (10baseT) inet6 fe80::250:baff:feaa:a77f%ne0 prefixlen 64 scopeid 0x1
The software configuration of the network card is very easy. The IP address “192.168.1.1” is assigned to the card.
#ifconfig ne0 inet 192.168.1.1 netmask 0xffffff00
Note that the networks 10.0.0.0/8 and 192.168.0.0/16 are reserved for private networks, which is what we're setting up here.
Repeating the previous command now gives a different result:
#ifconfig ne0ne0: flags=8863<UP,BROADCAST,NOTRAILERS,RUNNING,SIMPLEX,MULTICAST> mtu 1500 address: 00:50:ba:aa:a7:7f media: Ethernet autoselect (10baseT) inet 192.168.1.1 netmask 0xffffff00 broadcast 192.168.1.255 inet6 fe80::250:baff:feaa:a77f%ne0 prefixlen 64 scopeid 0x1
The output of ifconfig has now changed: the IP address is now printed and there are two new flags, “UP” and “RUNNING” If the interface isn't “UP”, it will not be used by the system to send packets.
The host was given the IP address 192.168.1.1, which belongs to the set of addresses reserved for internal networks which are not reachable from the Internet. The configuration is finished and must now be tested; if there is another active host on the network, a ping can be tried. For example, if 192.168.1.2 is the address of the active host:
#ping 192.168.1.2PING ape (192.168.1.2): 56 data bytes 64 bytes from 192.168.1.2: icmp_seq=0 ttl=255 time=1.286 ms 64 bytes from 192.168.1.2: icmp_seq=1 ttl=255 time=0.649 ms 64 bytes from 192.168.1.2: icmp_seq=2 ttl=255 time=0.681 ms 64 bytes from 192.168.1.2: icmp_seq=3 ttl=255 time=0.656 ms ^C ----ape PING Statistics---- 4 packets transmitted, 4 packets received, 0.0% packet loss round-trip min/avg/max/stddev = 0.649/0.818/1.286/0.312 ms
With the current setup, at the next boot it will be necessary to
repeat the configuration of the network card.
In order to avoid repeating the card's configuration at each
boot, add the following lines to
/etc/rc.conf:
auto_ifconfig=yes ifconfig_ne0="inet 192.168.1.1 netmask 0xffffff00"
In this example the variable ifconfig_ne0
was set because the network card was recognized as
ne0 by the kernel; if you are using a
different adapter, substitute the appropriate name in place of
ne0.
At the next boot the network card will be configured automatically.
If you have a router that is connected to the internet, you
can use it as default router, which will handle all your
packets. To do so, set defaultroute to the
router's IP address in /etc/rc.conf:
defaultroute=192.168.0.254
Be sure to use the default router's IP address instead of name, in case your DNS server is beyond the default router. In that case, the DNS server couldn't be reached to resolve the default router's hostname and vice versa, creating a chicken-and-egg problem.
To reach hosts on your local network, and assuming you really
have very few hosts, adjust /etc/hosts to
contain the addresses of all the hosts belonging to the
internal network. For example:
Example 24.2. /etc/hosts
# # Host Database # This file should contain the addresses and aliases # for local hosts that share this file. # It is used only for "ifconfig" and other operations # before the nameserver is started. # # 127.0.0.1 localhost ::1 localhost # # RFC 1918 specifies that these networks are "internal". # 10.0.0.0 10.255.255.255 # 172.16.0.0 172.31.255.255 # 192.168.0.0 192.168.255.255 192.168.1.1 ape.insetti.net ape 192.168.1.2 vespa.insetti.net vespa 192.168.1.0 insetti.net
To configure a machine as DNS client, you need to edit
/etc/resolv.conf, and enter the DNS
server's address, in addition to an optional domain name that
will be appended to hosts with no domain, in order to create a
FQDN for resolving. Assuming your DNS server's IP address is
192.168.1.2 and it is setup to serve for "home.net", put the
following into /etc/resolv.conf:
# /etc/resolv.conf domain home.net nameserver 192.168.1.2
Summing up, to configure the network the following must be done:
the network adapters must be installed and physically connected.
Next they must be configured (with ifconfig)
and, finally, the file /etc/rc.conf must
be modified to configure the interface and possibly default
router, and /etc/resolv.conf and
/etc/nsswitch.conf should be adjusted if
DNS should be used.
This type of network management is sufficient for small
networks without sophisticated needs.
Many home/office ISPs use PPP (point to point protocol) to provide Internet access to their clients. NetBSD includes pppoe(4) (PPP over Ethernet) functionality that can be used to connect to a modem which communicates with the ISP, typically not using Ethernet, allowing NetBSD to be used as a gateway on small home and office networks.
We start by configuring the kernel for PPPoE use
by bumping the tty queue size.
This setting can be made permanent by editing
/etc/sysctl.conf:
#sysctl -w kern.tty.qsize=32768
Now, create the interface with ifconfig(8):
#ifconfig pppoe0 create#ifconfig inet 0.0.0.0 0.0.0.1 down#ifconfig re0 up#pppoectl -e re0 pppoe0
We are using our computer's re0
interface to connect to our DSL modem.
Then, configure the PPPoE connection to use our ISP's provided username and password:
#pppoectl pppoe0 myauthproto=pap 'myauthname=XXX' 'myauthsecret=YYY' hisauthproto=none
We are now ready to test a first connection. Since something may be wrong, we will restrict retries for now:
#pppoectl pppoe0 max-auth-failure=1#ifconfig pppoe0 up#pppoectl -d pppoe0pppoe0: state = session Session ID: 0x254f PADI retries: 0 PADR retries: 0
This example output shows a working setup. The PPPoE session has been established and is still in use (state = session). We can now check the IP negotiation of PPP:
#ifconfig pppoe0pppoe0: flags=8851<UP,POINTOPOINT,RUNNING,SIMPLEX,MULTICAST> mtu 1492 inet 117.80.111.85 -> 118.5.113.169 netmask 0xff000000
We can make the configuration permanent by creating
/etc/ifconfig.pppoe0:
Example 24.3. /etc/ifconfig.pppoe0
create # Mark the physical interface used by this PPPoE interface up ! /sbin/ifconfig re0 up # Let $int use re0 as its Ethernet interface ! /sbin/pppoectl -e re0 $int # Configure authentication ! /sbin/pppoectl $int myauthproto=pap 'myauthname=XXX' 'myauthsecret=YYY' hisauthproto=none # Configure the PPPoE interface itself. These addresses are magic # meaning we don't care about either address and let the remote # ppp choose them. 0.0.0.0 0.0.0.1 up
To automatically get a route(8) to the outside world, we use ifwatchd(8). Create the following scripts:
And make them executable by root:
#chmod +x /etc/ppp/ip-up /etc/ppp/ip-down
Now, edit /etc/rc.conf to enable
ifwatchd:
ifwatchd=YES ifwatchd_flags="-u /etc/ppp/ip-up -d /etc/ppp/ip-down pppoe0"
And start the service:
#service ifwatchd start
A typical PPPoE connection requires a VLAN ID to be set on the external interface. On NetBSD this is accomplished by creating a vlan(4) interface:
#ifconfig vlan0 create#ifconfig vlan0 vlan 6 vlanif pppoe0
To ensure that vlan0 is created at
the appropriate time, refer to Section 24.7, “Ensuring interfaces are initialized in the correct order”.
Some systems behind misconfigured firewalls try to use Path-MTU-Discovery, while their firewall blocks all ICMP messages. This is an illegal, but not uncommon configuration. Typically, remote servers with this configuration are outside of your control, but you might still need to connect to them, e.g. to do your online banking.
Without special care, such systems will not be able to send larger chunks of data to a system connected via PPPoE. But there is a workaround: pretend to not be able to handle large packets, by sending a small MSS (maximum segment size) option during initial TCP handshake.
For connections originating from your PPPoE connected system, this is
accomplished by setting the sysctl(8) variable
net.inet.tcp.mss_ifmtu to 1, i.e. by adding this
to /etc/sysctl.conf:
# Obey interface MTUs when calculating MSS net.inet.tcp.mss_ifmtu=1
For connections originating from systems behind your PPPoE
router, you need to configure MSS clamping in your firewall,
like in this example /etc/npf.conf:
procedure "norm4" {
normalize: "random-id", "max-mss" 1440
}
procedure "norm6" {
normalize: "random-id", "max-mss" 1420
}
group "external" on "pppoe0" {
pass stateful out final family inet4 all apply "norm4"
pass stateful out final family inet6 all apply "norm6"
}
For more information about configuring NPF, see Section 24.5, “Setting up an Internet gateway with NPF”
To obtain an IPv6 address, the NetBSD kernel must be configured to accept IPv6 router advertisements with sysctl(8):
# sysctl -w net.inet6.ip6.accept_rtadv=1This setting can be made permanent by
editing /etc/sysctl.conf.
Many ISPs implement IPv6 over PPP via prefix delegation.
Prefix Delegation can be configured with dhcpcd(8),
for example with this /etc/dhcpcd.conf:
Example 24.7. /etc/dhcpcd.conf
duid ipv6only require dhcp_server_identifier option interface_mtu noipv6rs slaac private interface pppoe0 option rapid_commit ipv6rs iaid 1 ia_na 1 ia_pd 2/::/64 re1/1
With this configuration, running rtadvd(8) on the
re1 interface should be enough to assign IPv6
addresses to clients.
If you still can't get IPv6 working, other things to try are to
make sure ipv6-icmpand and
dhcpv6 can pass through your firewall.
npf(7) (NetBSD Packet Filter) is NetBSD's firewall. It can be used to protect a local network from the dangers of the wider Internet, and can also perform Network Address Translation (NAT) in order to make sure IPv4 packets reach the correct destination computer.
Some usage examples of NPF can be found in the subdirectory
/usr/share/examples/npf. Look at the file
soho_gw-npf.conf for an example of a configuration
for a small home/office gateway.
In order to use NetBSD as a gateway, the packet forwarding
sysctl(8) options must be enabled. You can add them to
/etc/sysctl.conf.
#sysctl -w net.inet.ip.forwarding=1net.inet.ip.forwarding = 1#sysctl -w net.inet6.ip6.forwarding=1net.inet6.ip6.forwarding = 1
And enable NPF in /etc/rc.conf:
npf=YES
The following configuration performs straightforward NAT, using
re0 as the external network and re1
as the internal network interface.
If you have multiple internal network interfaces, you might want to
bridge them. See Section 24.6, “Setting up a network bridge device”
Example 24.8. /etc/npf.conf
$ext_if = "re0"
$int_if = "re1"
$ext_addrs = { ifaddrs($ext_if) }
$localnet = { 192.168.0.0/24 }
# Allow pings.
alg "icmp"
# Perform IPv4 NAT.
map inet4($ext_if) dynamic $localnet -> inet4($ext_if)
group "external" on $ext_if {
# Allow all outbound traffic
pass stateful out all
# Block all incoming traffic
block in all
}
group "internal" on $int_if {
# We trust the internal network.
pass in final all
pass out final all
}
group default {
pass final on lo0 all
block all
}
Usually, you will want to configure dhcpd(8) so clients are automatically assigned IP addresses in the correct range:
Example 24.9. /etc/dhcpd.conf
subnet 192.168.0.0 netmask 255.255.255.0 {
option routers 192.168.0.1;
option domain-name-servers 9.9.9.9;
option subnet-mask 192.168.0.0;
range 192.168.0.100 192.168.0.254;
default-lease-time 604800; # default lease 7 days
}A bridge can be used to combine different physical networks into one logical network, i.e. connect them at layer 2 of the ISO-OSI model, not at layer 3, which is what a router would do. It can allow multiple network interfaces to be addressed as one. The NetBSD “bridge” driver provides bridge functionality on NetBSD systems.
In this example two physical networks are going to be combined in one logical network, 192.168.1.0, using a NetBSD bridge. The NetBSD machine which is going to act as bridge has two interfaces, ne0 and ne1, which are each connected to one physical network.
When the system is ready the bridge can be created, this can
be done using the brconfig(8) command. First
of a bridge interface has to be created. With the following
ifconfig(8) command the bridge0
interface will be created:
$ ifconfig bridge0 createPlease make sure that at this point both the ne0 and ne1 interfaces are up. The next step is to add the ne0 and ne1 interfaces to the bridge.
$ brconfig bridge0 add ne0 add ne1 upThis configuration can be automatically set up by creating
an /etc/ifconfig.interface file, in
this case /etc/ifconfig.bridge0,
with the following contents:
create !brconfig $int add ne0 add ne1 up
Note
In NetBSD 10.0 and later, it will become necessary to use vether instead of tap as a bridge endpoint. vether is unavailable in previous releases.
After setting up the bridge the bridge configuration can
be displayed using the brconfig -a command.
Remember that if you want to give the bridge machine an IP
address you can only allocate an IP address to one of the
interfaces which are part of the bridge. A virtual
tap(4) interface can also be created and configured as a bridge
endpoint, e.g. in /etc/ifconfig.tap0:
Example 24.10. /etc/ifconfig.tap0
create inet 192.168.0.1 netmask 255.255.255.0 up !ifconfig bridge0 create !brconfig bridge0 add $int add ne0 add ne1 up
In our previous example Section 24.6, “Setting up a network bridge device”,
we created a bridge(4) and tap(4) that are dependent upon other
networking interfaces to function.
This can present a problem if rc(8) initializes them before the
interfaces they depend upon.
Fortunately, it is possible to force a specific initialization
order in /etc/rc.conf:
auto_ifconfig=NO net_interfaces="ne0 ne1 pppoe0 bridge0 tap0"
With these lines, /etc/ifconfig.ne0 will be
read first, and /etc/ifconfig.tap0 last.
The same applies if ifconfig_ne0="up" lines are used
in /etc/rc.conf instead of dedicated configuration
files.
The following commands can be useful for diagnosing problems:
- ifconfig(8)
Displays and can change the configuration of network intefaces.
- ping(8)
Attempt to reach a host and measure latency.
- netstat(1)
Displays active connections.
- npfctl(8)
npfctl show displays the current firewall configuration, npfctl validate filename can be used to verify a configuration is correct before loading it.
- route(8)
route show displays the routing tables, other commands can be used to manipulate them.
- traceroute(8)
Shows the route followed by the packets to their destination.
- sysstat(1)
sysstat ifstat can be used to monitor network interfaces.
- tcpdump(8)
Can be used to monitor TCP/IP traffic.
Table of Contents
- 25.1. Overview
- 25.2. What is inetd?
- 25.3. Configuring inetd -
/etc/inetd.conf - 25.4. Services -
/etc/services - 25.5. Protocols -
/etc/protocols - 25.6. Remote Procedure Calls (RPC) -
/etc/rpc - 25.7. Allowing and denying hosts
-
/etc/hosts.{allow,deny} - 25.8. Adding a Service
- 25.9. When to use or not to use inetd
- 25.10. Other Resources
The "internet super server", or inetd(8), is available on all
Unix(like) systems, providing many of the basic network services
available. This chapter describes the relationship between the
daemon and several of the config files in the
/etc/ directory.
In this document we will look at a simple definition of inetd(8), how several files that relate to inetd(8) work (not that these files are not related to other software), how to add a service to inetd(8) and some considerations both to use inetd(8) for a particular service and times when a service might be better off running outside of inetd(8).
In traditional Unix scenarios, one server (daemon) process watches for connections on a particular port, and handles incoming requests. Now if a machine offers many services, many daemon processes would be needed, mostly running idle but still wasting resources like memory. The internet super server, inetd, is an approach to this problem. It listens on a number of ports, and when it receives a request it then determines which program to run to handle the request and starts an instance of that program.
Following is a very simple diagram to illustrate inetd(8):
pop3 ------ |
|
ftpd ------- | INETD | ---- Internet / DMZ / Switch / Whatever . . .
|
cvsupserver - |
In the above diagram you can see the general idea. The inetd(8) process receives a request and then starts the appropriate server process. What inetd(8) is doing is software multiplexing. An important note here, regarding security: On many other UNIX-like systems, a package called tcpwrappers is used as a security enhancement for inetd(8). On NetBSD the tcpwrapper functionality is built into inetd(8) using libwrap.
The operation of inetd(8) is controlled by its own config
file, surprisingly named /etc/inetd.conf,
see inetd.conf(5).
The inetd.conf file basically provides
enabling and mapping of services the systems administrator
would like to have multiplexed through inetd(8), indicating
which program should be started for incoming requests on which
port.
inetd.conf(5) is an ascii file containing one service per line, and several fields per line. The basic field layout is:
service-name socket-type protocol wait/nowait user:group server-program arguments
- service-name:
The service name indicates the port inetd(8) should listen on. It is either a decimal number, or a name matching a service name given in
/etc/services.- socket-type:
The communications socket type, the different types are "stream" for a TCP stream, "dgram" for an UDP service, "raw" for a raw socket, "rdm" for reliably delivered message and "seqpacket" for a sequenced packet socket. The most common socket types are "stream" and "dgram".
- protocol
The protocol used, mostly "tcp", "tcp6", "udp" and "udp6" for stream-oriented services via the Transmission Control Protocol, or datagram-oriented services via the User Datagram Protocol. It is worth noting that "tcp" and "udp" mean they use the default (currently IPv4), "tcp4" specifically means communication via IPv4 only, and "tcp6" and "udp6" are IPv6-only. In addition to those, protocols based on Remote Procedure Calls (RPC) can be specified as either "rpc/tcp" or "rpc/udp".
- wait/nowait
This field tells inetd(8) if it should wait for a server program to return or to continue processing new connections immediately. Many connections to server processes require answers after data transfers are complete, where other types can keep transmitting on a connection continuously, the latter is a "nowait" and the former "wait". In most cases, this entry corresponds to the socket-type, for example a streaming connection would (most of the time) have a "nowait" value in this field.
- user[:group]
This field gives the user name and optionally a group name that the server process which inetd(8) starts up runs as.
- server-program
This field is the full path of the program that gets started.
- program-arguments
This field contains the argument vector argv[] of the program started, including the program name and additional arguments the systems administrator may need to specify for the server program that is started.
That is all a lot to digest and there are other things the
systems administrator can do with some of the fields. Here is a
sample line from an inetd.conf file:
ftp stream tcp nowait root /usr/libexec/ftpd ftpd -ll
From the left, the service-name is "ftp", socket-type is "stream",
protocol is "tcp", inetd(8) won't wait for the server
process to terminate ("nowait"), the process runs as user "root",
path is /usr/libexec/ftpd and program name
and arguments are "ftpd -ll".
Notice in the last field, the program name is different
from the service-name.
The next file to consider is the service name data base that can
be found in /etc/services. This file
basically contains information mapping a service name to a port
number. The format of the /etc/services
file is:
service-name port-number/protocol-name [aliases]
"service-name" is the name of the service, "port-number" is the port number assigned to the service, "protocol-name" is either "tcp" or "udp", and if alias names for a port are needed, they can be added as "aliases", separated by white spaces. Comments may be added after a hash mark (#).
Let's take a look at the "ssh" entries as an example:
ssh 22/tcp # Secure Shell ssh 22/udp
As we can see, from the left, the service name is "ssh", the port number is "22", the protocols are both "tcp" and "udp". Notice that there is a separate entry for every protocol a service can use (even on the same port).
Another file read by inetd(8) is
/etc/protocols. This file has the information
pertaining to DARPA Internet protocols.
The format of the protocols name data base is:
protocol-name number [aliases]
where "protocol-name" describes the payload of an IP packet, e.g. "tcp" or "udp". "number" is the official protocol number assigned by IANA, and optional alias names can be added after that.
Let's look at the seventh entry in the
/etc/protocols
db as an example:
tcp 6 TCP # transmission control protocol
Starting from the left, we see that the protocol name is "tcp", the number is "6" and the only aliases listed is "TCP", belonging to the Transmission Control Protocol as indicated by the comment in that line.
The rpc program number data base used by services with the "rpc"
protocol type in inetd.conf(5) is kept in
/etc/rpc and contains name mappings to rpc
program numbers. The format of the file is:
server-name program-number aliases
For example, here is the nfs entry:
nfs 100003 nfsprog
As mentioned above, NetBSD's inetd(8) has the tcpwrapper
package built in via the libwrap library. As such, inetd(8)
can allow or deny access to each service on a more fine-grained
base than just allowing a service to everyone, or not enabling
it at all. The access control is defined in the files
/etc/hosts.allow and
/etc/hosts.deny, see the
hosts_access(5) manpage.
Each of the two files contains several lines that describe
access restrictions for a certain server. Access is allowed if
permission is given in /etc/hosts.allow. If
the service is not listened in
/etc/hosts.allow but in
/etc/hosts.deny, it is denied. If a service
is listed in neither file, it is allowed, giving standard
inetd(8) behaviour.
Each line in /etc/hosts.allow and
/etc/hosts.deny contains a service either
by name (as given in the field for argv[0] in
/etc/inetd.conf, e.g. "ftpd" instead of
"ftp"), or the special service "ALL" which obviously applies to
all services. Following the service name is - separated by a
colon - a number of access restrictions, which can be hostnames,
domains, single IP addresses, whole IP subnets or some other
restrictions, please check hosts_access(5) for all the
details.
An example configuration that is mostly open but denies access to services to a certain host and all machines from a certain domain would look like this:
# /etc/hostname.deny: ALL: some.host.name, .some.domain
Another example that would be mostly closed, denying access to
all but very few machines would need entries in both
/etc/hosts.allow and
/etc/hosts.deny. The entry for
/etc/hosts.deny would be:
# /etc/hosts.deny ALL: ALL
The entry to allow a few hosts would be put into
/etc/hosts.allow:
# /etc/hosts.allow ALL: friend.host.domain otherfriend.otherhost.otherdomain
Many times a systems administrator will find that they need to add a service to their system that is not already in inetd(8) or they may wish to move a service to it because it does not get very much traffic. This is usually pretty simple, so as an example we will look at adding a version of POP3 on a NetBSD system.
In this case we have retrieved and installed the "cucipop"
package, which can be found in
pkgsrc/mail/cucipop.
This server is pretty simple to use, the only oddities are
different path locations. Since it is POP3 we know it is a
stream oriented connection with "nowait". Running as "root" will
be fine, the only item that is different is the location of the
program and the name of the program itself.
So the first half of the new entry in
/etc/inetd.conf looks like this:
pop3 stream tcp nowait root
After installation, pkgsrc deposited cucipop in
/usr/pkg/sbin/cucipop.
So with the next field we have:
pop3 stream tcp nowait root /usr/pkg/sbin/cucipop
Last, we want to use the Berkeley mailbox format,
so our server program must be called with the
-Y option.
This leaves the entire entry looking like so:
pop3 stream tcp nowait root /usr/pkg/sbin/cucipop cucipop -Y
We have added the service named "pop3" to
/etc/inetd.conf. Next item to check is that
the system can map the service name to a port number in
/etc/services:
#grep ^pop3 /etc/servicespop3 110/tcp # POP version 3 pop3 110/udp pop3s 995/tcp # pop3 protocol over TLS/SSL (was spop3) pop3s 995/udp # pop3 protocol over TLS/SSL (was spop3)
The "pop3" entries here are of interest, i.e. they are already
contained in the /etc/services file shipped
with NetBSD.
Now, to have inetd(8) use the new entry, we simply restart it using the rc script:
#service inetd restart
All done, in most cases, the software you are using has documentation that will specify the entry, in the off case it does not, sometimes it helps to try and find something similar to the server program you will be adding. A classic example of this is a MUD server which has built-in telnet. You can pretty much borrow the telnet entry and change parts where needed.
The decision to add or move a service into or out of inetd(8) is usually based on server load. As an example, on most systems the telnet daemon does not require as many new connections as say a mail server. Most of the time the administrator has to feel out if a service should be moved.
A good example I have seen is mail services such as smtp and pop. I had setup a mail server in which pop3 was in inetd(8) and exim was running in standalone, I mistakenly assumed it would run fine since there was a low amount of users, namely myself and a diagnostic account. The server was also setup to act as a backup MX and relay in case another heavily used one went down. When I ran some tests I discovered a huge time lag for pop connections remotely. This was because of my steady fetching of mail and the diagnostic user constantly mailing diagnostics back and forth. In the end I had to move the pop3 service out of inetd(8).
The reason for moving the service is actually quite interesting. When a particular service becomes heavily used, of course, it causes a load on the system. In the case of a service that runs within the inetd(8) meta daemon the effects of a heavily loaded service can also harm other services that use inetd(8). If the multiplexor is getting too many requests for one particular service, it will begin to affect the performance of other services that use inetd(8). The fix, in a situation like that, is to make the offending service run outside of inetd(8) so the response time of both the service and inetd(8) will increase.
Following is some additional reading and information about topics covered in this document.
NetBSD manual pages:
Miscellaneous links:
Table of Contents
Use of the Domain Name System has been discussed in previous chapters, without going into detail on the setup of the server providing the service. This chapter describes setting up a simple, small domain with one Domain Name System (DNS) nameserver on a NetBSD system. It includes a brief explanation and overview of the DNS; further information can be obtained from the DNS Resources Directory (DNSRD) at http://www.dns.net/dnsrd/.
The DNS is a widely used naming service on the Internet and other TCP/IP networks. The network protocols, data and file formats, and other aspects of the DNS are Internet Standards, specified in a number of RFC documents, and described by a number of other reference and tutorial works. The DNS has a distributed, client-server architecture. There are reference implementations for the server and client, but these are not part of the standard. There are a number of additional implementations available for many platforms.
Naming services are used to provide a mapping between textual names and configuration data of some form. A nameserver maintains this mapping, and clients request the nameserver to resolve a name into its attached data.
The reader should have a good understanding of basic hosts to IP address mapping and IP address class specifications, see Section 23.6, “Name Service Concepts”.
In the case of the DNS, the configuration data bound to a name is in the form of standard Resource Records (RR's). These textual names conform to certain structural conventions.
The DNS presents a hierarchical name space, much like a UNIX filesystem, pictured as an inverted tree with the root at the top.
TOP-LEVEL .org
|
MID-LEVEL .diverge.org
______________________|________________________
| | |
BOTTOM-LEVEL strider.diverge.org samwise.diverge.org wormtongue.diverge.org
The system can also be logically divided even further if one wishes at different points. The example shown above shows three nodes on the diverge.org domain, but we could even divide diverge.org into subdomains such as "strider.net1.diverge.org", "samwise.net2.diverge.org" and "wormtongue.net2.diverge.org"; in this case, 2 nodes reside in "net2.diverge.org" and one in "net1.diverge.org".
There are directories of names, some of which may be sub-directories of further names. These directories are sometimes called zones. There is provision for symbolic links, redirecting requests for information on one name to the records bound to another name. Each name recognised by the DNS is called a Domain Name, whether it represents information about a specific host, or a directory of subordinate Domain Names (or both, or something else).
Unlike most filesystem naming schemes, however, Domain Names are written with the innermost name on the left, and progressively higher-level domains to the right, all the way up to the root directory if necessary. The separator used when writing Domain Names is a period, ".".
Like filesystem pathnames, Domain Names can be written in an
absolute or relative manner, though there are some differences
in detail. For instance, there is no way to indirectly refer
to the parent domain like with the UNIX
.. directory. Many (but not all)
resolvers offer a search path facility, so that
partially-specified names can be resolved relative to
additional listed sub-domains other than the client's own
domain. Names that are completely specified all the way to the
root are called Fully Qualified Domain
Names or FQDNs. A defining
characteristic of an FQDN is that it is written with a
terminating period. The same name, without the terminating
period, may be considered relative to some other
sub-domain. It is rare for this to occur without malicious
intent, but in part because of this possibility, FQDNs are
required as configuration parameters in some circumstances.
On the Internet, there are some established conventions for the names of the first few levels of the tree, at which point the hierarchy reaches the level of an individual organisation. This organisation is responsible for establishing and maintaining conventions further down the tree, within its own domain.
Resource Records for a domain are stored in a standardised format in an ASCII text file, often called a zone file. The following Resource Records are commonly used (a number of others are defined but not often used, or no longer used). In some cases, there may be multiple RR types associated with a name, and even multiple records of the same type.
Common DNS Resource Records
- A: Address
This record contains the numerical IP address associated with the name.
- CNAME: Canonical Name
-
This record contains the Canonical Name (an FQDN with an associated A record) of the host name to which this record is bound. This record type is used to provide name aliasing, by providing a link to another name with which other appropriate RR's are associated. If a name has a CNAME record bound to it, it is an alias, and no other RR's are permitted to be bound to the same name.
It is common for these records to be used to point to hosts providing a particular service, such as an FTP or HTTP server. If the service must be moved to another host, the alias can be changed, and the same name will reach the new host.
- PTR: Pointer
This record contains a textual name. These records are bound to names built in a special way from numerical IP addresses, and are used to provide a reverse mapping from an IP address to a textual name. This is described in more detail in Section 26.1.8, “Reverse Resolution”.
- NS: Name Server
This record type is used to delegate a sub-tree of the Domain Name space to another nameserver. The record contains the FQDN of a DNS nameserver with information on the sub-domain, and is bound to the name of the sub-domain. In this manner, the hierarchical structure of the DNS is established. Delegation is described in more detail in Section 26.1.4, “Delegation”.
- MX: Mail eXchange
This record contains the FQDN for a host that will accept SMTP electronic mail for the named domain, together with a priority value used to select an MX host when relaying mail. It is used to indicate other servers that are willing to receive and spool mail for the domain if the primary MX is unreachable for a time. It is also used to direct email to a central server, if desired, rather than to each and every individual workstation.
- HINFO: Host Information
Contains two strings, intended for use to describe the host hardware and operating system platform. There are defined strings to use for some systems, but their use is not enforced. Some sites, because of security considerations, do not publicise this information.
- TXT: Text
A free-form text field, sometimes used as a comment field, sometimes overlaid with site-specific additional meaning to be interpreted by local conventions.
- SOA: Start of Authority
This record is required to appear for each zone file. It lists the primary nameserver and the email address of the person responsible for the domain, together with default values for a number of fields associated with maintaining consistency across multiple servers and caching of the results of DNS queries.
Using NS records, authority for portions of the DNS namespace below a certain point in the tree can be delegated, and further sub-parts below that delegated again. It is at this point that the distinction between a domain and a zone becomes important. Any name in the DNS is called a domain, and the term applies to that name and to any subordinate names below that one in the tree. The boundaries of a zone are narrower, and are defined by delegations. A zone starts with a delegation (or at the root), and encompasses all names in the domain below that point, excluding names below any subsequent delegations.
This distinction is important for implementation - a zone is a single administrative entity (with a single SOA record), and all data for the zone is referred to by a single file, called a zone file. A zone file may contain more than one period-separated level of the namespace tree, if desired, by including periods in the names in that zone file. In order to simplify administration and prevent overly-large zone files, it is quite legal for a DNS server to delegate to itself, splitting the domain into several zones kept on the same server.
For redundancy, it is common (and often administratively required) that there be more than one nameserver providing information on a zone. It is also common that at least one of these servers be located at some distance (in terms of network topology) from the others, so that knowledge of that zone does not become unavailable in case of connectivity failure. Each nameserver will be listed in an NS record bound to the name of the zone, stored in the parent zone on the server responsible for the parent domain. In this way, those searching the name hierarchy from the top down can contact any one of the servers to continue narrowing their search. This is occasionally called walking the tree.
There are a number of nameservers on the Internet which are called root nameservers. These servers provide information on the very top levels of the domain namespace tree. These servers are special in that their addresses must be pre-configured into nameservers as a place to start finding other servers. Isolated networks that cannot access these servers may need to provide their own root nameservers.
In order to maintain consistency between these servers, one is usually configured as the primary server, and all administrative changes are made on this server. The other servers are configured as secondaries, and transfer the contents of the zone from the primary. This operational model is not required, and if external considerations require it, multiple primaries can be used instead, but consistency must then be maintained by other means. DNS servers that store Resource Records for a zone, whether they be primary or secondary servers, are said to be authoritative for the zone. A DNS server can be authoritative for several zones.
When nameservers receive responses to queries, they can cache the results. This has a significant beneficial impact on the speed of queries, the query load on high-level nameservers, and network utilisation. It is also a major contributor to the memory usage of the nameserver process.
There are a number of parameters that are important to maintaining consistency amongst the secondaries and caches. The values for these parameters for a particular domain zone file are stored in the SOA record. These fields are:
Fields of the SOA Record
- Serial
A serial number for the zone file. This should be incremented any time the data in the domain is changed. When a secondary wants to check if its data is up-to-date, it checks the serial number on the primary's SOA record.
- Refresh
A time, in seconds, specifying how often the secondary should check the serial number on the primary, and start a new transfer if the primary has newer data.
- Retry
If a secondary fails to connect to the primary when the refresh time has elapsed (for example, if the host is down), this value specifies, in seconds, how often the connection should be retried.
- Expire
If the retries fail to reach the primary within this number of seconds, the secondary destroys its copies of the zone data file(s), and stops answering requests for the domain. This stops very old and potentially inaccurate data from remaining in circulation.
- TTL
This field specifies a time, in seconds, that the resource records in this zone should remain valid in the caches of other nameservers. If the data is volatile, this value should be short. TTL is a commonly-used acronym, that stands for "Time To Live".
DNS clients are configured with the addresses of DNS servers. Usually, these are servers which are authoritative for the domain of which they are a member. All requests for name resolution start with a request to one of these local servers. DNS queries can be of two forms:
A recursive query asks the nameserver to resolve a name completely, and return the result. If the request cannot be satisfied directly, the nameserver looks in its configuration and caches for a server higher up the domain tree which may have more information. In the worst case, this will be a list of pre-configured servers for the root domain. These addresses are returned in a response called a referral. The local nameserver must then send its request to one of these servers.
Normally, this will be an iterative query, which asks the second nameserver to either respond with an authoritative reply, or with the addresses of nameservers (NS records) listed in its tables or caches as authoritative for the relevant zone. The local nameserver then makes iterative queries, walking the tree downwards until an authoritative answer is found (either positive or negative) and returned to the client.
In some configurations, such as when firewalls prevent direct IP communications between DNS clients and external nameservers, or when a site is connected to the rest of the world via a slow link, a nameserver can be configured with information about a forwarder. This is an external nameserver to which the local nameserver should make requests as a client would, asking the external nameserver to perform the full recursive name lookup, and return the result in a single query (which can then be cached), rather than reply with referrals.
The DNS provides resolution from a textual name to a resource record, such as an A record with an IP address. It does not provide a means, other than exhaustive search, to match in the opposite direction; there is no mechanism to ask which name is bound to a particular RR.
For many RR types, this is of no real consequence, however it is often useful to identify by name the host which owns a particular IP address. Rather than complicate the design and implementation of the DNS database engine by providing matching functions in both directions, the DNS utilises the existing mechanisms and creates a special namespace, populated with PTR records, for IP address to name resolution. Resolving in this manner is often called reverse resolution, despite the inaccurate implications of the term.
The manner in which this is achieved is as follows:
A normal domain name is reserved and defined to be for the purpose of mapping IP addresses. The domain name used is "in-addr.arpa." which shows the historical origins of the Internet in the US Government's Defence Advanced Research Projects Agency's funding program.
This domain is then subdivided and delegated according to the structure of IP addresses. IP addresses are often written in decimal dotted quad notation, where each octet of the 4-octet long address is written in decimal, separated by dots. IP address ranges are usually delegated with more and more of the left-most parts of the address in common as the delegation gets smaller. Thus, to allow delegation of the reverse lookup domain to be done easily, this is turned around when used with the hierarchical DNS namespace, which places higher level domains on the right of the name.
Each byte of the IP address is written, as an ASCII text representation of the number expressed in decimal, with the octets in reverse order, separated by dots and appended with the in-addr.arpa. domain name. For example, to determine the hostname of a network device with IP address 11.22.33.44, this algorithm would produce the string "44.33.22.11.in-addr.arpa." which is a legal, structured Domain Name. A normal nameservice query would then be sent to the nameserver asking for a PTR record bound to the generated name.
The PTR record, if found, will contain the FQDN of a host.
One consequence of this is that it is possible for mismatch to occur. Resolving a name into an A record, and then resolving the name built from the address in that A record to a PTR record, may not result in a PTR record which contains the original name. There is no restriction within the DNS that the "reverse" mapping must coincide with the "forward" mapping. This is a useful feature in some circumstances, particularly when it is required that more than one name has an A record bound to it which contains the same IP address.
While there is no such restriction within the DNS, some application server programs or network libraries will reject connections from hosts that do not satisfy the following test:
the state information included with an incoming connection includes the IP address of the source of the request.
a PTR lookup is done to obtain an FQDN of the host making the connection
an A lookup is then done on the returned name, and the connection rejected if the source IP address is not listed amongst the A records that get returned.
This is done as a security precaution, to help detect and prevent malicious sites impersonating other sites by configuring their own PTR records to return the names of hosts belonging to another organisation.
Now let's look at actually setting up a small DNS enabled network. We will continue to use the examples mentioned in Chapter 24, Setting up TCP/IP on NetBSD in practice, i.e. we assume that:
Our IP networking is working correctly
We have IPNAT working correctly
Currently all hosts use the ISP for DNS
Our Name Server will be the “strider” host which also runs IPNAT, and our two clients use "strider" as a gateway. It is not really relevant as to what type of interface is on "strider", but for argument's sake we will say a 56k dial up connection.
So, before going any further, let's look at our
/etc/hosts file on
"strider" before we have made the alterations to use DNS.
Example 26.1. strider's /etc/hosts file
127.0.0.1 localhost 192.168.1.1 strider 192.168.1.2 samwise sam 192.168.1.3 wormtongue worm
This is not exactly a huge network, but it is worth noting that the same rules apply for larger networks as we discuss in the context of this section.
The other assumption we want to make is that the domain we want
to set up is diverge.org, and that the domain
is only known on our internal network, and not worldwide. Proper
registration of the nameserver's IP address as primary would be
needed in addition to a static IP. These are mostly
administrative issues which are left out here.
The NetBSD operating system provides a set of config files
for you to use for setting up DNS. Along with a default
/etc/named.conf, the following files are
stored in the /etc/namedb directory:
localhost127loopback.v6root.cache
You will see modified versions of these files in this section, and I strongly suggest making a backup copy of the original files for reference purposes.
Note
The examples in this chapter refer to BIND major version 8, however, it should be noted that format of the name database and other config files are almost 100% compatible between version. The only difference I noticed was that the “$TTL” information was not required.
The first file we want to look at is
/etc/named.conf. This file is the
config file for bind (hence the
catchy name). Setting up system like the one we are doing is
relatively simple. First, here is what mine looks like:
options {
directory "/etc/namedb";
allow-transfer { 192.168.1.0/24; };
allow-query { 192.168.1.0/24; };
listen-on port 53 { 192.168.1.1; };
};
zone "localhost" {
type master;
notify no;
file "localhost";
};
zone "127.IN-ADDR.ARPA" {
type master;
notify no;
file "127";
};
zone "0.0.0.0.0.0.0.0.0.0.0.0.0.0.0.0.0.0.0.0.0.0.0.0.0.0.0.0.0.0.0.ip6.int" {
type master;
file "loopback.v6";
};
zone "diverge.org" {
type master;
notify no;
file "diverge.org";
};
zone "1.168.192.in-addr.arpa" {
type master;
notify no;
file "1.168.192";
};
zone "." in {
type hint;
file "root.cache";
};
Note that in my named.conf the root (".")
section is last, that is because there is another domain
called diverge.org on the internet (I happen to own it) so I
want the resolver to look out on the internet last. This is
not normally the case on most systems.
Another very important thing to remember here is that if you have an internal setup, in other words no live internet connection and/or no need to do root server lookups, comment out the root (".") zone. It may cause lookup problems if a particular client decides it wants to reference a domain on the internet, which our server couldn't resolve itself.
Looks like a pretty big mess, upon closer examination it is revealed that many of the lines in each section are somewhat redundant. So we should only have to explain them a few times.
Let's go through the sections of
named.conf:
This section defines some global parameters, most noticeable
is the location of the DNS tables, on this particular
system, they will be put in
/etc/namedb as indicated by the
"directory" option.
Following are the rest of the params:
- allow-transfer
This option lists which remote DNS servers acting as secondaries are allowed to do zone transfers, i.e. are allowed to read all DNS data at once. For privacy reasons, this should be restricted to secondary DNS servers only.
- allow-query
This option defines hosts from what network may query this name server at all. Restricting queries only to the local network (192.168.1.0/24) prevents queries arriving on the DNS server's external interface, and prevent possible privacy issues.
- listen-on port
This option defined the port and associated IP addresses this server will run named(8) on. Again, the "external" interface is not listened here, to prevent queries getting received from "outside".
The rest of the named.conf file
consists of “zone”s. A zone is an area that can
have items to resolve attached, e.g. a domain can have
hostnames attached to resolve into IP addresses, and a
reverse-zone can have IP addresses attached that get
resolved back into hostnames. Each zone has a file
associated with it, and a table within that file for
resolving that particular zone. As is readily apparent,
their format in named.conf is
strikingly similar, so I will highlight just one of their
records:
- type
The type of a zone is usually of type "master" in all cases except for the root zone “.” and for zones that a secondary (backup) service is provided - the type obviously is "secondary" in the latter case.
- notify
Do you want to send out notifications to secondaries when your zone changes? Obviously not in this setup, so this is set to "no".
- file
This option sets the filename in our
/etc/namedbdirectory where records about this particular zone may be found. For the "diverge.org" zone, the file/etc/namedb/diverge.orgis used.
For the most part, the zone files look quite similar, however,
each one does have some unique properties. Here is what the
localhost file looks like:
Example 26.2. localhost
1|$TTL 3600 2|@ IN SOA strider.diverge.org. root.diverge.org. ( 3| 1 ; Serial 4| 8H ; Refresh 5| 2H ; Retry 6| 1W ; Expire 7| 1D) ; Minimum TTL 8| IN NS localhost. 9|localhost. IN A 127.0.0.1 10| IN AAAA ::1
Line by line:
- Line 1:
This is the Time To Live for lookups, which defines how long other DNS servers will cache that value before discarding it. This value is generally the same in all the files.
- Line 2:
This line is generally the same in all zone files except
root.cache. It defines a so-called "Start Of Authority" (SOA) header, which contains some basic information about a zone. Of specific interest on this line are "strider.diverge.org." and "root.diverge.org." (note the trailing dots!). Obviously one is the name of this server and the other is the contact for this DNS server, in most cases root seems a little ambiguous, it is preferred that a regular email account be used for the contact information, with the "@" replaced by a "." (for example, mine would be "jrf.diverge.org.").- Line 3:
This line is the serial number identifying the "version" of the zone's data set (file). The serial number should be incremented each time there is a change to the file, the usual format is to either start with a value of "1" and increase it for every change, or use a value of "YYYYMMDDNN" to encode year (YYYY), month (MM), day (DD) and change within one day (NN) in the serial number.
- Line 4:
This is the refresh rate of the server, in this file it is set to once every 8 hours.
- Line 5:
The retry rate.
- Line 6:
Lookup expiry.
- Line 7:
The minimum Time To Live.
- Line 8:
This is the Nameserver line, which uses a "NS" resource record to show that "localhost" is the only DNS server handing out data for this zone (which is "@", which indicates the zone name used in the
named.conffile, i.e. "diverge.org") is, well, "localhost".- Line 9:
This is the localhost entry, which uses an "A" resource record to indicate that the name "localhost" should be resolved into the IP-address 127.0.0.1 for IPv4 queries (which specifically ask for the "A" record).
- Line 10:
This line is the IPv6 entry, which returns ::1 when someone asks for an IPv6-address (by specifically asking for the AAAA record) of "localhost.".
This is the reverse lookup file (or zone) to resolve the special IP address 127.0.0.1 back to "localhost":
1| $TTL 3600 2| @ IN SOA strider.diverge.org. root.diverge.org. ( 3| 1 ; Serial 4| 8H ; Refresh 5| 2H ; Retry 6| 1W ; Expire 7| 1D) ; Minimum TTL 8| IN NS localhost. 9| 1.0.0 IN PTR localhost.
In this file, all of the lines are the same as the
localhost zonefile with exception of line 9, this is the
reverse lookup (PTR) record. The zone used here is "@" again,
which got set to the value given in
named.conf, i.e. "127.in-addr.arpa". This
is a special "domain" which is used to do reverse-lookup of IP
addresses back into hostnames. For it to work, the four bytes
of the IPv4 address are reserved, and the domain
"in-addr.arpa" attached, so to resolve the IP address
"127.0.0.1", the PTR record of "1.0.0.127.in-addr.arpa" is
queried, which is what is defined in that line.
This zone file is populated by records for all of our hosts. Here is what it looks like:
1| $TTL 3600 2| @ IN SOA strider.diverge.org. root.diverge.org. ( 3| 1 ; serial 4| 8H ; refresh 5| 2H ; retry 6| 1W ; expire 7| 1D ) ; minimum seconds 8| IN NS strider.diverge.org. 9| IN MX 10 strider.diverge.org. ; primary mail server 10| IN MX 20 samwise.diverge.org. ; secondary mail server 11| strider IN A 192.168.1.1 12| samwise IN A 192.168.1.2 13| www IN CNAME samwise.diverge.org. 14| worm IN A 192.168.1.3
There is a lot of new stuff here, so let's just look over each line that is new here:
- Line 9
This line shows our mail exchanger (MX), in this case it is "strider". The number that precedes "strider.diverge.org." is the priority number, the lower the number their higher the priority. The way we are setup here is if "strider" cannot handle the mail, then "samwise" will.
- Line 11
-
CNAME stands for canonical name, or an alias for an existing hostname, which must have an A record. So we have aliased the following:
www.diverge.org to samwise.diverge.org
The rest of the records are simply mappings of IP address to a full name (A records).
This zone file is the reverse file for all of the host
records, to map their IP numbers we use on our private network
back into hostnames. The format is similar to that of the
"localhost" version with the obvious exception being the
addresses are different via the different zone given in the
named.conf file,
i.e. "0.168.192.in-addr.arpa" here:
1|$TTL 3600 2|@ IN SOA strider.diverge.org. root.diverge.org. ( 3| 1 ; serial 4| 8H ; refresh 5| 2H ; retry 6| 1W ; expire 7| 1D ) ; minimum seconds 8| IN NS strider.diverge.org. 9|1 IN PTR strider.diverge.org. 10|2 IN PTR samwise.diverge.org. 11|3 IN PTR worm.diverge.org.
This file contains a list of root name servers for your server to query when it gets requests outside of its own domain that it cannot answer itself. Here are first few lines of a root zone file:
; ; This file holds the information on root name servers needed to ; initialize cache of Internet domain name servers ; (e.g. reference this file in the "cache . <file>" ; configuration file of BIND domain name servers). ; ; This file is made available by InterNIC ; under anonymous FTP as ; file /domain/db.cache ; on server FTP.INTERNIC.NET ; -OR- RS.INTERNIC.NET ; ; last update: Jan 29, 2004 ; related version of root zone: 2004012900 ; ; ; formerly NS.INTERNIC.NET ; . 3600000 IN NS A.ROOT-SERVERS.NET. A.ROOT-SERVERS.NET. 3600000 A 198.41.0.4 ; ; formerly NS1.ISI.EDU ; . 3600000 NS B.ROOT-SERVERS.NET. B.ROOT-SERVERS.NET. 3600000 A 192.228.79.201 ; ; formerly C.PSI.NET ; . 3600000 NS C.ROOT-SERVERS.NET. C.ROOT-SERVERS.NET. 3600000 A 192.33.4.12 ; ...
This file can be obtained from ISC at http://www.isc.org/ and
usually comes with a distribution of BIND. A
root.cache file is included in the NetBSD
operating system's "etc" set.
This section has described the most important files and settings
for a DNS server. Please see the BIND documentation in
/usr/src/dist/bind/doc/bog and
named.conf(5) for more information.
In this section we will look at how to get DNS going and setup "strider" to use its own DNS services.
Setting up named to start automatically is quite simple.
In /etc/rc.conf simply set
named=yes. Additional
options can be specified in named_flags, for
example, I like to use -g nogroup -u nobody,
so a non-root account runs the "named" process. You may also
want to set named_chrootdir=/var/chroot/named
to ensure bind runs chrooted.
Upon first start, this will migrate the configuration files and
cache database into the chroot directory. (Note: If you do this,
prefix the bind pathnames in the remainder of
this document with /var/chroot/named.)
In addition to being able to startup "named" at boot time, it can also be controlled with the ndc command. In a nutshell the ndc command can stop, start or restart the named server process. It can also do a great many other things. Before use, it has to be setup to communicate with the "named" process, see the rndc(8) and named.conf(5) man pages for more details on setting up communication channels between "ndc" and the "named" process.
Next we want to point "strider" to
itself for lookups. We have two simple steps, first, decide on
our resolution order. On a network this small, it is likely that
each host has a copy of the hosts table, so we can get away with
using /etc/hosts first, and then
DNS. However, on larger networks it is much
easier to use DNS. Either way, the file where order of
name services used for resolution is determined
is /etc/nsswitch.conf
Here is part of a typical nsswitch.conf:
. . . group_compat: nis hosts: files dns netgroup: files [notfound=return] nis . . .
The line we are interested in is the "hosts" line. "files"
means the system uses the /etc/hosts file
first to determine ip to name translation, and if it can't find
an entry, it will try DNS.
The next file to look at is
/etc/resolv.conf, which is used to
configure DNS lookups ("resolution") on the client side. The
format is pretty self explanatory but we will go over it
anyway:
domain diverge.org search diverge.org nameserver 192.168.1.1
In a nutshell this file is telling the resolver that this machine belongs to the "diverge.org" domain, which means that lookups that contain only a hostname without a "." gets this domain appended to build a FQDN. If that lookup doesn't succeed, the domains in the "search" line are tried next. Finally, the "nameserver" line gives the IP addresses of one or more DNS servers that should be used to resolve DNS queries.
To test our nameserver we can use several commands, for example:
#host samsam.diverge.org has address 192.168.1.2
As can be seen, the domain was appended automatically here,
using the value from /etc/resolv.conf. Here
is another example, the output of running host
www.yahoo.com:
$host www.yahoo.comwww.yahoo.com is an alias for www.yahoo.akadns.net. www.yahoo.akadns.net has address 68.142.226.38 www.yahoo.akadns.net has address 68.142.226.39 www.yahoo.akadns.net has address 68.142.226.46 www.yahoo.akadns.net has address 68.142.226.50 www.yahoo.akadns.net has address 68.142.226.51 www.yahoo.akadns.net has address 68.142.226.54 www.yahoo.akadns.net has address 68.142.226.55 www.yahoo.akadns.net has address 68.142.226.32
Other commands for debugging DNS besides host(1) are
nslookup(8) and dig(1). Note that ping(8) is
not useful for debugging DNS, as it will
use whatever is configured in
/etc/nsswitch.conf to do the name-lookup.
At this point the server is configured properly.
The procedure for setting up the client hosts are easier,
you only need to setup /etc/nsswitch.conf
and /etc/resolv.conf to the same values as
on the server.
A caching only name server has no local zones; all the
queries it receives are forwarded to the root servers and the
replies are accumulated in the local cache. The next time the
query is performed the answer will be faster because the data is
already in the server's cache. Since this type of server
doesn't handle local zones, to resolve the names of the local
hosts it will still be necessary to use the already known
/etc/hosts file.
Since NetBSD supplies defaults for all the files needed by a
caching only server, it only needs to be enabled and started and
is immediately ready for use! To enable named, put
named=yes into
/etc/rc.conf, and tell the system to use it
adding the following line to the
/etc/resolv.conf file:
#cat /etc/resolv.confnameserver 127.0.0.1
Now we can start named:
#service named restart
Now that the server is running we can test it using the nslookup(8) program:
$nslookupDefault server: localhost Address: 127.0.0.1 >
Let's try to resolve a host name, for example "www.NetBSD.org":
> www.NetBSD.org
Server: localhost
Address: 127.0.0.1
Name: www.NetBSD.org
Address: 204.152.190.12
If you repeat the query a second time, the result is slightly different:
> www.NetBSD.org
Server: localhost
Address: 127.0.0.1
Non-authoritative answer:
Name: www.NetBSD.org
Address: 204.152.190.12
As you've probably noticed, the address is the same, but the message “Non-authoritative answer” has appeared. This message indicates that the answer is not coming from an authoritative server for the domain NetBSD.org but from the cache of our own server.
The results of this first test confirm that the server is working correctly.
We can also try the host(1) and dig(1) commands, which give the following result.
$host www.NetBSD.orgwww.NetBSD.org has address 204.152.190.12$$dig www.NetBSD.org; <<>> DiG 8.3 <<>> www.NetBSD.org ;; res options: init recurs defnam dnsrch ;; got answer: ;; ->>HEADER<<- opcode: QUERY, status: NOERROR, id: 19409 ;; flags: qr rd ra; QUERY: 1, ANSWER: 1, AUTHORITY: 5, ADDITIONAL: 0 ;; QUERY SECTION: ;; www.NetBSD.org, type = A, class = IN ;; ANSWER SECTION: www.NetBSD.org. 23h32m54s IN A 204.152.190.12 ;; AUTHORITY SECTION: NetBSD.org. 23h32m54s IN NS uucp-gw-1.pa.dec.com. NetBSD.org. 23h32m54s IN NS uucp-gw-2.pa.dec.com. NetBSD.org. 23h32m54s IN NS ns.NetBSD.org. NetBSD.org. 23h32m54s IN NS adns1.berkeley.edu. NetBSD.org. 23h32m54s IN NS adns2.berkeley.edu. ;; Total query time: 14 msec ;; FROM: miyu to SERVER: 127.0.0.1 ;; WHEN: Thu Nov 25 22:59:36 2004 ;; MSG SIZE sent: 32 rcvd: 175
As you can see dig(1) gives quite a bit of output, the expected answer can be found in the "ANSWER SECTION". The other data given may be of interest when debugging DNS problems.
Table of Contents
This chapter explains how to set up NetBSD to use mail and news. Only a simple but very common setup is described: the configuration of a host connected to the Internet with a modem through a provider. You can think of this chapter as the continuation of Chapter 24, Setting up TCP/IP on NetBSD in practice, assuming a similar network configuration. Even this “simple” setup proves to be difficult if you don't know where to start or if you've only read introductory or technical documentation. A general description of mail and news configuration is beyond the scope of this guide; please read a good Unix Administration book (some very good ones are listed on the NetBSD site).
This chapter also briefly describes the configuration (but not the usage) of two popular applications, mutt for mail and tin for news. The usage is not described because they are easy to use and well documented. Obviously, both mutt and tin are not mandatory choices: many other similar applications exist but I think that they are a good starting point because they are widely used, simple, work well and don't use too much disk space and memory. Both are console mode programs; if you prefer graphics applications there are also many choices for X.
In short, the programs required for the configuration described in this chapter are:
postfix
fetchmail
mutt
tin
Only postfix is installed with the base system; you can install the other programs from the NetBSD package collection, pkgsrc.
Note
Because sendmail is widely popular and several programs like fetchmail are designed to be used with it, postfix includes a command line wrapper that accepts sendmail's commands line syntax but works with postfix. See sendmail(1) for more details.
Before continuing, remember that none of the programs presented in this chapter is mandatory: there are other applications performing similar tasks and many users prefer them. You'll find different opinions reading the mailing lists. You can also use different strategies for sending and receiving mail: the one explained here is only a starting point; once you understand how it works you'll probably want to modify it to suit your needs or to adopt a different method altogether.
At the opposite extreme of the example presented here, there is the usage of an application like Mozilla, which does everything and frees you from the need of configuring many components: with Mozilla you can browse the Internet, send and receive mail and read news. Besides, the setup is very simple. There is a price to pay, though: Mozilla is a “closed” program that will not cooperate easily with other standard Unix utilities.
Another possibility is to use emacs to read mail and news. Emacs needs no introduction to Unix users but, in case you don't know, it is an extensible editor (although calling emacs an editor is somewhat reductive) which becomes a complete work environment, and can be used to read mail, news and to perform many operations. For many people emacs is the only environment that they need and they use it for all their work. The configuration of emacs for mail and news is described in the emacs manual.
In the rest of this chapter we will deal with a host connected to the Internet through a PPP connection via serial modem to a provider.
the local host's name is “ape” and the internal network is “insetti.net”, which means that the FQDN (Fully Qualified Domain Name) is “ape.insetti.net”.
the user's login name on ape is “carlo”.
the provider's name is BigNet.
the provider's mail server is “mail.bignet.it”.
the provider's news server is “news.bignet.it”.
the user's (“carlo”) account at the provider is “alan” with the password “pZY9o”.
First some basic terminology:
- MUA (mail user agent)
a program to read and write mail. For example: mutt, elm and pine but also the simple mail application installed with the base system.
- MTA (mail transfer agent)
a program that transfers mail between two host but also locally (on the same host). The MTA decides the path that the mail will follow to get to the destination. On other BSD systems (but not only) the standard MTA is sendmail, other examples are qmail, exim and Microsoft Exchange.
- MDA (mail delivery agent)
a program, usually used by the MTA, that delivers the mail; for example, it physically puts the messages in the recipient's mailbox. For example, postfix uses one or more MDAs to deliver mail, and procmail is another well-known MDA.
Figure 27.1, “Structure of the mail system” depicts the mail system that we want to set up. Between the local network (or the single host) and the provider there is a modem PPP connection. The “bubbles” with the thick border (postfix, fetchmail, mutt) are the programs launched manually by the user; the remaining bubbles are the programs that are launched automatically. The circled numbers refer to the logical steps of the mail cycle:
In step (1) mail is downloaded from the provider's POP server using fetchmail, which hands messages off to postfix's sendmail wrapper to put the messages in the user's mailbox.
In step (2) the user launches mutt (or another MUA) to read mail, reply and write new messages.
In step (3) the user “sends” the mail from within mutt. Messages are accumulated in the spool area.
In step (4) the user calls postfix's sendmail wrapper to transfer the messages to the provider's SMTP server, that will deliver them to the final destination (possibly through other mail servers). The provider's SMTP server acts as a relay for our mail.
The connection with the provider must be up only during steps (1) and (4); for the remaining steps it is not needed.
When an MTA must deliver a local message, it is delivered directly. If the message is intended for a different domain, the MTA must find out the address of the mail server for that domain. Postfix uses the DNS service (described in Chapter 26, The Domain Name System) to find a mail exchanger handling mail for the given domain, and delivers the message to that mail server then.
Postfix is controlled by a set of configuration files and
databases, of which /etc/postfix/main.cf
and /etc/postfix/master.cf are the most
important.
The first problem to be solved is that the local network we are dealing with is an internal network, i.e. not directly accessible from the Internet. This means that the names used internally have no meaning on the Internet; in short, “ape.insetti.net” cannot be reached by an external host: no one will be able to reply to a mail sent with this return address (many mail systems will even reject the message as spam prevention as it comes from an unknown host). The true address, the one visible from everybody, is assigned by the provider and, therefore, it is necessary to convert the local address “carlo@ape.insetti.net” to the real address “alan@bignet.it”. Postfix, if correctly configured, will take care of this when it transfers the messages.
You'll probably also want to configure postfix in order to send the e-mails to the provider's mail server, using it as a relay. In the configuration described in this chapter, postfix does not directly contact the recipient's mail server (as previously described) but relays all its mail to the provider's mail server.
Note
The provider's mail server acts as a relay, which means that it delivers mail which is not destined to its own domain, to another mail server. It acts as an intermediary between two servers.
Since the connection with the provider is not always active, it
is not necessary to start postfix as a daemon in
/etc/rc.conf: you can disable it with the
line “postfix=NO”.
As a consequence it will be necessary to
launch postfix manually when you want to transfer mail to the
provider. Local mail is delivered correctly even if postfix is
not active as a daemon.
Let's start configuring postfix.
This type of configuration uses a new file
/etc/postfix/generic which contains the
hostname mapping used by postfix to rewrite the internal
hostnames.
The first step is therefore to write the mapping file:
carlo@ape.insetti.net alan@bignet.it root@ape.insetti.net alan@bignet.it news@ape.insetti.net alan@bignet.it
These entries will map the mail sent from the users given on the left side into the globally valid email addresses given on the right, making it appear as if the mail was really sent from that address.
For the sake of efficiency, generic
must be transformed into a binary file with the following
command:
#postmap /etc/postfix/generic
Now it's time to create the prototype configuration file which we'll use to create the postfix configuration file.
#vi /etc/postfix/main.cf
For the sake of simplicity, we'll only show the variables you need to change:
relayhost = mail.bignet.it smtp_generic_maps = hash:/etc/postfix/generic
This configuration tells postfix to rewrite the addresses of
type “ape.insetti.net” using the real names found in the
/etc/postfix/generic file.
It also says that mail should be sent to the
“mail.bignet.it” server.
The meaning of the options is described in detail in
postconf(5).
The last step is to reload the configuration. You can do that easily with:
#service postfix reloadpostfix/postfix-script: refreshing the Postfix mail system
Now everything is ready to start sending mail.
Postfix is finally configured and ready to work, but before sending real mail it is better to do some simple tests. First let's try sending a local e-mail with the following command (postfix's sendmail wrapper):
$sendmail carloSubject: testHello world.
Please follow exactly the example above: leave a blank line after Subject: and end the message with a line containing only one dot. Now you should be able to read the message with your mail client and verify that the From: field has been correctly rewritten.
From: alan@bignet.it
$ls -l /usr/sbin/sendmaillrwxr-xr-x 1 root wheel 21 Nov 1 01:14 /usr/sbin/sendmail@ -> /usr/sbin/mailwrapper
The purpose of mailwrapper is to allow the usage of an alternative MTA instead of postfix (for example, sendmail). If you plan to use a different mailer I suggest that you read the mailwrapper(8) and the mailer.conf(5) manpages, which are very clear.
If someone sends me mail, it is received and stored by the
provider, and not automatically transferred to the local hosts;
therefore it is necessary to download it.
Fetchmail is a very popular program
that downloads mail from a remote mail server (using e.g. the
Post Office Protocol, POP) and forwards it to
the local system for delivery (usually using postfix's
sendmail wrapper).
It is powerful yet easy to use and configure: after
installation, the file ~/.fetchmailrc must be
created and the program is ready to run
(~/.fetchmailrc contains a password so
appropriate permissions on the file are required).
This is an example .fetchmailrc:
poll mail.bignet.it protocol POP3 username alan there with password pZY9o is carlo here flush mda "/usr/sbin/sendmail -oem %T"
The last line (“mda ...”) is used only if postfix is not active as daemon on the system. Please note that the POP-mail server indicated in this file (mail.bignet.it) is only used to retrieve mails, and that it is not necessary the same as the mail relay used by postfix to send out mails.
After setting up the .fetchmailrc file, the
following command can be used to download and deliver mail
to the local system:
$fetchmail
The messages can now be read with mutt.
Mutt is one of the most popular mail
programs: it is “lightweight”, easy to use and has lots
of features.
The man page mutt is very bare bones;
the real documentation is in
/usr/pkg/share/doc/mutt/, in particular
manual.txt.
Mutt's configuration is defined by the ~/.muttrc
file. The easiest way to create it is to copy mutt's example
muttrc file (usually
/usr/pkg/share/examples/mutt/sample.muttrc)
to the home directory and modify it. The following example
shows how to achieve some results:
Save a copy of sent mail.
Define a directory and two files for incoming and outgoing mail saved by mutt (in this example the directory is
~/Mailand the files areincomingandoutgoing).Define some colors.
Define an alias.
set copy=yes set edit_headers set folder="~/Mail" unset force_name set mbox="~/Mail/incoming" set record="~/Mail/outgoing" unset save_name bind pager <up> previous-page bind pager <down> next-page color normal white black color hdrdefault blue black color indicator white blue color markers red black color quoted cyan black color status white blue color error red white color underline yellow black mono quoted standout mono hdrdefault underline mono indicator underline mono status bold alias pippo Pippo Verdi <pippo.verdi@pluto.net>
To start mutt:
$mutt
Please note that mutt supports color, but this depends on the terminal settings. Under X you can use "xterm-color", for example:
$env TERM=xterm-color mutt
This section describes a simple method for receiving and reading mail. The connection to the provider is activated only for the time required to download the messages; mail is then read offline.
Activate the connection to the provider.
Run fetchmail.
Deactivate the connection.
Read mail with mutt.
When mail has been written and “sent” with mutt, the messages must be transferred to the provider with postfix. Mail is sent from mutt with the y command, but this does not really send it; the messages are enqueued in the spool area; if postfix is not active as a daemon it is necessary to start it manually or the messages will remain on the hard disk. The necessary steps are:
Write mail with mutt, send it and exit mutt. You can check if and what messages are in the postfix mail queue using the mailq(1) program.
Activate the connection with the provider.
If your provider requires you to do "SMTP-after-POP", i.e. it first wants to make sure to know who you are before you are allowed to send mail (and no spam), you need to run fetchmail again first.
Write the command /usr/sbin/postfix flush to transfer the queued messages to the provider.
Deactivate the connection when the queue is empty.
When you start using mail, you won't probably have very sophisticated requirements and the already described standard configuration will satisfy all your needs. But for many users the number of daily messages will increase with time and a more rational organization of the mail storage will become necessary, for example subdividing mail in different mail boxes organized by topic. If, for example, you subscribe to a mailing list, you will likely receive many messages every day and you will want to keep them separate from the rest of your mail. You will soon find that you are spending too much time every day repeating the same manual operations to organize your mail boxes.
Why repeat the same operations manually when you can have a program perform them automatically for you? There are numerous tools that you can add to your mail system to increase its flexibility and automatically process your messages. Amongst the most known and used there are:
procmail, an advanced mail delivery agent and general purpose mail filter for local mail, which automatically processes incoming mail using user defined rulesets. It integrates smoothly with sendmail/postfix.
spamassassin or spamprobe, to help fight spam.
metamail, a tool to process attachments.
formail, a mail formatter.
In the remaining part of this section a sample configuration for procmail will be presented for a very common case: delivering automatically to a user defined mailbox all the messages coming from a mailing list. The configuration of postfix will be modified in order to call procmail directly (procmail will be the local mailer used by sendmail). and a custom configuration file for procmail will be created.
First, procmail must be installed using the package system
(mail/procmail) or pkg_add.
Next, the configuration of postfix must be changed, in order to use procmail as local mailer:
mailbox_command = /usr/pkg/bin/procmail
The line defines the path of the procmail program (you can see where procmail is installed with the command which procmail).
The last step is the creation of the procmail configuration file, containing the recipes for mail delivery.
Let's say that, for example, you subscribed to a mailing list on roses whose address is “roses@flowers.org” and that every message from the list contains the following line in the header:
Delivered-To: roses@flowers.org
Assuming you want to automatically sort all mails going over
that list into the local mail folder "roses_list", the procmail
configuration file (.procmailrc) looks like
this:
PATH=/bin:/usr/bin:/usr/pkg/bin MAILDIR=$HOME/Mail LOGFILE=$MAILDIR/from :0 * ^Delivered-To: roses@flowers.org roses_list
The previous file contains only one rule, beginning with the
line containing “:0”. The following line identifies
all messages containing the string “Delivered-To:
roses@flowers.org” and the last line says that the selected
messages must go to the roses_list mailbox
(which you should have created in $MAILDIR). The remaining
messages will be delivered to the default mailbox.
Note that $MAILDIR is the same directory that you have
configured with mutt:
set folder="~/Mail"
Of course the mailing list is only an example; procmail is a very versatile tool which can be used to filter mail based on many criteria. As usual, refer to the man pages for more details: procmail(1), procmailrc(5), and procmailex(5) (this last one contains many examples of configuration files).
The word news indicates the set of messages posted to the USENET newsgroups, a service available on the Internet. Each newsgroup contains articles related to a specific topic. Reading a newsgroup is different than reading a mailing list: when you subscribe to a mailing list you receive the articles by mail and you read them with a standard mail program like mutt, which you use also to send replies. News, instead, are read directly from a news server with a dedicated program called newsreader like, for example, tin. With tin you can subscribe to the newsgroups that you're interested in and follow the threads. A thread is a sequence of articles which all derive from an article that we could call “original”. In short, a message is sent to the group, someone answers, other people answer to those who answered in the first place and so on, creating a tree like structure of messages and replies: without a newsreader it is impossible to understand the correct sequence of messages.
After the installation of tin (from the
package collection as usual) the only thing left to do is to write
the name of the NNTP server in the file
/usr/pkg/etc/nntp/server, which you may
need to create first. For example:
news.bignet.it
Once this has been done, the program can be started with the command tin. On the screen something similar to the following example will be displayed:
$tinConnecting to news.bignet.it... news.bignet.it InterNetNews NNRP server INN 1.7.2 08-Dec-1997 ready (posting ok). Reading groups from active file... Checking for new groups... Reading attributes file... Reading newsgroups file... Creating newsrc file... Autosubscribing groups... Reading newsrc file...
Be patient when you connect for the first time, because tin downloads an immense list of newsgroups to which you can subscribe and this takes several minutes. When the download is finished, the program's main screen is displayed; usually no groups are displayed; to see the list of groups press y. To subscribe to a group, move on the group's name and press y.
Once that you have subscribed to some newsgroups you can start
tin more quickly with the command tin -Q.
The search for new groups is disabled
(-q), only active groups are searched
(-n) and newsgroup description are not loaded
(-d): it will not be possible to use the
y (yank) command in tin.
When tin is started with this option it can't tell if a
newsgroup is moderated or not.
Note that if you are connecting from an internal network (like
in our example), when you send ("post") a message the address at
the beginning of the message will be wrong (because it is the
internal address). To solve the problem, use the option
“mail_address” in the tin configuration file
(~/.tin/tinrc) or set the REPLYTO
environment variable.
Table of Contents
See Section D.3.3, “Joel Knight's license on the CARP article” for the license of this chapter.
CARP is the Common Address Redundancy Protocol. Its primary purpose is to allow multiple hosts on the same network segment to share an IP address. CARP is a secure, free alternative to the Virtual Router Redundancy Protocol and the Hot Standby Router Protocol.
CARP works by allowing a group of hosts on the same network segment to share an IP address. This group of hosts is referred to as a "redundancy group". The redundancy group is assigned an IP address that is shared amongst the group members. Within the group, one host is designated the "master" and the rest as "backups". The master host is the one that currently "holds" the shared IP; it responds to any traffic or ARP requests directed towards it. Each host may belong to more than one redundancy group at a time.
One common use for CARP is to create a group of redundant firewalls. The virtual IP that is assigned to the redundancy group is configured on client machines as the default gateway. In the event that the master firewall suffers a failure or is taken offline, the IP will move to one of the backup firewalls and service will continue unaffected.
While highly redundant and fault-tolerant hardware minimizes the need for CARP, it doesn't erase it. There's no hardware fault tolerance that's capable of helping if someone knocks out a power cord, or if your system administrator types reboot in the wrong window. CARP also makes it easier to make the patch and reboot cycle transparent to users, and easier to test a software or hardware upgrade--if it doesn't work, you can fall back to your spare until fixed.
There are, however, situations in which CARP won't help. CARP's design does require that the members of a group be on the same physical subnet with a static IP address, although with the introduction of the carpdev directive, there is no more need for IP addresses on the physical interfaces. Similarly, services that require a constant connection to the server (such as SSH or IRC) will not be transparently transferred to the other system--though in this case, CARP can help with minimizing downtime. CARP by itself does not synchronize data between applications, for example, manually duplicating data between boxes with rsync, or whatever is appropriate for your application.
CARP supports both IPv4 and IPv6.
The master host in the group sends regular advertisements to the local network so that the backup hosts know it's still alive. If the backup hosts don't hear an advertisement from the master for a set period of time, then one of them will take over the duties of master (whichever backup host has the lowest configured advbase and advskew values). It's possible for multiple CARP groups to exist on the same network segment. CARP advertisements contain the Virtual Host ID which allows group members to identify which redundancy group the advertisement belongs to.
In order to prevent a malicious user on the network segment from spoofing CARP advertisements, each group can be configured with a password. Each CARP packet sent to the group is then protected by an SHA1 HMAC.
Each redundancy group is represented by a carp(4) virtual network interface. As such, CARP is configured using ifconfig(8) The follow options are available:
carpNThe name of the carp(4) virtual interface where N is a integer that represents the interface's number (e.g. carp0).
vhidThe Virtual Host ID. This is a unique number that is used to identify the redundancy group to other nodes on the network. Acceptable values are from 1 to 255. This allows for multiple redundancy groups to exist on the same network.
passwordThe authentication password to use when talking to other CARP-enabled hosts in this redundancy group. This must be the same on all members of the redundancy group.
carpdevThis optional parameter specifies the physical network interface that belongs to this redundancy group. By default, CARP will try to determine which interface to use by looking for a physical interface that is in the same subnet as the ipaddress and mask combination given to the carp(4) interface.
advbaseThis optional parameter specifies how often, in seconds, to advertise that we're a member of the redundancy group. The default is 1 second. Acceptable values are from 1 to 255.
advskewThis optional parameter specifies how much to skew the advbase when sending CARP advertisements. By manipulating advbase, the master CARP host can be chosen. The higher the number, the less preferred the host will be when choosing a master. The default is 0. Acceptable values are from 1 to 254.
stateForce a carp(4) interface into a certain state. Valid states are init, backup, and master
ipaddressThis is the shared IP address assigned to the redundancy group. This address does not have to be in the same subnet as the IP address on the physical interface (if present). This address needs to be the same on all hosts in the group, however.
maskThe subnet mask of the shared IP.
Further CARP behaviour can be controlled via sysctl(8)
net.inet.carp.allowAccept incoming CARP packets or not. Default is 1 (yes).
net.inet.carp.preemptAllow hosts within a redundancy group that have a better advbase and advskew to preempt the master. In addition, this option also enables failing over all interfaces in the event that one interface goes down. If one physical CARP-enabled interface goes down, CARP will change advskew to 240 on all other CARP-enabled interfaces, in essence, failing itself over. This option is 0 (disabled) by default.
net.inet.carp.logLog bad CARP packets. Default is 0 (disabled).
net.inet.carp.arpbalanceLoad balance traffic across multiple redundancy group hosts. Default is 0 (disabled). See carp(4) for more information.
CARP support is not enabled by default.
To use carp(4) you need a kernel with support for the
carp pseudo-device. Make sure the following
line is in your kernel configuration file:
pseudo-device carp # CARP
After configuring the carp
pseudo-device in your kernel configuration, you must recompile your
kernel and reboot to enable carp(4) support.
An example CARP configuration:
#sysctl -w net.inet.carp.allow=1#ifconfig carp0 create#ifconfig carp0 vhid 1 pass lanpasswd \ carpdev em0 advskew 100 10.0.0.1 255.255.255.0
This sets up the following:
Enables receipt of CARP packets (this is the default setting)
Creates a carp(4) interface.
Configures carp0 for virtual host #1, enables a password(lanpasswd), sets em0 as the interface belonging to the group, and makes this host a backup due to the advskew of 100 (assuming of course that the master is set up with an advskew less than 100). The shared IP assigned to this group is 10.0.0.1/255.255.255.0.
Running ifconfig on carp0 shows the status of the interface:
#ifconfig carp0carp0: flags=8802<UP,BROADCAST,SIMPLEX,MULTICAST> mtu 1500 carp: BACKUP carpdev em0 vhid 1 advbase 1 advskew 100 inet 10.0.0.1 netmask 0xffffff00 broadcast 10.0.0.255
The following example creates a cluster of two highly-available, redundant firewalls. The following diagram presents what we're trying to achieve:
+----| WAN/Internet |----+
| |
em1| |em1
+-----+ +-----+
| fw1 | | fw2 |
+-----+ +-----+
em0| |em0
| |
---+-------Shared LAN-------+---
Both firewalls are connected to the LAN on em0 and to a WAN/Internet connection on em1. IP addresses are as follows:
Firewall 1 (fw1) em0: 172.16.0.1
Firewall 1 (fw1) em1: 192.0.2.1
Firewall 2 (fw2) em0: 172.16.0.2
Firewall 2 (fw2) em1: 192.0.2.2
The IP addresses we wish to share between the redundancy groups:
WAN/Internet Shared IP: 192.0.2.100
LAN Shared IP: 172.16.0.100
The network policy is that Firewall 1 (fw1) will be the preferred master.
The following configuration is for Firewall 1 (fw1):
#Enable preemption and group interface failover#sysctl -w net.inet.carp.preempt=1
#Configure CARP on the LAN side#ifconfig carp0 create#ifconfig carp0 vhid 1 pass lanpasswd carpdev em0 \ 172.16.0.100 255.255.255.0
#Configure CARP on the WAN side#ifconfig carp1 create#ifconfig carp1 vhid 2 pass wanpasswd carpdev em1 \ 192.0.2.100 255.255.255.0
As mentioned before, our policy is for Firewall 1 to be the
preferred master. When configuring Firewall 2 we make the
advskew a higher value since it's less
preferred to be the master.
The following configuration is for Firewall 2 (fw2):
#Enable preemption and group interface failover#sysctl -w net.inet.carp.preempt=1
#Configure CARP on the LAN side#ifconfig carp0 create#ifconfig carp0 vhid 1 pass lanpasswd carpdev em0 \ advskew 128 172.16.0.100 255.255.255.0
#Configure CARP on the WAN side#ifconfig carp1 create#ifconfig carp1 vhid 2 pass wanpasswd carpdev em1 \ advskew 128 192.0.2.100 255.255.255.0
There can be times when it's necessary to failover or demote the master node on purpose. Examples include taking the master node down for maintenance or when troubleshooting a problem. The objective here is to gracefully fail over traffic to one of the backup hosts so that users do not notice any impact.
To failover, shut down the carp(4) interface on the master node. This will cause the master to advertise itself with an "infinite" advbase and advskew. The backup host(s) will see this and immediately take over the role of master.
#ifconfig carp0 down
Table of Contents
Now that the network is working it is possible to share files and directories over the network using the Network File System (NFS). From the point of view of file sharing, the computer which gives access to its files and directories is called the server, and the computer using these files and directories is the client. A computer can be client and server at the same time.
Warning: NFS has no authentication, and access control is only by network address. NFS should be deployed only on restricted or firewalled networks (e.g., with npf(7); see Section 24.5, “Setting up an Internet gateway with NPF”). It is not safe to deploy on the open internet.
-
The server must enable the rpcbind(8), mountd(8), lockd(8), and statd(8) daemons, and enable the
nfs_serveroption (which enables nfsd(8)), in/etc/rc.conf:rpcbind=yes mountd=yes nfs_server=yes lockd=yes statd=yes
-
The client must enable the rpcbind(8), lockd(8), and statd(8) daemons, and enable the
nfs_clientoption,/etc/rc.conf:rpcbind=yes nfs_client=yes lockd=yes statd=yes
-
The server must list the exported file systems in
/etc/exports(see exports(5)) and then run the command service mountd reload.Warning: Only entire file systems can be exported, not subtrees of file systems. You can export subdirectories of a file system as possible mount points for clients, but that exposes the entire content of the file system they live on to clients. If you want to export one subtree and prevent access to other subtrees, the exported subtree must be on its own file system.
A client host can access a remote file system through NFS if:
-
The server host exports a mount point in the file system to the client. The list of mount points a NFS server exports can be checked with the showmount -e command (see showmount(8)). For example:
#showmount -e 192.168.1.2Exports list on 192.168.1.2: /home host1 host2 host3 The client host mounts the remote directory in fstab(5) or with the command mount 192.168.1.2:/home /home (see mount_nfs(8)).
The scenario described here is the following: five client machines (cli1, ..., cli5) share some directories on a server (buzz.toys.org). Some of the directories exported by the server are reserved for a specific client, the other directories are common for all client machines. All the clients boot from the server and must mount the directories.
The directories exported from the server are:
/export/cliX/rootthe five root directories for the five client machines. Each client has its own root directory, with
X= 1, 2, 3, 4, or 5./export/cliX/swapFive swap directories for the five swap machines.
/export/common/usr/usrdirectory; common for all client hosts./usr/srcCommon
/usr/srcdirectory for all client machines.
The following file systems exist on the server:
/dev/ra0a on / /dev/ra0f on /usr /dev/ra1a on /usr/src /dev/ra2a on /export
Each client needs the following file systems:
buzz:/export/cliX/root on /
buzz:/export/common/usr on /usr
buzz:/usr/src on /usr/src
The server configuration is the following:
# /etc/exports /usr/src -network 192.168.1.0 -mask 255.255.255.0 /export -alldirs -maproot=root -network 192.168.1.0 -mask 255.255.255.0
Note that all exported directories are on file systems
other than / and
/usr, so that clients can't overwrite
important files like /bin/sh and
/usr/bin/less or read from secret files
like /root/.ssh/id_ed25519 or
/etc/krb5.keytab on the server.
On the client machines /etc/fstab
contains:
buzz:/export/cliX/root / nfs rw
buzz:/export/common/usr /usr nfs ro,nodev,nosuid
buzz:/usr/src /usr/src nfs rw,nodev,nosuid
Each client machine has its number substituted to the
“X” character in the
first line of the previous example.
29.1.2. Setting up NFS automounting for /net
with amd(8)
The problem with NFS (and other) mounts is, that you usually
have to be root to make them, which can be rather
inconvenient for users. Using amd(8) you can set up a
certain directory (Commonly /net),
under which one
can make any NFS-mount as a normal user, as long as the
file system about to be accessed is actually exported by the
NFS server.
To check if a certain server exports a file system, and
which ones, use the showmount-command with
the -e
(export) switch:
$showmount -e wuarchive.wustl.eduExports list on wuarchive.wustl.edu: /export/home onc.wustl.edu /export/local onc.wustl.edu /export/adm/log onc.wustl.edu /usr onc.wustl.edu / onc.wustl.edu /archive Everyone
If you then want to mount a directory to access anything
below it (for example
/archive/systems/unix/NetBSD),
just change into that directory:
$cd /net/wuarchive.wustl.edu/archive/systems/unix/NetBSD
The file system will be mounted (by amd), and you can a access any files just as if the directory was mounted by the superuser of your system.
You can set up such a /net directory with the
following steps (including basic amd
configuration):
-
in
/etc/rc.conf, set the following variable:amd=yes
mkdir /amd
mkdir /net
-
Taking
/usr/share/examples/amd/amd.conf, put the following into/etc/amd.conf:[ /net ] map_name = /etc/amd/net map_type = file
-
Taking
/usr/share/examples/amd/netas example, put the following into/etc/amd/net:/defaults type:=host;rhost:=${key};fs:=${autodir}/${rhost}/root * host==${key};type:=link;fs:=/ \ host!=${key};opts:=ro,soft,intr,nodev,nosuid,noconn -
Reboot, or (re)start amd by hand:
#service amd restart
It is not unusual to find that the system clock is wrong, often by several minutes: for some strange reason it seems that computer clocks are not very accurate. The problem gets worse if you administer many networked hosts: keeping the clocks in sync can easily become a nightmare. To solve this problem, the NTP protocol (version 3) comes to our aid: this protocol can be used to synchronize the clocks of a network of workstations using one or more NTP servers.
Thanks to the NTP protocol it is possible to adjust the clock of a single workstation but also to synchronize an entire network. The NTP protocol is quite complex, defining a hierarchical master-slave structure of servers divided in strata: the top of the hierarchy is occupied by stratum 1 servers, connected to an external clock (ex. a radio clock) to guarantee a high level of accuracy. Underneath, stratum 2 servers synchronize their clocks with stratum 1, and so on. The accuracy decreases as we proceed towards lower levels. This hierarchical structure avoids the congestion which could be caused by having all hosts refer to the same (few) stratum 1 servers. If, for example, you want to synchronize a network, you don't connect all the hosts to the same public stratum 1 server. Instead, you create a local server which connects to the main server and the remaining hosts synchronize their clocks with the local server.
Fortunately, to use the NTP tools you don't need to understand the details of the protocol and of its implementation (if you are interested, refer to RFC 1305) and you only need to know how to configure and start some programs. The base system of NetBSD already contains the necessary tools to utilize this protocol (and other time related protocols, as we'll see), derived from the xntp implementation. This section describes a simple method to always have a correct system time.
First, it is necessary to find the address of the public NTP servers to use as a reference; a detailed listing can be found at http://support.ntp.org/bin/view/Servers/WebHome. As an example, for Italy the three stratum 1 servers tempo.cstv.to.cnr.it, ntp1.inrim.it, and ntp2.inrim.it can be used.
Next, to adjust the system clock give the following command as root:
#ntpdate -bntp1.inrim.itntp2.inrim.it
(substitute the names of the servers in the example with the
ones that you are actually using.
Option -b tells ntpdate
to set the system time with the settimeofday system call,
instead of slewing it with adjtime (the default).
This option is suggested when the difference between the local
time and the correct time can be considerable.
As you've seen, ntpdate is not difficult to use.
The next step is to start it automatically, in order to always
have the correct system time.
If you have a permanent connection to the Internet, you can start
the program at boot with the following line of
/etc/rc.conf:
ntpdate=YES ntpdate_hosts="ntp1.inrim.it"
The name of the NTP server to use is specified in the
ntpdate_hosts variable; if you leave this
field empty, the boot script will try to extract the name from
the /etc/ntp.conf file.
If you don't have a permanent Internet connection (ex. you
have a dial-up modem connection through an ISP) you can start
ntpdate from the ip-up script, as
explained in Chapter 24, Setting up TCP/IP on NetBSD in practice.
In this case add the following line to the
ip-up script:
/usr/sbin/ntpdate -s -b ntp1.inrim.it
(the path is mandatory or the script will probably not find
the executable).
Option -s diverts logging output from the
standard output (this is the default) to the system syslog(3)
facility, which means that the messages from ntpdate will
usually end up in /var/log/messages.
Besides ntpdate there are other useful NTP commands.
It is also possible to turn one of the local hosts into an
NTP server for the remaining hosts of the network.
The local server will synchronize its clock with a public
server.
For this type of configuration you must use the
ntpd daemon and create the
/etc/ntp.conf configuration file.
For example:
serverntp1.inrim.itserverntp2.inrim.it
ntpd can be started too from rc.conf,
using the relevant option:
ntpd=YES
NTP is not your only option if you want to synchronize your network: you can also use the timed daemon or the rdate(8) command as well. timed was developed for 4.3BSD.
Timed too uses a master-slave hierarchy: when started on a
host, timed asks the network time to a master and adjusts the
local clock accordingly. A mixed structure, using both timed
and ntpd can be used. One of the local hosts gets the correct
time from a public NTP server and is the timed master for the
remaining hosts of network, which become its clients and
synchronize their clocks using timed. This means that the local
server must run both NTP and timed; care must be taken that they
don't interfere with each other (timed must be started with the
-F hostname option so that it doesn't try to
adjust the local clock).
Finally, rdate(8) can be used to
synchronize once against a given host, much like
ntpdate(8). The host in question must have the "time"
service (port 37) enabled in
/etc/inetd.conf.
Table of Contents
Table of Contents
A virtual machine is a virtual computer (the "guest") running inside another computer (the "host"). Virtual machines are useful for testing, running different operating systems, isolating parts of a system, and more.
nvmm(4) (NetBSD Virtual Machine Monitor) is NetBSD's native hypervisor. In regular usage, it's used as an "accelerator" for the QEMU virtual machine software. It will make virtual machines on your NetBSD host run faster by taking advantage of CPU virtualization extensions. Currently, a CPU that supports AMD SVM or Intel VMX is required, but more backends for other architectures may be added in the future. QEMU can also be used without an accelerator, with significantly reduced performance.
Other hypervisors supported by NetBSD include Intel HAXM (also used with QEMU), and Xen, which has quite a different design.
When running modern operating systems as VM guests, you will generally want to use para-virtualized I/O, rather than having QEMU emulate real hardware devices. On NetBSD, this is supported with the virtio(4) drivers.
Note
Many computers (especially laptops) have hardware virtualization capabilities disabled by default. You may need to enable the necessary features from the firmware at boot.
Before loading the NVMM module, make sure the modules
in /stand are correct and up-to-date for the version
of the NetBSD kernel you are using.
The NetBSD Virtual Machine Monitor isn't active by default.
It must be activated by loading the nvmm module with
modload(8):
#modload nvmm
Verify NVMM is loaded with modstat(8):
#modstat | grep nvmmnvmm misc filesys - 0 - -
You can load the module automatically at boot time by adding this
line to /etc/modules.conf:
nvmm
Loading NVMM at boot time will also allow the system to run with a secmodel_securelevel(9) of 1, which prevents loading modules after boot. However, since NVMM blocks things like suspend, you may wish to unload it:
#modunload nvmm
By default the /dev/nvmm device is owned by the
root user.
You probably want to run virtual machines as a non-root user
for security reasons, so set the owner of the /dev/nvmm
device to something reasonable:
#chown nia:wheel /dev/nvmm
On a machine containing lots of untrusted VMs, you may wish to create a dedicated user or group for them with useradd(8) and groupadd(8).
You can see NVMM's current status with nvmmctl(8):
$nvmmctl identifynvmm: Kernel API version 2 nvmm: State size 1008 nvmm: Max machines 128 nvmm: Max VCPUs per machine 256 nvmm: Max RAM per machine 128G nvmm: Arch Mach conf 0 nvmm: Arch VCPU conf 0x3<CPUID,TPR> nvmm: Guest FPU states 0x3<x87,SSE>
QEMU is a CPU emulator and virtual machine that can use
NVMM as an accelerator. It isn't included with NetBSD by default.
However, it is available in pkgsrc
as emulators/qemu, and can be
installed with pkgin:
#pkgin install qemu
This command starts a VM in an X11 window with NVMM acceleration, the same CPU type as the host machine, two CPU cores, and one gigabyte of memory:
$qemu-system-x86_64 -accel nvmm -cpu max -smp cpus=2 -m 1G \ -display sdl,gl=on \ -cdrom NetBSD-9.1-amd64.iso
The guest system will be much slower without acceleration as every CPU instruction will have to be emulated.
You should also be able to see the virtual machine running with nvmmctl(8):
$nvmmctl listMachine ID VCPUs RAM Owner PID Creation Time ---------- ----- ---- --------- ------------------------ 0 2 147M 10982 Sat May 8 10:09:59 2021
Generally, you will want to create a virtual drive to contain your
virtual machine on the host. We’ll want to create a
qcow2 image
because it provides better performance and is more versatile than a
raw image:
$qemu-img create -f qcow2 netbsd.qcow2 16G
A VirtIO block device provides the best performance.
Add the following arguments to qemu-system-x86_64
to use it:
-drive file=netbsd.qcow2,if=none,id=hd0 \
-device virtio-blk-pci,drive=hd0Older operating systems may not have VirtIO drivers, in which case you can use a normal emulated disk:
-hda netbsd.qcow2Operating systems require a good source of randomness for system security, cryptography, and so on. In a VM, this is ideally provided by the host machine, which has greater access to the underlying hardware. You can easily attach a VirtIO random number generator device with the following arguments to QEMU:
-object rng-random,filename=/dev/urandom,id=viornd0 \
-device virtio-rng-pci,rng=viornd0This requires no extra configuration on the host machine.
Entropy is generally required for secure communications. For more information on entropy, refer to entropy(7).
The simplest way to set up networking with QEMU is so-called "user networking". This will mean raw socket operations like ping(8) won’t work, but normal TCP/IP protocols like HTTP/FTP/etc will work. Another way is with bridged networking, see Section 30.3, “Configuring bridged networking on a NetBSD host”.
The most performant device type is
virtio-net-pci:
-netdev user,id=vioif0 -device virtio-net-pci,netdev=vioif0To use older guest operating systems that don’t support VirtIO, Intel Gigabit Ethernet is a good choice:
-netdev user,id=wm0 -device e1000,netdev=wm0Or an AMD PCnet card, for very old guest operating systems:
-netdev user,id=pcn0 -device pcnet,netdev=pcn0On a NetBSD host, the following QEMU arguments may be used to enable audio:
-audiodev oss,id=oss,out.dev=/dev/audio,in.dev=/dev/audio \
-device ac97,audiodev=ossac97 is the classic standardized sound driver
for x86 systems.
You may wish to change the /dev/audioX
device being used, see
Chapter 10, Audio.
You may need to adjust things further to get smooth playback, see Section 30.4.3, “Smooth audio playback and latency in VMs”.
These arguments will create an X11 window with OpenGL enabled (for smooth scaling if the window is resized), using a VMware-compatible VGA device, and an USB mouse:
-display sdl,gl=on -vga vmware \
-usb -device usb-mouse,bus=usb-bus.0There is a VMware video driver included with X11 on NetBSD, so the display will automatically configure when startx(1) runs and can be adjusted with xrandr(1).
A VNC display will allow remote access from a VNC client like
net/tigervnc, useful when running QEMU
with --daemonize on a server:
-display vnc=unix:/home/nia/.qemu-myvm-vnc -vga vmware
-usb -device usb-mouse,bus=usb-bus.0A simpler option is a curses display,
preferable for systems that don’t
need more than text output in a terminal:
-display cursesFor more information on configuring X11, see Chapter 9, The X Window System.
For more information on securely configuring VNC, see QEMU’s online documentation on VNC.
While QEMU user networking is easy to use and doesn't require root privileges, it's generally slower than bridged networking using a tap(4) device, and doesn't allow the use of diagnostic tools like ping(8) inside the guest.
To configure bridged networking on a NetBSD host, you must first make note of your host machine’s primary network interace. Find the one with an address assigned and a route to the outside world with ifconfig(8).
In this example, the host machine’s primary interface is
wm0. All of these commands run on the host machine.
Create a virtual tap(4) interface:
#ifconfig tap0 create#ifconfig tap0 descr "NetBSD VM" up
Create a bridge(4) connecting the actual interface and the virtual interface:
#ifconfig bridge0 create#ifconfig bridge0 descr "LAN VM bridge" up#brconfig bridge0 add tap0 add wm0
Configure NetBSD to do this all at boot time by editing
/etc/ifconfig.tap0:
create descr "NetBSD VM" up ! ifconfig bridge0 create ! ifconfig bridge0 descr "LAN VM bridge" up ! brconfig bridge0 add tap0 add wm0
You can now pass the arguments to QEMU to run with bridged networking:
-netdev tap,id=tap0,ifname=tap0,script=no -device virtio-net-pci,netdev=tap0For more information on NetBSD network configuration, see Chapter 24, Setting up TCP/IP on NetBSD in practice.
AVOID UNCLEAN SHUTDOWNS! This means pressing Ctrl+C or killing the virtual machine. In QEMU, the disks will rarely be synced, and data loss will almost certainly occur.
You may wish to add the log,noatime
mount options in /etc/fstab next to
rw to speed up fsck(8).
You can also enable the sync option,
but this will significantly decrease performance.
Always shut down NetBSD safely using the shutdown(8) command and make backups.
QEMU's networking will sometimes configure an invalid IPv6 route on IPv4-only configurations, meaning programs like the NetBSD packaging tools will prefer IPv6 and spend a long time timing out before succeeding.
Work around this by editing /etc/rc.conf
to prefer IPv4 addresses:
ip6addrctl=YES ip6addrctl_policy="ipv4_prefer"
Virtual machines cannot generally provide the same smooth playback at low latency that real hardware provides. For smooth playback, you may need to increase NetBSD's audio latency inside the VM:
$sysctl -w hw.audio0.blk_ms=100
To set this automatically automatically at boot time, add it to
/etc/sysctl.conf.
You can test audio output in the VM. Ensure that audiocfg(1) plays a continuous beep for each channel:
$audiocfg test 0
Note
On physical hardware where the display resolution is already set properly by the kernel, doing this will disable graphical acceleration.
If you want to increase the size of the x86 console, enter the following at the NetBSD boot prompt:
> vesa 1024x768x32
This setting can be made permanent in
/boot.cfg.
Table of Contents
The NetBSD port for amd64, i386, alpha, mac68k, macppc, and many others can execute a great number of native Linux programs, using the Linux emulation layer. Generally, when you think about emulation you imagine something slow and inefficient because, often, emulations must reproduce hardware instructions and even architectures (usually from old machines) in software. In the case of the Linux emulation this is radically different: it is only a thin software layer, mostly for system calls which are already very similar between the two systems. The application code itself is processed at the full speed of your CPU, so you don't get a degraded performance with the Linux emulation and the feeling is exactly the same as for native NetBSD applications.
The installation of the Linux emulation is described in the compat_linux(8) man page; using the package system only two steps are needed.
If you use a GENERIC kernel you don't need to do anything because Linux compatibility is already enabled.
If you use a customized kernel, check that the following options are enabled:
option COMPAT_LINUX option EXEC_ELF32
or the following options if you are going to use 64-bit ELF binaries:
option COMPAT_LINUX option EXEC_ELF64
when you have compiled a kernel with the previous options you can start installing the necessary software.
Usually, applications are linked against shared libraries, and for Linux applications, Linux shared libraries are needed. You can get the shared libraries from any Linux distribution, provided it's not too old, but the suggested method is to use the package system to install the provided libraries from openSUSE.
All Linux binaries exist entirely within the separate root
directories inside /emul/linux and
/emul/linux32.
The kernel will always search these paths first when looking
for shared objects required by Linux programs.
A number of useful Linux shared object binaries is provided by
pkgsrc, for running both 64-bit and 32-bit applications. The absolute
minimum required to run dynamically linked Linux applications are
are provided by the suse131_base and
suse131_32_base packages (or, if using binary
packages suse_base-13 and
suse32_base-13). Many other libraries are also
provided as separate packages.
Some packages in pkgsrc are provided as Linux binaries and
will also install all the required SUSE dependencies when installed.
However, this is uncommon. One such package is
adoptopenjdk11-bin.
It is possible to examine which libraries are required by a Linux program with readelf(1):
$readelf -d ./runnerDynamic section at offset 0x3a2e94 contains 40 entries: Tag Type Name/Value 0x00000001 (NEEDED) Shared library: [libstdc++.so.6] 0x00000001 (NEEDED) Shared library: [libz.so.1] 0x00000001 (NEEDED) Shared library: [libXxf86vm.so.1] 0x00000001 (NEEDED) Shared library: [libGL.so.1] 0x00000001 (NEEDED) Shared library: [libopenal.so.1] 0x00000001 (NEEDED) Shared library: [libm.so.6] 0x00000001 (NEEDED) Shared library: [librt.so.1] 0x00000001 (NEEDED) Shared library: [libpthread.so.0] 0x00000001 (NEEDED) Shared library: [libdl.so.2] 0x00000001 (NEEDED) Shared library: [libcrypto.so.1.0.0] 0x00000001 (NEEDED) Shared library: [libXext.so.6] 0x00000001 (NEEDED) Shared library: [libX11.so.6] 0x00000001 (NEEDED) Shared library: [libXrandr.so.2] 0x00000001 (NEEDED) Shared library: [libGLU.so.1] 0x00000001 (NEEDED) Shared library: [libssl.so.1.0.0] 0x00000001 (NEEDED) Shared library: [libgcc_s.so.1] 0x00000001 (NEEDED) Shared library: [libc.so.6]
For example, an application which requires
libcrypto.so.1.0.0,
libXext.so.6, and
libGL.so.1
will require openssl,
x11, and glx,
in addition to the base SUSE package.
Once the correct libraries are installed, no special steps are required to run a Linux program - simply type the command (if you acquired it as a non-pkgsrc download, include the full path on the filesystem). The kernel will detect it is a Linux executable and run it in the correct translation mode.
If we examine the outcome of the installation of the Linux
libraries and programs we find that
/emul/linux is a symbolic link pointing to
/usr/pkg/emul/linux, where the following
directories have been created:
bin/
dev/
etc/
lib/
lib64/
proc/
sbin/
usr/
var/
Note
Please always refer to /emul/linux and not
to /usr/pkg/emul/linux.
The latter is an implementation detail and may change in the
future.
How much space is required for the Linux emulation software? On one system we got the following figure:
#cd /usr/pkg/emul#du -k /emul/linux/... 399658 /emul/linux/
Linux plugins for Mozilla-based browsers can be used on native NetBSD Firefox builds through nspluginwrapper, a wrapper that translates between the native browser and a foreign plugin. At the moment, nspluginwrapper only works reliably on Mozilla-based browsers that link against GTK2+ (GTK1+ is not supported). nspluginwrapper can be installed through pkgsrc:
#cd /usr/pkgsrc/www/nspluginwrapper#make install
Plugins can then be installed in two steps: first, the plugin has to be installed on the system (e.g. through pkgsrc). After that the plugin should be registered with the nspluginwrapper by the users who want to use that plugin.
In this short example we will have a look at installing the Macromedia Flash plugin. We can fullfill the first step by installing the Flash plugin through pkgsrc:
#cd /usr/pkgsrc/multimedia/ns-flash#make install
After that an unprivileged user can register the Flash plugin:
$ nspluginwrapper -i /usr/pkg/lib/netscape/plugins/libflashplayer.so
The plugin should then be registered correctly. You can check this
by using the -l option of
nspluginwrapper
(nspluginwrapper -l). If the plugin is listed,
you can restart Firefox, and verify that the plugin was installed
by entering about:plugins in the location
bar.
The following articles may be of interest for further understanding Linux (and other) emulation:
[chap-linux-further-implementing-linux-emul-on-netbsd] Implementing Linux emulation on NetBSD . May 2004.
Table of Contents
- 32. Obtaining the sources
- 33. Crosscompiling NetBSD with
build.sh - 34. Compiling the kernel
- 35. Updating an existing system from sources
- 36. Building NetBSD installation media
Table of Contents
To read the NetBSD sources from your local disk or to build the system, you need to download the NetBSD sources. This chapter explains a number of different ways to obtain the NetBSD sources, although the preferred method is to download the tarballs and then update via cvs(1).
Traditionally, the NetBSD kernel and userland sources are placed in
/usr/src. This directory is not present by
default in the NetBSD installation and you will need to create it
first. As it is in a system directory, you will need root access
to create the directory and make sure your normal user account
can write to it. For demonstration purposes, it is assumed that
the non-root login is carlo.
Please replace it with a valid login name on your system:
$suPassword:********#mkdir /usr/src#chown<carlo>/usr/src
If you want the sources to the X Window System, you should prepare
/usr/xsrc as well:
#mkdir /usr/xsrc#chown<carlo>/usr/xsrc
Note
Please note that for the subsequent steps, root access is neither needed nor recommended, so this preparation step should be done first. All CVS operations can (and should) be done as normal user, so relinquish your root privileges:
#exit$
Before starting to fetch or download the required files, you may want to know the definitions of “Formal releases”, “Maintenance branches” and other related terms. That information is available under the NetBSD release glossary and graphs.
It is sometimes faster to begin by downloading a source tarball.
You can download tarballs (see tar(1)) from ftp.NetBSD.org
(or any other mirror) for a number of releases or
branches. These tarballs include the CVS
directories, so you can continue to update your source tree using
cvs(1), as explained in the CVS section.
Note that source tarballs for stable branches are only updated every three days.
The source files to a release do not change after the release has been made.
The tarballs for the sources of a specific release are
available under
/pub/NetBSD/NetBSD-
on ftp.NetBSD.org (or a mirror),
where <RELEASE-NUMBER>/source/sets/<RELEASE-NUMBER> is the release you want to
fetch (for example, 10.0).
To fetch the sources of a NetBSD release using tarballs, simply do:
$ftp -i ftp://ftp.NetBSD.org/pub/NetBSD/NetBSD-10.0/source/sets/Trying 2001:470:a085:999::21:21 ... Connected to ftp.NetBSD.org. 220 ftp.NetBSD.org FTP server (NetBSD-ftpd 20180428) ready. 331 Guest login ok, type your name as password. [...] 250 CWD command successful. ftp>mget *.tgzlocal: gnusrc.tgz remote: gnusrc.tgz 229 Entering Extended Passive Mode (|||61968|) 150 Opening BINARY mode data connection for 'gnusrc.tgz' (152604808 bytes). [...] ftp>quit221- 221 Thank you for using the FTP service on ftp.NetBSD.org.
You should now have 5 files:
$ls *.tgzgnusrc.tgz sharesrc.tgz src.tgz syssrc.tgz xsrc.tgz
You now must extract them all:
$for file in *.tgz>do>tar -xzf $file -C />done
$ftp -i ftp://ftp.NetBSD.org/pub/NetBSD/NetBSD-release-10/tar_files/src/Trying 2001:470:a085:999::21:21 ... Connected to ftp.NetBSD.org. 220 ftp.NetBSD.org FTP server (NetBSD-ftpd 20180428) ready. 331 Guest login ok, type your name as password. [...] 250 CWD command successful. ftp>mget *.tar.gzlocal: bin.tar.gz remote: bin.tar.gz 229 Entering Extended Passive Mode (|||56011|) 150 Opening BINARY mode data connection for 'bin.tar.gz' (996075 bytes). [...] ftp>quit221- Data traffic for this session was 429024351 bytes in 25 files. Total traffic for this session was 429035139 bytes in 26 transfers. 221 Thank you for using the FTP service on ftp.NetBSD.org.
You should now have 25 files:
$ls *.tar.gzbin.tar.gz doc.tar.gz libexec.tar.gz tools.tar.gz common.tar.gz etc.tar.gz regress.tar.gz top-level.tar.gz compat.tar.gz external.tar.gz rescue.tar.gz usr.bin.tar.gz config.tar.gz extsrc.tar.gz sbin.tar.gz usr.sbin.tar.gz crypto.tar.gz games.tar.gz share.tar.gz dist.tar.gz include.tar.gz sys.tar.gz distrib.tar.gz lib.tar.gz tests.tar.gz
You now must extract them all:
$for file in *.tar.gz>do>tar -xzf $file -C /usr>done
To download the NetBSD-current tarballs, located under
/pub/NetBSD/NetBSD-current/tar_files/src,
just follow the same steps as in
Section 32.3.2, “Downloading sources for a NetBSD stable branch”, but
using this path.
You may also want to fetch the X Window System sources, available
under:
/pub/NetBSD/NetBSD-current/tar_files/xsrc.
CVS (Concurrent Versions System) can be used to fetch the NetBSD source tree or to keep the NetBSD source tree up to date with respect to changes made to the NetBSD sources. There are two main source modules available through cvs(1), “src” and “xsrc”.
The list of currently maintained branches is available under
src/doc/BRANCHES (see the
“Status” entry on the “Release branches”
section).
Caution!
Be sure to take care in selecting the correct and desired branch tag so you don't accidentally downgrade your source tree.
Before you can do an initial (full) checkout of the NetBSD
sources via anonymous CVS, you
must set the CVSROOT environment variable, which
tells cvs(1) where to fetch the files from:
$export CVSROOT="anoncvs@anoncvs.NetBSD.org:/cvsroot"
Make sure that the environment variable CVS_RSH
is set to “ssh”.
$export CVS_RSH="ssh"
In the examples below, we use the -P option,
which tells CVS to prune empty directories.
The source files to a release do not change after the release has been made.
To get the NetBSD (kernel and userland) sources for a specific
release, run the following command after setting
CVSROOT as shown above:
$cd /usr$cvs checkout -r<TAG>-P src
Where <TAG> is the release tag
to be checked out, e.g., “netbsd-10-0-RELEASE”. If you
want to fetch a later patchlevel, you would use, e.g.,
“netbsd-10-0-RELEASE”.
For example, in order to fetch the sources for NetBSD 10.0, you would use the “netbsd-10-0-RELEASE” tag:
$cvs checkout -r netbsd-10-0-RELEASE -P src
To fetch the X Window System source, just “checkout” the “xsrc” module. For example:
$cvs checkout -r netbsd-10-0-RELEASE -P xsrc
NetBSD stable branches are a flavor of “Maintenance branches”. Please consult the Section 32.2, “Terminology”.
If you want to follow a stable branch, just pass the
branch name to the cvs(1) -r
option.
For example, if you want to fetch the most recent version of “netbsd-9”, you just need to use that tag:
$cd /usr$cvs checkout -r netbsd-9 -P src
And for the “xsrc” module:
$cvs checkout -r netbsd-9 -P xsrc
If you have checked out sources from a stable branch in
/usr/src and want
to update them to get the latest security and bug fixes, run:
$cd /usr/src$cvs update -dP
The same applies to the “xsrc” module, but in
that case you will have to change your working directory to
/usr/xsrc first.
To obtain the NetBSD-current source just omit
“-r <BRANCH>”
and replace it with “-A”:
$cd /usr$cvs checkout -A -P src
The “xsrc” module is obtained the same way:
$cd /usr$cvs checkout -A -P xsrc
To update your NetBSD-current source tree, add the
-A flag:
$cd /usr/src$cvs update -A -dP
The same applies to the “xsrc” module, but in
that case you will have to change your working directory to
/usr/xsrc first.
32.4.4. Saving some cvs(1) options
If you find yourself typing the same options to CVS over and over
again, you may want to make those options the default by adding them
to .cvsrc in your home directory.
In the following example, cvs update will add any
missing newly-added directories to your tree, as well as delete any
newly-empty directories. Also shown are examples of how to make
cvs rdiff and cvs diff use
the unified diff(1) format. The final line in the example
causes CVS to be a bit more quiet in its operation.
Table of Contents
NetBSD uses a framework, build.sh,
to build both the operating system's kernel and the whole userland
for either the same platform as the host machine, or for a different
platform, using cross-compilation.
build.sh will take care of creating all the
tools required to build NetBSD for a given platform, and make them
available ready to use for development work.
In this chapter, we will show how to use
build.sh to first create a toolchain,
including compiler, assembler, linker and so on,
then use it to cross-compile a NetBSD kernel and userspace for
AArch64 on an AMD64 host machine.
While native kernel builds are covered in Chapter 34, Compiling the kernel, using the build.sh
script is generally preferred for building the entire of NetBSD.
Before starting, we have placed the sources in a subdirectory
of our user's home directory: /home/nia/cvs/src.
While /usr/src is the traditional location for
NetBSD sources, as described in
Chapter 32, Obtaining the sources, we would like to build the operating
system as an unprivileged (non-root) user.
A more detailed description of the build.sh
framework can be found in Luke Mewburn and Matthew Green's
paper
and their
presentation
from BSDCon 2003 as well as in
/usr/src/BUILDING.
The first step to do cross-development is to get all the necessary tools available. In NetBSD terminology, this is called the "toolchain", and it includes BSD-compatible make(1), C/C++ compilers, linker, assembler, config(8), as well as a fair number of tools that are only required when crosscompiling a full NetBSD release, which we won't cover here.
The command to create the toolchain is quite simple, using
NetBSD's src/build.sh script. Please note
that all the commands here can be run as normal (non-root) user:
$cd /home/nia/cvs/src$./build.sh -U -O ~/obj -j2 -m evbarm -a aarch64 tools
The "-U" option indicates we are doing an unprivileged build, as a non-root user, typically with the source code located somewhere other than
/usr/srcThe "-O" option specifies the directory to use for compiled object files.
The "-j2" option specifies the number of parallel builds to run. You may wish to set this to the number of CPU cores on your host system.
-
The "-m evbarm -a aarch64" options indicate we are building for a machine type of evbarm with a CPU type of aarch64. You can list the available machines and CPU types:
$./build.sh list-arch
If the tools have been built previously and they only need to be updated, then the update option "-u" can be used to only rebuild tools that have changed:
$./build.sh -U -u -O ~/obj -j2 -m evbarm -a aarch64 tools
When the tools are built, information about them and several environment variables is printed out:
===> Tools built to /home/nia/obj/tooldir.NetBSD-9.99.81-amd64
===> build.sh ended: Sun Apr 18 12:10:58 CEST 2021
===> Summary of results:
build.sh command: ./build.sh -U -u -O /home/nia/obj -j2 -m evbarm -a aarch64 tools
build.sh started: Sun Apr 18 11:17:46 CEST 2021
NetBSD version: 9.99.81
MACHINE: evbarm
MACHINE_ARCH: aarch64
Build platform: NetBSD 9.99.81 amd64
HOST_SH: /bin/sh
No $TOOLDIR/bin/nbmake, needs building.
Bootstrapping nbmake
MAKECONF file: /etc/mk.conf
TOOLDIR path: /home/nia/obj/tooldir.NetBSD-9.99.81-amd64
DESTDIR path: /home/nia/obj/destdir.evbarm
RELEASEDIR path: /home/nia/obj/releasedir
Created /home/nia/obj/tooldir.NetBSD-9.99.81-amd64/bin/nbmake
Updated makewrapper: /home/nia/obj/tooldir.NetBSD-9.99.81-amd64/bin/nbmake-evbarm
Tools built to /home/nia/obj/tooldir.NetBSD-9.99.81-amd64
build.sh ended: Sun Apr 18 12:10:58 CEST 2021
During the build, object directories are used consistently, i.e. special directories are kept that keep the platform-specific object files and compile results. In our example, they will be kept in directories named "obj.evbarm" as we build for AArch64 as target platform.
The toolchain itself is part of this, but as it's hosted and compiled for an amd64 system, it will get placed in its own directory indicating where to cross-build from. Here's where our toolchain is located:
$pwd/home/nia/cvs/src$ls -d ~/obj/tooldir*/home/nia/obj/tooldir.NetBSD-9.99.81-amd64
So, the general rule of thumb is for a given "host" and "target" system combination, the cross-compiler will be placed in the "tooldir.host" directory by default. A full list of all tools created for cross-compiling the whole NetBSD operating system includes:
$ls ~/obj/tooldir.NetBSD-9.99.81-amd64/binaarch64--netbsd-addr2line nbconfig nbmkcsmapper aarch64--netbsd-ar nbcrunchgen nbmkdep aarch64--netbsd-as nbctags nbmkesdb aarch64--netbsd-c++ nbctfconvert nbmklocale aarch64--netbsd-c++filt nbctfmerge nbmknod aarch64--netbsd-cpp nbcvslatest nbmktemp aarch64--netbsd-dbsym nbdb nbmkubootimage aarch64--netbsd-elfedit nbdisklabel nbmsgc aarch64--netbsd-fdisk nbdtc nbmtree aarch64--netbsd-g++ nbeqn nbnroff aarch64--netbsd-gcc nbfile nbpax aarch64--netbsd-gcc-9.3.0 nbgenassym nbpaxctl aarch64--netbsd-gcc-ar nbgencat nbperf aarch64--netbsd-gcc-nm nbgmake nbpic aarch64--netbsd-gcc-ranlib nbgpt nbpwd_mkdb aarch64--netbsd-gcov nbgrep nbrefer aarch64--netbsd-gcov-dump nbgroff nbrpcgen aarch64--netbsd-gcov-tool nbhexdump nbsed aarch64--netbsd-install nbhost-mkdep nbslc aarch64--netbsd-ld nbindxbib nbsoelim aarch64--netbsd-ld.bfd nbinstall-info nbsortinfo aarch64--netbsd-mdsetimage nbinstallboot nbstat aarch64--netbsd-nm nbjoin nbstrfile aarch64--netbsd-objcopy nblex nbsunlabel aarch64--netbsd-objdump nbllvm-tblgen nbtbl aarch64--netbsd-ranlib nblorder nbtexi2dvi aarch64--netbsd-readelf nbm4 nbtexi2pdf aarch64--netbsd-size nbmake nbtexindex aarch64--netbsd-strings nbmake-evbarm nbtic aarch64--netbsd-strip nbmakefs nbtsort nbasn1_compile nbmakeinfo nbuudecode nbawk nbmakekeys nbxz nbcap_mkdb nbmakestrs nbyacc nbcat nbmakewhatis nbzic nbcksum nbmandoc nbcompile_et nbmenuc
As you can see, most of the tools that are available native on NetBSD are present with some program prefix to identify the target platform for tools that are specific to a certain target platform.
One important tool that should be pointed out here is "nbmake-evbarm". This is a shell wrapper for a BSD compatible make(1) command that's setup to use all the right commands from the cross-compilation toolchain. Using this wrapper instead of /usr/bin/make allows crosscompiling programs that were written using the NetBSD Makefile infrastructure (see src/share/mk). We will use this make(1) wrapper in a second to cross compile the kernel!
Now that we have a working toolchain available, the "usual" steps for building a kernel are needed - create a kernel config file, run config(1), then build. As the config(1) program used to create header files and Makefile for a kernel build is platform specific, we need to use the "nbconfig" program that's part of our new toolchain. That aside, the procedure is just as like compiling a "native" NetBSD kernel. Commands involved here are:
$cd /home/nia/cvs/src/sys/arch/evbarm/conf$cp GENERIC64MYKERNEL$viMYKERNEL$/home/nia/obj/tooldir.NetBSD-9.99.81-amd64/bin/nbconfigMYKERNEL
That's all. This command has created a directory
../compile/
with a number of header files defining information about devices
to compile into the kernel, a Makefile that is setup to build
all the needed files for the kernel, and link them together.MYKERNEL
We have all the files and tools available to crosscompile our
AArch64-based kernel from our Intel-based host system, so
let's get to it! After changing in the directory created in the
previous step, we need to use the toolchain's
nbmake-evbarm shell wrapper, which just
calls make(1) with all the necessary settings for crosscompiling
for an AArch64 platform:
$cd ../compile/MYKERNEL/$/home/nia/obj/tooldir.NetBSD-9.99.81-amd64/bin/nbmake-evbarm depend$/home/nia/obj/tooldir.NetBSD-9.99.81-amd64/bin/nbmake-evbarm
This will churn away a bit, then spit out a kernel:
... text data bss dec hex filename 11131832 3627920 1738912 16498664 fbbfe8 netbsd ...$ls -lh netbsd-rwxr-xr-x 1 nia wheel 16M Apr 18 12:46 netbsd$file netbsdnetbsd: ELF 64-bit LSB executable, ARM aarch64, version 1 (SYSV), statically linked, for NetBSD 9.99.81, not stripped
Note
Since we are building for AArch64, a few other kernel images
in different formats were built, including netbsd.img
and netbsd.bin for the U-Boot /boot
partition. On systems with more standard boot procedures, you only need to
worry about netbsd.
Now the kernel in the file netbsd can
be transferred to a machine (via scp, rsync, etc.) and booted.
After configuring and crosscompiling the kernel, the next
logical step is to crosscompile the whole system, and bring it
into a distribution-ready format. Before doing so, an
alternative approach to crosscompiling a kernel will be shown
in the next section, using the build.sh
script to do configuration and crosscompilation of the kernel
in one step.
A cross compiled kernel can be done manually as described in
the previous sections, or by the easier method of using
build.sh, which will be shown here.
Preparation of the kernel config file is the same as described above:
$cd /home/nia/cvs/src/sys/arch/evbarm/conf$cp GENERIC64MYKERNEL$viMYKERNEL
Then edit MYKERNEL and once finished,
all that needs to be done is
to use build.sh to build the kernel
(it will also configure it, running the steps shown above):
$cd /home/nia/cvs/src$./build.sh -U -u -j2 -O ~/obj -m evbarm -a aarch64 kernel=MYKERNEL
Notice that update ("-u") was specified, the tools are
already built, there
is no reason to rebuild all of the tools. Once the kernel is built,
build.sh will print its location,
along with other information:
...
===> Summary of results:
build.sh command: ./build.sh -O /home/nia/obj -U -u -j2 -m evbarm -a aarch64 kernel=MYKERNEL
build.sh started: Sun Apr 18 12:25:16 CEST 2021
NetBSD version: 9.99.81
MACHINE: evbarm
MACHINE_ARCH: aarch64
Build platform: NetBSD 9.99.81 amd64
HOST_SH: /bin/sh
MAKECONF file: /etc/mk.conf
TOOLDIR path: /home/nia/obj/tooldir.NetBSD-9.99.81-amd64
DESTDIR path: /home/nia/obj/destdir.evbarm
RELEASEDIR path: /home/nia/obj/releasedir
Updated makewrapper: /home/nia/obj/tooldir.NetBSD-9.99.81-amd64/bin/nbmake-evbarm
Building kernel without building new tools
Building kernel: MYKERNEL
Build directory: /home/nia/obj/sys/arch/evbarm/compile/MYKERNEL
Kernels built from MYKERNEL:
/home/nia/obj/sys/arch/evbarm/compile/MYKERNEL/netbsd
build.sh ended: Sun Apr 18 12:46:26 CEST 2021
===> .
The path to the kernel built is of interest here:
/home/nia/obj/sys/arch/evbarm/compile/,
it can be used the same way as described above.MYKERNEL/netbsd
By now it is probably becoming clear that the toolchain actually
works in stages. First the toolchain is built, then a
kernel. Since build.sh will attempt to
rebuild the tools at every invocation, using “update”
saves time. It is probably also clear that outside of a few options,
the build.sh semantics are basically
build.sh command.
So, it stands to reason that
building the whole userland and/or a release is a matter of
using the right commands.
It should be no surprise that building and creating a release would look like the following:
$./build.sh -U -u -j2 -O ~/obj -m evbarm -a aarch64 release
These commands will compile the full NetBSD userland and put it into the destination object directory, and then build a release from it in a release subdirectory.
The NetBSD project has its own copy of the X Window System's which contains changes to make X function well on as many of the platforms supported by NetBSD as possible. Due to this, it is desirable to use the X Window System version available from and for NetBSD, which can also be crosscompiled much like the kernel and base system. To do so, the "xsrc" sources must be checked out from CVS into just as "src" and "pkgsrc" were as described in Chapter 32, Obtaining the sources.
After this, X can be crosscompiled for the target platform by
adding the -x switch to build.sh, e.g. when creating
a full release:
$./build.sh -U -u -O ~/obj -j2 -x -X /home/nia/cvs/xsrc -m evbarm -a aarch64 release
The -x option automatically sets
the variable to build X11, and -X
points to the directory containing the X11 sources.
The build system has a lot of variables that can be used to direct
things like where certain files go, what (if any) tools are used
and so on. A look in src/BUILDING covers
most of them. In this section some examples of changing default
settings are given, each following its own ways.
Many people like to track NetBSD-current and perform cross compiles of architectures that they use. The logic for this is simple, sometimes a new feature or device becomes available and someone may wish to use it. By keeping track of changes and building every now and again, one can be assured that these architectures can build their own release.
It is reasonable to assume that if one is tracking and building for more than one architecture, they might want to keep the builds in a different location than the default. There are two ways to go about this, either use a script to set the new DESTDIR, or simply do so interactively. In any case, it can be set the same way as any other variable (depending on your shell of course).
For sh(1), or ksh(1), this is:
$export DESTDIR=/usr/builds/evbarm-aarch64
For csh(1), the command is:
$setenv DESTDIR /usr/builds/evbarm-aarch64
Simple enough. When the build is run, the binaries and
files will be sent to /usr/builds.
The NetBSD toolchain builds and links against shared libraries
by default. Many users still prefer to be able to link
statically. Sometimes a small system can be created without
having shared libraries, which is a good example of doing a
full static build. If a particular build machine will always
need one environment variable set in a particular way, then it
is easiest to simply add the changed setting to
/etc/mk.conf.
To make sure a build box always builds statically, simply
add the following line to
/etc/mk.conf:
LDSTATIC=-static
Besides variables in environment and
/etc/mk.conf, the build process can be
influenced by a number of switches to the
build.sh script itself, as we have
already seen when forcing unprivileged (non-root) builds,
selecting the target architecture or preventing deletion of
old files before the build. All these options can be
listed by running build.sh -h:
$cd /home/nia/cvs/src$build.sh -hUsage: build.sh [-EhnoPRrUuxy] [-a arch] [-B buildid] [-C cdextras] [-c compiler] [-D dest] [-j njob] [-M obj] [-m mach] [-N noisy] [-O obj] [-R release] [-S seed] [-T tools] [-V var=[value]] [-w wrapper] [-X x11src] [-Y extsrcsrc] [-Z var] operation [...] Build operations (all imply "obj" and "tools"): build Run "make build". distribution Run "make distribution" (includes DESTDIR/etc/ files). release Run "make release" (includes kernels & distrib media). Other operations: help Show this message and exit. makewrapper Create nbmake-${MACHINE} wrapper and nbmake. Always performed. cleandir Run "make cleandir". [Default unless -u is used] dtb Build devicetree blobs. obj Run "make obj". [Default unless -o is used] tools Build and install tools. install=idir Run "make installworld" to `idir' to install all sets except `etc'. Useful after "distribution" or "release" kernel=conf Build kernel with config file `conf' kernel.gdb=conf Build kernel (including netbsd.gdb) with config file `conf' releasekernel=conf Install kernel built by kernel=conf to RELEASEDIR. kernels Build all kernels installmodules=idir Run "make installmodules" to `idir' to install all kernel modules. modules Build kernel modules. rumptest Do a linktest for rump (for developers). sets Create binary sets in RELEASEDIR/RELEASEMACHINEDIR/binary/sets. DESTDIR should be populated beforehand. distsets Same as "distribution sets". sourcesets Create source sets in RELEASEDIR/source/sets. syspkgs Create syspkgs in RELEASEDIR/RELEASEMACHINEDIR/binary/syspkgs. iso-image Create CD-ROM image in RELEASEDIR/images. iso-image-source Create CD-ROM image with source in RELEASEDIR/images. live-image Create bootable live image in RELEASEDIR/RELEASEMACHINEDIR/installation/liveimage. install-image Create bootable installation image in RELEASEDIR/RELEASEMACHINEDIR/installation/installimage. disk-image=target Create bootable disk image in RELEASEDIR/RELEASEMACHINEDIR/binary/gzimg/target.img.gz. params Display various make(1) parameters. list-arch Display a list of valid MACHINE/MACHINE_ARCH values, and exit. The list may be narrowed by passing glob patterns or exact values in MACHINE or MACHINE_ARCH. Options: -a arch Set MACHINE_ARCH to arch. [Default: deduced from MACHINE] -B buildid Set BUILDID to buildid. -C cdextras Append cdextras to CDEXTRA variable for inclusion on CD-ROM. -c compiler Select compiler: clang gcc [Default: gcc] -D dest Set DESTDIR to dest. [Default: destdir.MACHINE] -E Set "expert" mode; disables various safety checks. Should not be used without expert knowledge of the build system. -h Print this help message. -j njob Run up to njob jobs in parallel; see make(1) -j. -M obj Set obj root directory to obj; sets MAKEOBJDIRPREFIX. Unsets MAKEOBJDIR. -m mach Set MACHINE to mach. Some mach values are actually aliases that set MACHINE/MACHINE_ARCH pairs. [Default: deduced from the host system if the host OS is NetBSD] -N noisy Set the noisyness (MAKEVERBOSE) level of the build: 0 Minimal output ("quiet") 1 Describe what is occurring 2 Describe what is occurring and echo the actual command 3 Ignore the effect of the "@" prefix in make commands 4 Trace shell commands using the shell's -x flag [Default: 2] -n Show commands that would be executed, but do not execute them. -O obj Set obj root directory to obj; sets a MAKEOBJDIR pattern. Unsets MAKEOBJDIRPREFIX. -o Set MKOBJDIRS=no; do not create objdirs at start of build. -P Set MKREPRO and MKREPRO_TIMESTAMP to the latest source CVS timestamp for reproducible builds. -R release Set RELEASEDIR to release. [Default: releasedir] -r Remove contents of TOOLDIR and DESTDIR before building. -S seed Set BUILDSEED to seed. [Default: NetBSD-majorversion] -T tools Set TOOLDIR to tools. If unset, and TOOLDIR is not set in the environment, nbmake will be (re)built unconditionally. -U Set MKUNPRIVED=yes; build without requiring root privileges, install from an UNPRIVED build with proper file permissions. -u Set MKUPDATE=yes; do not run "make cleandir" first. Without this, everything is rebuilt, including the tools. -V var=[value] Set variable `var' to `value'. -w wrapper Create nbmake script as wrapper. [Default: ${TOOLDIR}/bin/nbmake-${MACHINE}] -X x11src Set X11SRCDIR to x11src. [Default: /usr/xsrc] -x Set MKX11=yes; build X11 from X11SRCDIR -Y extsrcsrc Set EXTSRCSRCDIR to extsrcsrc. [Default: /usr/extsrc] -y Set MKEXTSRC=yes; build extsrc from EXTSRCSRCDIR -Z var Unset ("zap") variable `var'.
As can be seen, a number of switches can be set to change the standard build behaviour. A number of them has already been introduced, others can be set as appropriate.
33.7.4. make(1) variables used during build
Several variables control the behaviour of NetBSD builds.
Unless otherwise specified, these variables may be set in
either the process environment or in the make(1)
configuration file specified by MAKECONF.
For a definitive list of these options, see
BUILDING and
share/mk/bsd.README files in the
toplevel source directory.
- BUILDID
Identifier for the build. The identifier will be appended to object directory names, and can be consulted in the make(1) configuration file in order to set additional build parameters, such as compiler flags.
- DESTDIR
-
Directory to contain the built NetBSD system. If set, special options are passed to the compilation tools to prevent their default use of the host system's
/usr/include,/usr/lib, and so forth. This pathname should not end with a slash (/) character (For installation into the system's root directory, setDESTDIRto an empty string). The directory must reside on a filesystem which supports long filenames and hard links.Defaults to an empty string if
USETOOLSis “yes”; unset otherwise. Note:build.shwill provide a default (destdir.MACHINE in the top-level.OBJDIR) unless run in “expert” mode. - EXTERNAL_TOOLCHAIN
-
If defined by the user, points to the root of an external toolchain (e.g.
/usr/local/gnu). This enables the cross-build framework even when default toolchain is not available (seeTOOLCHAIN_MISSINGbelow).Default: Unset
- MAKEVERBOSE
-
The verbosity of build messages. Supported values:
0 No descriptive messages are shown. 1 Descriptive messages are shown. 2 Descriptive messages are shown (prefixed with a '#') and command output is not suppressed. Default: 2
- MKCATPAGES
-
Can be set to “yes” or “no”. Indicates whether preformatted plaintext manual pages will be created during a build.
Default: “yes”
- MKDOC
-
Can be set to “yes” or “no”. Indicates whether system documentation destined for
DESTDIR/usr/share/docwill be installed during a build.Default: “yes”
- MKHOSTOBJ
-
Can be set to “yes” or “no”. If set to “yes”, then for programs intended to be run on the compile host, the name, release and architecture of the host operating system will be suffixed to the name of the object directory created by “make obj”. This allows for multiple host systems to compile NetBSD for a single target. If set to “no”, then programs built to be run on the compile host will use the same object directory names as programs built to be run on the target.
Default: “no”
- MKINFO
-
Can be set to “yes” or “no”. Indicates whether GNU info files, used for the documentation of most of the compilation tools, will be created and installed during a build.
Default: “yes”
- MKLINT
-
Can be set to “yes” or “no”. Indicates whether lint(1) will be run against portions of the NetBSD source code during the build, and whether lint libraries will be installed into
DESTDIR/usr/libdata/lintDefault: “yes”
- MKMAN
-
Can be set to “yes” or “no”. Indicates whether manual pages will be installed during a build.
Default: “yes”
- MKNLS
-
Can be set to “yes” or “no”. Indicates whether Native Language System locale zone files will be compiled and installed during a build.
Default: “yes”
- MKOBJ
-
Can be set to “yes” or “no”. Indicates whether object directories will be created when running “make obj”. If set to “no”, then all built files will be located inside the regular source tree.
Default: “yes”
- MKPIC
-
Can be set to “yes” or “no”. Indicates whether shared objects and libraries will be created and installed during a build. If set to “no”, the entire build will be statically linked.
Default: Platform dependent. As of this writing, all platforms except sh3 default to “yes”
- MKPICINSTALL
-
Can be set to “yes” or “no”. Indicates whether the ar(1) format libraries (
lib*_pic.a), used to generate shared libraries, are installed during a build.Default: “yes”
- MKPROFILE
-
Can be set to “yes” or “no”. Indicates whether profiled libraries (
lib*_p.a) will be built and installed during a build.Default: “yes”; however, some platforms turn off
MKPROFILEby default at times due to toolchain problems with profiled code. - MKSHARE
-
Can be set to “yes” or “no”. Indicates whether files destined to reside in
DESTDIR/usr/sharewill be built and installed during a build. If set to “no”, then all ofMKCATPAGES,MKDOC,MKINFO,MKMANandMKNLSwill be set to “no” unconditionally.Default: “yes”
- MKTTINTERP
-
Can be set to “yes” or “no”. For X builds, decides if the TrueType bytecode interpreter is turned on. See freetype.org for details.
Default: “no”
- MKUNPRIVED
-
Can be set to “yes” or “no”. Indicates whether an unprivileged install will occur. The user, group, permissions and file flags will not be set on the installed items; instead the information will be appended to a file called
METALOGinDESTDIR. The contents ofMETALOGare used during the generation of the distribution tar files to ensure that the appropriate file ownership is stored.Default: “no”
- MKUPDATE
-
Can be set to “yes” or “no”. Indicates whether all install operations intended to write to
DESTDIRwill compare file timestamps before installing, and skip the install phase if the destination files are up-to-date. This also has implications on full builds (See below).Default: “no”
- MKLLVM
-
Can be set to “yes” or “no”. Indicates whether Clang should be built and installed as the host compiler.
Default: “no”
- MKX11
-
Can be set to “yes” or “no”. Indicates whether X11 is built from
X11SRCDIR.Default: “yes”
- TOOLDIR
-
Directory to hold the host tools, once built. This directory should be unique to a given host system and NetBSD source tree. (However, multiple targets may share the same
TOOLDIR; the target-dependent files have unique names). If unset, a default based on the uname(1) information of the host platform will be created in the.OBJDIRofsrc.Default: Unset.
- USETOOLS
-
Indicates whether the tools specified by
TOOLDIRshould be used as part of a build in progress. Must be set to “yes” if cross-compiling.yes Use the tools from TOOLDIR.no Do not use the tools from TOOLNAME, but refuse to build native compilation tool components that are version-specific for that tool.never Do not use the tools from TOOLNAME, even when building native tool components. This is similar to the traditional NetBSD build method, but does not verify that the compilation tools in use are up-to-date enough in order to build the tree successfully. This may cause build or runtime problems when building the whole NetBSD source tree.Default: “yes” if building all or part of a whole NetBSD source tree (detected automatically); “no” otherwise (to preserve traditional semantics of the
bsd.*.mkmake(1) include files). - X11SRCDIR
-
Directory containing the X11 source.
Default: “usr/xsrc”
The following variables only affect the top level
Makefile and do not affect manually building
subtrees of the NetBSD source code.
- INSTALLWORLDDIR
-
Location for the “make installworld” target to install to.
Default: “/”
- MKOBJDIRS
-
Can be set to “yes” or “no”. Indicates whether object directories will be created automatically (via a “make obj” pass) at the start of a build.
Default: “no”
- MKUPDATE
-
Can be set to “yes” or “no”. If set, then addition to the effects described for
MKUPDATE=yesabove, this implies the effect ofNOCLEANDIR(i.e., “make cleandir” is avoided).Default: “no”
- NOCLEANDIR
-
If set, avoids the “make cleandir” phase of a full build. This has the effect of allowing only changed files in a source tree to recompiled. This can speed up builds when updating only a few files in the tree.
Default: Unset
- NODISTRIBDIRS
-
If set, avoids the “make distrib-dirs” of a full build. This skips running mtree(8) on
DESTDIR, useful on systems where building as an unprivileged user, or where it is known that the system wide mtree files have not changed.Default: Unset
- NOINCLUDES
-
If set, avoids the “make includes” phase of a full build. This has the effect of preventing make(1) from thinking that some programs are out-of-date simply because system include files have changed. However, this option should not be trusted when updating the entire NetBSD source tree arbitrarily; it is suggested to use
MKUPDATE=yesin that case.Default: Unset
- RELEASEDIR
-
If set, specifies the directory to which a release(7) layout will be written at the end of a “make release”.
Default: Unset
- TOOLCHAIN_MISSING
-
Set to “yes” on platforms for which there is no working in-tree toolchain, or if you need/wish using native system toolchain (i.e. non-cross tools available via your shell search path).
Default: depends on target platform; on platforms with in-tree toolchain is set to “no”.
Table of Contents
There are several reasons you might want to compile a NetBSD kernel:
you can install bug-fixes, security updates, or new functionality by rebuilding the kernel from updated sources.
by removing unused device drivers and kernel sub-systems from your configuration, you can dramatically reduce kernel size and, therefore, memory usage and attack surface. Care must be taken when doing this, since it can result in an unusable system. Always back up old working kernels.
you can access additional features by enabling kernel options or sub-systems, some of which are experimental or disabled by default.
you can get a deeper knowledge of the system.
To recompile the kernel you must have installed the compiler set
(comp.tgz).
The basic steps to an updated or customised kernel then are:
Install or update the kernel sources
Create or modify the kernel configuration file
Building the kernel from the configuration file, either manually or using build.sh
Install the kernel
If you chose to use AnonCVS to fetch the entire source tree, be patient, the operation can last many minutes, because the repository contains thousands of files.
If you have a source tarball, you can extract it as root:
#cd /#tar zxf /path/to/syssrc.tgz
Even if you used the tarball from the release, you may wish to use AnonCVS to update the sources with changes that have been applied since the release. This might be especially relevant if you are updating the kernel to include the fix for a specific bug, including a vulnerability described in a NetBSD Security Advisory. You might want to get the latest sources on the relevant release or critical updates branch for your version, or Security Advisories will usually contain information on the dates or revisions of the files containing the specific fixes concerned. See Section 32.4, “Fetching by CVS” for more details on the CVS commands used to update sources from these branches.
Once you have the sources available, you can create a custom kernel: this is not as difficult as you might think. In fact, a new kernel can be created in a few steps which will be described in the following sections.
Note
The directories described in this section are amd64
specific. Users of other architectures must substitute the
appropriate directories, see the subdirectories of
src/sys/arch for a list.
The kernel configuration file defines the type, the number and
the characteristics of the devices supported by the kernel as
well as several kernel configuration options. For the amd64
port, kernel configuration files are located in the
/usr/src/sys/arch/amd64/conf directory.
Please note that the names of the kernel configuration files are historically in all uppercase, so they are easy to distinguish from other files in that directory:
$cd /usr/src/sys/arch/amd64/conf/$lsALL INSTALL XEN3_DOM0 kern.ldscript.kaslr CVS INSTALL_XEN3_DOMU XEN3_DOMU majors.amd64 GENERIC MODULAR files.amd64 std.amd64 GENERIC_KASLR Makefile.amd64 kern.ldscript std.xen GENERIC_USERMODE NOCOMPAT kern.ldscript.Xen
The easiest way to create a new file is to copy an existing one and modify it. Usually the best choice on most platforms is the GENERIC configuration, as it contains most drivers and options. In the configuration file there are comments describing the options; a more detailed description is found in the options(4) man page. So, the usual procedure is:
$cp GENERICMYKERNEL$viMYKERNEL
The modification of a kernel configuration file basically involves three operations:
support for hardware devices is included/excluded in the kernel (for example, SCSI support can be removed if it is not needed.)
support for kernel features is enabled/disabled (for example, enable NFS client support, enable Linux compatibility, ...)
tuning kernel parameters.
Lines beginning with “#” are comments; lines are disabled by commenting them and enabled by removing the comment character. It is better to comment lines instead of deleting them; it is always possible uncomment them later.
The output of the dmesg(8) command can be used to determine which lines can be disabled. For each line of the type:
XXXatYYY
both XXX and
YYY must be active in the kernel
configuration file.
You'll probably have to experiment a bit before achieving a minimal
configuration but on a desktop system without SCSI and PCMCIA you can
halve the kernel size.
You could also examine the options in the configuration file and disable the ones that you don't need. Each option has a short comment describing it, which is normally sufficient to understand what the option does. Many options have a longer and more detailed description in the options(4) man page.
Based on your kernel configuration file, either one of the standard configurations or your customised configuration, a new kernel must be built.
These steps can either be performed manually, or using the
build.sh command that was introduced
in section Chapter 33, Crosscompiling NetBSD with build.sh.
This section will give instructions on how to build a native
kernel using manual steps, the following section Section 34.5, “Building the kernel using build.sh” describes how to use
build.sh to do the same.
Configure the kernel
Generate dependencies
Compile the kernel
When you've finished modifying the kernel configuration file (which
we'll call MYKERNEL), you should issue the
following command:
$config MYKERNEL
If MYKERNEL contains no errors, the
config(1) program will create the necessary files for
the compilation of the kernel, otherwise it will be necessary to correct
the errors before running config(1) again.
Notes for cross-compiling
As the config(1) program used to create header files and Makefile for a kernel build is platform specific, it is necessary to use the nbconfig program that's part of a newly created toolchain (created for example with
/usr/src/build.sh -m sparc64 tools
). That aside, the procedure is just as like compiling a "native" NetBSD kernel. The command is for example:
%/usr/src/tooldir.NetBSD-9.0-amd64/bin/nbconfigMYKERNEL
This command has created a directory
../compile/
with a number of header files defining information about devices
to compile into the kernel, a Makefile that is setup to build
all the needed files for the kernel, and link them together.MYKERNEL
Dependencies generation and kernel compilation is performed by the following commands:
$cd ../compile/MYKERNEL$make depend$make
It can happen that the compilation stops with errors; there can be a variety of reasons but the most common cause is an error in the configuration file which didn't get caught by config(1). Sometimes the failure is caused by a hardware problem (often faulty RAM chips): the compilation puts a higher stress on the system than most applications do. Another typical error is the following: option B, active, requires option A which is not active. A full compilation of the kernel can last from some minutes to several hours, depending on the hardware.
The result of a successful make command is the
netbsd file in the compile directory, ready
to be installed.
Notes for cross-compiling
For crosscompiling a sparc64 kernel, it is necessary to use the
crosscompiler toolchain's nbmake-sparc64 shell
wrapper, which calls make(1) with all the necessary settings for
crosscompiling for a sparc64 platform:
%cd ../compile/MYKERNEL/%/usr/src/tooldir.NetBSD-9.0-amd64/bin/nbmake-sparc64 depend%/usr/src/tooldir.NetBSD-9.0-amd64/bin/nbmake-sparc64
This will churn away a bit, then spit out a kernel:
... text data bss dec hex filename 5016899 163728 628752 5809379 58a4e3 netbsd%ls -l netbsd-rwxr-xr-x 1 feyrer 666 5874663 Dec 2 23:17 netbsd%file netbsdnetbsd: ELF 64-bit MSB executable, SPARC V9, version 1 (SYSV), statically linked, not stripped
Now the kernel in the file netbsd can
either be transferred to an UltraSPARC machine (via NFS, FTP,
scp, etc.) and booted from a possible harddisk, or directly from
the cross-development machine using NFS.
After creating and possibly editing the kernel config file, the
manual steps of configuring the kernel, generating dependencies
and recompiling can also be done using the
src/build.sh script, all in one go:
$cd /usr/src$./build.sh kernel=MYKERNEL
This will perform the same steps as above, with one small
difference: before compiling, all old object files will be
removed, to start with a fresh build. This is usually overkill,
and it's fine to keep the old file and only rebuild the ones
whose dependencies have changed. To do this, add the
-u option to build.sh:
$cd /usr/src$./build.sh -u kernel=MYKERNEL
At the end of its job, build.sh will print
out the location where the new compiled kernel can be found. It
can then be installed.
Whichever method was used to produce the new kernel file, it must now be installed. The new kernel file should be copied to the root directory, after saving the previous version.
#mv /netbsd /netbsd.old#mv netbsd /
Customization can considerably reduce the kernel's size.
In the following example netbsd.old is the
install kernel and netbsd is the new kernel.
-rwxr-xr-x 3 root wheel 3523098 Dec 10 00:13 /netbsd -rwxr-xr-x 3 root wheel 7566271 Dec 10 00:13 /netbsd.old
The new kernel is activated after rebooting:
#shutdown -r now
When the computer is restarted it can happen that the new kernel doesn't work as expected or even doesn't boot at all. Don't worry: if this happens, just reboot with the previously saved kernel and remove the new one (it is better to reboot “single user”):
Reboot the machine
-
Press the space bar at the boot prompt during the 5 seconds countdown
boot: -
Type
>boot netbsd.old -s -
Now issue the following commands to restore the previous version of the kernel:
#fsck /#mount /#mv netbsd.old netbsd#reboot
This will give you back the working system you started with, and you can revise your custom kernel config file to resolve the problem. In general, it's wise to start with a GENERIC kernel first, and then make gradual changes.
Table of Contents
A common mechanism for upgrading a NetBSD system to a newer version is by rebuilding the system from sources and installing the results. This works both for stable releases such as NetBSD 10.0 and for NetBSD-current. In particular, if you are running a stable NetBSD release in a production environment, you are encouraged to perform this procedure regularly in order to incorporate any security fixes that have been applied to the branch since its release.
There are a variety of ways of achieving the goal of rebuilding NetBSD from source, and this chapter will guide you through the variety of options that are available. The chapter starts by showing first what the manual procedure looks like, and proceeds to describe some of automation tools that simplify the process.
Note
Please remember to check src/UPDATING for the latest changes and special instructions that may be involved in upgrading the system.
Most of the following steps can be done as ordinary user.
Only the installation of a new kernel and the userland will require
root privileges.
Although /usr is choosen as the working
directory in the following examples, the procedure can also
take place in a user's home directory. Ordinary users have normally not
the permissions to make changes in /usr,
but this can be changed by root.
Having up-to-date sources is a prerequisite for the following steps. Section 32.4, “Fetching by CVS” informs about the ways to retrieve or update the sources for a release, stable or current branch (using CVS).
Please always refer to the output of build.sh -h
and the files UPDATING and
BUILDING for details - it's worth
it, there are many options that can
be set on the command line or in
/etc/mk.conf
The first step is to build the userland:
$cd /usr/src$./build.sh -O ../obj -T ../tools -U distribution
The next step will build the kernel:
$cd /usr/src$./build.sh -O ../obj -T ../tools -U kernel=<KERNEL>
Installing the new kernel, rebooting (to ensure that the new kernel works) and installing the new userland are the final steps of the updating procedure:
$cd /usr/src$su#mv /netbsd /netbsd.old#mv /usr/obj/sys/arch/<ARCH>/compile/<KERNEL>/netbsd /#shutdown -r now...$cd /usr/src$su#./build.sh -O ../obj -T ../tools -U install=/
If the new kernel netbsd does not boot
successfully, you can fall back on booting the
netbsd.old kernel.
Updating your system's configuration files is done in two steps. First, postinstall(8) is used to check and fix things that can be easily automated. Afterwards, etcupdate(8) is used to merge the remaining configuration file changes.
#/usr/sbin/postinstall -s /usr/src check#/usr/sbin/postinstall -s /usr/src fix#/usr/sbin/etcupdate -s /usr/src
Optionally reboot to ensure all running services are using the new binaries:
#shutdown -r now
-
From the root of the source tree:
$cd /usr/src -
Build the userland:
$./build.sh -O ../obj -T ../tools -U -u distribution -
Build the kernel:
$./build.sh -O ../obj -T ../tools -U -u kernel=GENERIC -
Install the kernel:
$cd ../obj/sys/arch/<ARCH>/compile/GENERIC$su#mv /netbsd /netbsd.old#cp netbsd /netbsd -
Reboot into the new kernel:
#shutdown -r now -
Install the new userland:
$cd /usr/src$su#./build.sh -O ../obj -T ../tools -U install=/ -
Update the system and configuration files;:
#/usr/sbin/etcupdate -s /usr/src
Note
In the procedure above, the -u option indicates an update process,
and that a make clean operation should not be run before starting the build. This is
useful when doing an update from a previous build and/or a fresh build. The
-U option allows the entire build by a non-root user
followed with an install by root.
It is also possible to use sysinst to install a freshly
built system. The steps are as follows:
-
Build a complete release:
$./build.sh -O ../obj -T ../tools -U -u -x release The resulting install sets will be in the
/usr/obj/releasedir/directory.Copy the install kernel to the root directory of your NetBSD system, reboot from it, and upgrade with
sysinst(see Chapter 4, Upgrading NetBSD).
The sysbuild and
sysupgrade tools (currently available in
pkgsrc/sysutils/sysbuild and
pkgsrc/sysutils/sysupgrade respectively) automate
the full process of rebuilding NetBSD from sources
(including the retrieval of the sources from a CVS
repository) and installing the results with minimal
effort.
Both of these tools have configuration files to determine how to
build a release and how to install it. Among other things, these
specify the CVS repository to use, what architecture to build for,
where to place the build files and what steps to perform during an
upgrade. The files can be found in
/usr/pkg/etc/sysbuild/default.conf and
/usr/pkg/etc/sysupgrade.conf. The default
configuration of both tools should let you get started with minimal
effort.
In their simplest form, you can do a full NetBSD build and upgrade your system to it by running these commands:
#sysbuild build#sysupgrade auto ~/sysbuild/release/$(uname -m)
And that's all that it takes. These invocations will do the following:
Download the source trees from CVS into
/usr/srcand/usr/xsrc. The latter is only fetched if your system has X11. And, if you already have the sources in your system, this will only update them to the newest version.Build a new release into
~/sysbuild/<machine>/. This per-machine directory will include subdirectories likeobj,destdir, etc. The build results will be left in~/sysbuild/release/<machine>/.Install a new kernel and unpack the new sets using the just-built release files.
Run both etcupdate and postinstall to aid you in merging new configuration changes into your system.
For more details, please see the included sysbuild(1) and sysupgrade(8) manual pages, as well as the comments in the referenced configuration files.
The commands above depict the most basic and simple invocation
of the tools using the default configuration
files. One drawback is that you require root access
during the build of the source tree so that
sysbuild can upgrade the source trees
under /usr/src and
/usr/xsrc. It is recommended that you avoid
building as root once you are familiar with the procedure, and this
section show what is needed to do so with
sysbuild.
In order to build as non-root, you can either choose to store
your source trees out of /usr (easiest) or give
permissions to your user to modify the trees under
/usr (good if you want to share the source tree
with more than one user).
If you want to store the source trees under your home
directory, which is convenient for development purposes, simply edit
/usr/pkg/etc/sysbuild.conf and add these
settings:
SRCDIR="${HOME}/sysbuild/src"
[ ! -f /etc/mtree/set.xbase ] || XSRCDIR="${HOME}/sysbuild/xsrc"
Once this is done, the "sysbuild build" invocation show above should just work under your unprivileged user. The upgrade procedure then becomes:
$sysbuild build... become root ...#sysupgrade auto ~/sysbuild/release/$(uname -m)
The other alternative, in case you want to maintain your source trees in the locations described by hier(7), is to do the following as root:
#mkdir -p /usr/src /usr/xsrc#chown -R <your-user>:wsrc /usr/src /usr/xsrc... and optionally add <your-user> to wsrc in /etc/group ...
After this, the default configuration file of sysbuild will let you place the files in these locations and let you do unprivileged builds.
The pkgsrc/sysutils/sysbuild-user package
can be used to configure and maintain an unprivileged system user to
perform periodic (e.g. nightly) builds from source. This can come
in very handy to closely track NetBSD-current.
The installed user is appropriately named sysbuild, and is
configured by default to run a full system build overnight. The
results are left in
/home/sysbuild/release/<machine>/, which
is the convenient default of sysupgrade's
release directory. Any build failures will be reported to you by
email.
The behavior of sysbuild for this
unprivileged user is configured in
/home/sysbuild/default.conf.
You can interact with sysbuild under this unprivileged user by running commands of the form:
#su - sysbuild /usr/pkg/bin/sysbuild ...
etcupdate is a script to help users compare,
merge and install new configuration and startup files (files found in the etc.tgz
distribution set) in /dev, /etc and /root after performing an operating
system upgrade. The upgrade of the operating system could have
been performed either by compiling sources or by extracting
the distribution binaries.
In case where the sources are in /usr/src the following command should be enough:
#etcupdate
But what if your NetBSD sources are in an alternative location, such as
in /home/jdoe/netbsd/src? Don't worry, tell
etcupdate the location of your source tree with -s srcdir and it will work
just fine:
#etcupdate -s /home/jdoe/netbsd/src
Sometimes it's not convenient to have the sources around but you still want to update the configuration and startup files. The solution is to feed etc.tgz (or xetc.tgz) to etcupdate via the -s tgzfile switch.
#etcupdate -s /some/where/etc.tgz
The etcmanage perl script (available from
pkgsrc/sysutils/etcmanage
or as binary package) is an alternative to etcupdate.
It should be used in the following way, in combination with postinstall(8):
#/usr/pkg/bin/etcmanage#/usr/sbin/postinstall
Table of Contents
For some architectures, you can build a disk or ISO image
that boots into an installer.
This is accomplished by running ./build.sh
with the targets install-image (for an USB stick) or
iso-image (for a DVD or CD):
$./build.sh -U -u -j2 -m amd64 -O ~/obj tools$./build.sh -U -u -j2 -m amd64 -O ~/obj release$./build.sh -U -u -j2 -m amd64 -O ~/obj install-image
Many other ./build.sh targets are available, see
Chapter 33, Crosscompiling NetBSD with build.sh.
Sometimes you may want to create your own customized pre-installed ("live") images instead of using the precompiled images, for e.g. mass deployment on embedded systems. This section outlines the steps to do so.
You must build a release of NetBSD so there are binaries to fill the image. See Chapter 33, Crosscompiling NetBSD with
build.shfor instructions.You must write or pick a sh(1) script from
src/distrib/utils/embedded/conf. Examine the default configurations, and if necessary, customize one to your needs. The scripts can alter and add to the system configuration files.-
Run the utility:
$export MKDTB=no$./distrib/utils/embedded/mkimage -D obj/destdir.amd64 -K sys/arch/amd64/compile/obj/GENERIC/netbsd -h amd64 -x ./example-amd64-image.imgIn this case, we are building an image for the amd64.conf configuration, so we specify -h amd64.
We want to include the X11 sets, so we specify -x.
We need to specify the device type of the root filesystem with e.g. -r sd. Typically, this is ld(4) for SD/MMC devices, and sd(4) for USB sticks.
We specify MKDTB=no in the environment to avoid building device tree blobs, which are only used on ARM and MIPS.
-
Make any final additions to the image. This can include installing packages with pkg_add(1), etc. We mount the image as a virtual disk using vndconfig(8):
#vndconfig vnd0 ./example-amd64-image.img#mount /dev/vnd0a /mnt#pkg_add -P /mnt -K /usr/pkg/pkgdb -v darkstat-3.0.719.tgz#umount /mnt -
Write the image to your live media:
#dd if=example-amd64-image.img ibs=1m | progress dd of=/dev/rsd0 obs=1m
Table of Contents
This document is currently available in the following formats:
In addition, this guide is also sold on occasion in printed form at
tradeshows and exhibitions, with all profits being donated to the NetBSD
Foundation.
On demand printing may at some point be available as well.
If you are interested in obtaining a printed and bound copy of this
document, please contact <www@NetBSD.org>.
This guide was born as a collection of sparse notes that Federico Lupi, the original author of the NetBSD Guide, wrote mostly for himself. When he realized that they could be useful to other NetBSD users he started collecting them and created the first version of the guide using the groff formatter. In order to “easily” get a wider variety of output formats (e.g. HTML and PostScript/PDF), he made the “mistake” of moving to SGML/DocBook, which is the current format of the sources. Maintainership was picked up by the NetBSD project and its developers later, and the format was changed to XML/DocBook later due to better tools and slightly more knowhow on customisations.
The following open source tools were used to write and format the guide:
the vi editor which ships with NetBSD (nvi).
the libxslt parser from GNOME for transforming XML/DocBook into HTML.
the TeX system from the NetBSD packages collection. TeX is used as a backend to produce the PS and PDF formats.
the tgif program for drawing the figures.
the gimp and xv programs for converting between image formats and making small modifications to the figures.
Many thanks to all the people involved in the development of these great tools.
Table of Contents
There is an interest for both introductory and advanced documentation on NetBSD: this is probably a sign of the increased popularity of this operating system and of a growing user base. It is therefore important to keep adding new material to this guide and improving the existing text.
Whatever your level of expertise with NetBSD, you can contribute to the development of this guide. This appendix explains how, and what you should know before you start.
If you are a beginner and you found this guide helpful,
please send your comments and suggestions to <www@NetBSD.org>.
For example, if you tried something described here and it didn't
work for you, or if you think that something is not clearly explained, or
if you have an idea for a new chapter, etc: this type of feedback
is very useful.
If you are an intermediate or advanced user, please consider contributing new material to the guide: you could write a new chapter or improve an existing one.
Whatever you choose to do, don't start working before having contacted us, in order to avoid duplicating efforts.
The sources for the NetBSD guide can be found in CVS under htdocs/docs/guide.
If you want to contribute some material to the guide you have
several options, depending on the amount of text you want to
write.
If you just want to send a small fix, the easiest way to get
it into the guide is to send it as a diff to the existing sources
to <www@NetBSD.org> via e-mail, although you should
feel free to send any small changes or suggestions there as well.
If you plan to write a substantial amount of text, such as a section or a chapter, you can choose among many formats:
XML/DocBook; this is the preferred format. If you choose to use this format, please get the guide sources and use them as a template for the indentation and text layout, in order to keep the formatting consistent.
text; if the formatting is kept simple, it is not difficult to convert text to XML format.
other formats are also accepted if you really can't use any of the previous ones.
For the guide I use a formatting style similar to a program. The following is a template:
<chapter id="chap-xxxxx"> <title>This is the title of the chapter</title> <para> This is the text of a paragraph. This is the text of a paragraph. This is the text of a paragraph. This is the text of a paragraph. This is the text of a paragraph. </para> <!-- ============================================================= --> <sect1> <title>This is the title of a sect1</title> <para> This is the text of a paragraph. This is the text of a paragraph. This is the text of a paragraph. This is the text of a paragraph. This is the text of a paragraph. </para> <!-- ........................................................... --> <sect2> <title>This is the title of a sect2</title> <para> A sect2 is nested inside a sect1. </para> </sect2> </sect1> <!-- ============================================================= --> <sect1> <title>This is the title of another sect1</title> <para> An itemized list: <itemizedlist> <listitem> <para> text </para> </listitem> <listitem> <para> text </para> </listitem> </itemizedlist> </para> </sect1> </chapter>
The defaults are:
two spaces for each level of indentation
lines not longer than 72 characters.
use separator lines (comments) between sect1/sect2.
Table of Contents
This appendix describes the installation of the tools needed to produce a formatted version of the NetBSD guide. Besides that it contains instructions that describe how to build the guide.
XML (eXtensible Markup Language) is a language which is used to define other languages based on markups, i.e. with XML you can define the grammar (i.e. the valid constructs) of markup languages. HTML, for example, can be defined using XML. If you are a programmer, think of XML like the BNF (Backus-Naur Form): a tool used to define grammars.
DocBook is a markup template defined using XML; DocBook lists the valid tags that can be used in a DocBook document and how they can be combined together. If you are a programmer, think of DocBook as the grammar of a language specified with the BNF. For example, it says that the tags:
<para> ... </para>
define a paragraph, and that a <para> can be inside a <sect1> but that a <sect1> cannot be inside a <para>.
Therefore, when you write a document, you write a document in DocBook and not in XML: in this respect DocBook is the counterpart of HTML (although the markup is richer and a few concepts are different).
The DocBook specification (i.e. the list of tags and rules) is called a DTD (Document Type Definition).
In short, a DTD defines how your source documents look like but it gives no indication about the format of your final (compiled) documents. A further step is required: the DocBook sources must be converted to some other representation like, for example, HTML or PDF. This step is performed by a tool like Jade, which applies the DSSSL transforms to the source document. DSSSL (Document Style Semantics and Specification Language) is a format used to define the stylesheets necessary to perform the conversion from DocBook to other formats. The build structure for the guide also supports the XSL (Extensible Stylesheet Language) stylesheet language. The xsltproc program is used for transforming XML with XSL stylesheets.
All the tools that are needed to generate the guide in various formats can be installed through the netbsd-www, netbsd-doc, and netbsd-doc-print meta-packages. Together the netbsd-doc and netbsd-www packages install everything that is needed to generate the HTML version of the guide. To be able to generate printable formats, such as Postscript and PDF, install the netbsd-doc-print meta-package.
Supposing that a current pkgsrc tree is installed at
/usr/pkgsrc, you can install all these
meta-packages with:
$cd /usr/pkgsrc/meta-pkgs/netbsd-www$make install$cd /usr/pkgsrc/meta-pkgs/netbsd-doc$make install$cd /usr/pkgsrc/meta-pkgs/netbsd-doc-print$make install
This section provides an overview of how the guide can be compiled from XML to any of the following target formats: html, html-split, ascii, ps, and pdf. Creating all formats is the default. To produce any of the above output formats, run make with the format(s) as argument.
Let's look at a few examples.
Before looking at the output generated in any of the above-mentioned formats, integrity of the XML structure has to be ensured. This can be done by running make lint:
$cd htdocs/docs/guide/en$make lint
Fix any errors you may get. When working on the contents of the guide, you may want to produce the HTML version to have a look at it for proofreading:
$cd htdocs/docs/guide/en$make html-split
After this, please update the Postscript and PDF versions of the guide too. The command for this is:
$cd htdocs/docs/guide/en$make pdf
Before you commit the generated files, please make sure that you commit the XML files first, then re-generate all formats, i.e. the procedure would be something like:
$cd htdocs/docs/guide/en$cvs commit *.xml$$make lint$make$make install-doc$$cd ..$cvs commit en download
When running make with no argument, all formats will be re-generated. This is the default way to build the guide for the NetBSD.org website.
The official DocBook home page is where you can find the definitive documentation on DocBook. You can also read online or download a copy of the book DocBook: The Definitive Guide by Norman Walsh and Leonard Muellner.
For DSSSL start looking at http://nwalsh.com.
XSL is described at http://www.w3.org/Style/XSL/.
Jade/OpenJade sources and info can be found on the OpenJade Home Page.
If you want to produce Postscript and PDF documents from your DocBook source, look at the home page of JadeTex.
Table of Contents
The NetBSD Guide was originally written by Federico Lupi who managed the sources, coordinated updates, and merged all contributions on his own. Since then, it has been updated and maintained by the NetBSD www team. The Guide has progressed thanks to the contributions of many people who have volunteered their time and effort, supplied material and sent in suggestions and corrections.
Federico's original credits are:
Paulo Aukar
Grant Beattie, converted to XML DocBook.
Manolo De Santis, Audio Chapter
Eric Delcamp, Boot Floppies
Hubert Feyrer, who contributed the Introduction to TCP/IP Networking in Chapter 23, Introduction to TCP/IP Networking including Next generation Internet protocol - IPv6 and the section on getting IPv6 Connectivity & Transition via 6to4 He also helped with the SGML to XML transition.
Jason R. Fink
Daniel de Kok, audio and linux chapters fixes.
Reinoud Koornstra, CVS chapter and rebuilding
/devin the Misc chapter.Brian A. Seklecki
<lavalamp@burghcom.com>who contributed the CCD Chapter.Guillain Seuillot
Martti Kuparinen, RAIDframe documentation.
David Magda
This document is currently maintained by the NetBSD www team. Thanks to their efforts, the document is kept up to date and available online at all times. In addition, special thanks go to (in alphabetical order):
Hubert Feyrer, for getting the guide up to speed for NetBSD 2.0, and for making numerous improvements to all chapters.
Jason R. Fink, for maintaining this document and integrating changes.
Joel Knight for the Chapter 28, Introduction to the Common Address Redundancy Protocol (CARP). See Section D.3.3, “Joel Knight's license on the CARP article” for the accompanying license.
Daniel de Kok, for constant contributions of new chapters, maintenance of existing chapters and his translation work.
Hiroki Sato, for allowing us to build PDF and PS versions of this document.
Jan Schaumann, for maintenance work and www/htdocs management.
Lubomir Sedlacik, for some details on using CGD for swap in Section 14.6, “Suggestions and Warnings”.
Dag-Erling Smørgrav, for the article on Chapter 18, Pluggable Authentication Modules (PAM). See Section D.3.2, “Networks Associates Technology's license on the PAM article” for the accompanying license.
Florian Stöhr, for Section 14.4, “Example: encrypted CDs/DVDs”.
Redistribution and use in source and binary forms, with or without modification, are permitted provided that the following conditions are met:
Redistributions of source code must retain the above copyright notice, this list of conditions and the following disclaimer.
Redistributions in binary form must reproduce the above copyright notice, this list of conditions and the following disclaimer in the documentation and/or other materials provided with the distribution.
All advertising materials mentioning features or use of this software must display the following acknowledgement: This product includes software developed by Federico Lupi for the NetBSD Project.
The name of the author may not be used to endorse or promote products derived from this software without specific prior written permission.
THIS SOFTWARE IS PROVIDED BY THE AUTHOR “AS IS” AND ANY EXPRESS OR IMPLIED WARRANTIES, INCLUDING, BUT NOT LIMITED TO, THE IMPLIED WARRANTIES OF MERCHANTABILITY AND FITNESS FOR A PARTICULAR PURPOSE ARE DISCLAIMED. IN NO EVENT SHALL THE AUTHOR BE LIABLE FOR ANY DIRECT, INDIRECT, INCIDENTAL, SPECIAL, EXEMPLARY, OR CONSEQUENTIAL DAMAGES (INCLUDING, BUT NOT LIMITED TO, PROCUREMENT OF SUBSTITUTE GOODS OR SERVICES; LOSS OF USE, DATA, OR PROFITS; OR BUSINESS INTERRUPTION) HOWEVER CAUSED AND ON ANY THEORY OF LIABILITY, WHETHER IN CONTRACT, STRICT LIABILITY, OR TORT (INCLUDING NEGLIGENCE OR OTHERWISE) ARISING IN ANY WAY OUT OF THE USE OF THIS SOFTWARE, EVEN IF ADVISED OF THE POSSIBILITY OF SUCH DAMAGE.
Copyright (c) 2001-2003 Networks Associates Technology, Inc.
All rights reserved.
This software was developed for the FreeBSD Project by ThinkSec AS and
Network Associates Laboratories, the Security Research Division of
Network Associates, Inc. under DARPA/SPAWAR contract N66001-01-C-8035
("CBOSS"), as part of the DARPA CHATS research program.
Redistribution and use in source and binary forms, with or without
modification, are permitted provided that the following conditions
are met:
1. Redistributions of source code must retain the above copyright
notice, this list of conditions and the following disclaimer.
2. Redistributions in binary form must reproduce the above copyright
notice, this list of conditions and the following disclaimer in the
documentation and/or other materials provided with the distribution.
3. The name of the author may not be used to endorse or promote
products derived from this software without specific prior written
permission.
THIS SOFTWARE IS PROVIDED BY THE AUTHOR AND CONTRIBUTORS ``AS IS'' AND
ANY EXPRESS OR IMPLIED WARRANTIES, INCLUDING, BUT NOT LIMITED TO, THE
IMPLIED WARRANTIES OF MERCHANTABILITY AND FITNESS FOR A PARTICULAR PURPOSE
ARE DISCLAIMED. IN NO EVENT SHALL THE AUTHOR OR CONTRIBUTORS BE LIABLE
FOR ANY DIRECT, INDIRECT, INCIDENTAL, SPECIAL, EXEMPLARY, OR CONSEQUENTIAL
DAMAGES (INCLUDING, BUT NOT LIMITED TO, PROCUREMENT OF SUBSTITUTE GOODS
OR SERVICES; LOSS OF USE, DATA, OR PROFITS; OR BUSINESS INTERRUPTION)
HOWEVER CAUSED AND ON ANY THEORY OF LIABILITY, WHETHER IN CONTRACT, STRICT
LIABILITY, OR TORT (INCLUDING NEGLIGENCE OR OTHERWISE) ARISING IN ANY WAY
OUT OF THE USE OF THIS SOFTWARE, EVEN IF ADVISED OF THE POSSIBILITY OF
SUCH DAMAGE.
Copyright (c) 2005 Joel Knight <enabled@myrealbox.com>
Permission to use, copy, modify, and distribute this documentation for
any purpose with or without fee is hereby granted, provided that the
above copyright notice and this permission notice appear in all copies.
THE DOCUMENTATION IS PROVIDED "AS IS" AND THE AUTHOR DISCLAIMS ALL
WARRANTIES WITH REGARD TO THIS DOCUMENTATION INCLUDING ALL IMPLIED
WARRANTIES OF MERCHANTABILITY AND FITNESS. IN NO EVENT SHALL THE
AUTHOR BE LIABLE FOR ANY SPECIAL, DIRECT, INDIRECT, OR CONSEQUENTIAL
DAMAGES OR ANY DAMAGES WHATSOEVER RESULTING FROM LOSS OF USE, DATA OR
PROFITS, WHETHER IN AN ACTION OF CONTRACT, NEGLIGENCE OR OTHER
TORTIOUS ACTION, ARISING OUT OF OR IN CONNECTION WITH THE USE OR
PERFORMANCE OF THIS DOCUMENTATION
Table of Contents
[RFC1055] Copyright © 1988. RFC 1055: Nonstandard for transmission of IP datagrams over serial lines: SLIP.
[RFC1331] Copyright © 1992. RFC 1331: The Point-to-Point Protocol (PPP) for the Transmission of Multi-protocol Datagrams over Point-to-Point Links.
[RFC2529] Copyright © 1999. RFC 2529: Transmission of IPv6 over IPv4 Domains without Explicit Tunnels.